According to Oberlo, over 3.7 billion users worldwide are engaged with social media in 2021 and the number is rapidly growing. So, to achieve business goals and credibility, it’s important to add social feeds to the website. One of the most engaging social media is Instagram.
However, first of all, you need to generate an Instagram access token to accomplish the entire process. In this tutorial, we will show you the easiest way to get an Instagram access token for the website.
So, let’s jump to the deep to learn the entire process.
What is an Instagram Access Token?
Instagram access token is basically a set of characters that helps third-party apps & websites to get access to the Instagram feeds.
Why Should You Generate an Instagram Access Token?
Instagram doesn’t allow you to share account information on the third-party platform without proper clarification. So, to secure account privacy, you need to get the Instagram API key first to share images and videos on the websites.
How to Get Instagram Access Token?
However, let’s talk less and discover the entire process to create the Instagram access token.
Step 1: Developer Login


The first step to get started is to visit – https://developers.facebook.com/
If you are not, please make sure you are logged in with your Facebook account. If you are visiting this for the first time you need to do some basic stuff like confirmation of email and others. Once you are done. Click My App.
Step 2: Create An App


You will have a screen that shows you the Create App button for making a new app. Click on the Create App and choose the Consumer Type to make an app that can bring you the Instagram access token. Click the Next button along with the Consumer type app.


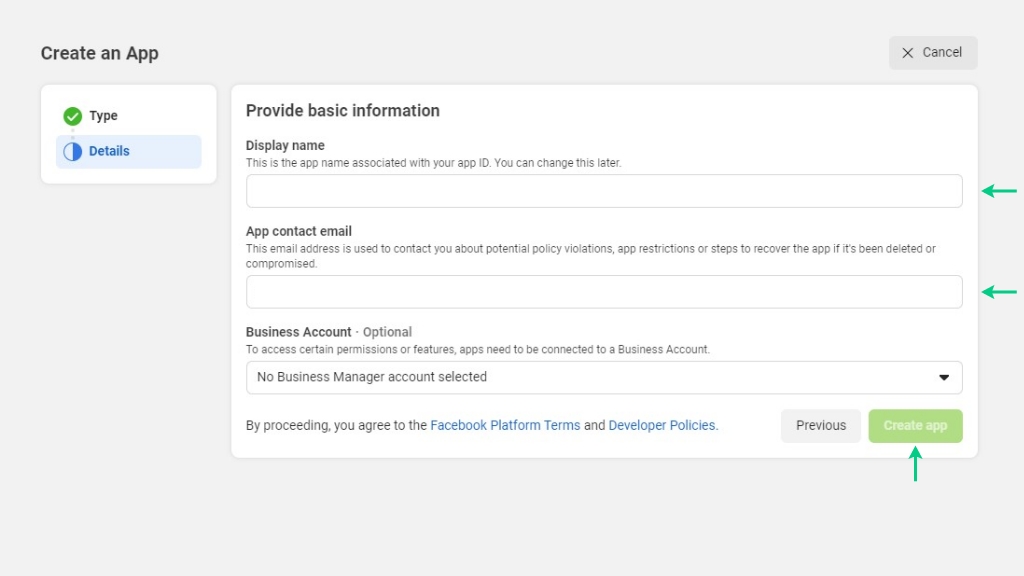
Step 3: App Name & Email


Step 4: Add product


Now it’s time to select the product you need. We need an Instagram basic display. Just click on the set up button.
Step 5: Basic Settings


At this point, we can see a warning! We need to provide some basic information before creating the app. You can click the settings showing on the warning area or on the left of your screen Basic under settings. Both of the links will take you to the same page where you need to fill in some basic information.


Fill in those pieces of information according to your business. The basic information you need is a privacy policy, TOC, and data deletation URL.


Scroll down a bit and click add platform. A popup will show and you need to select the website and hit next. Now a new field will show where you need to give the website URL.
Don’t forget to hit the Save Change button.
Note: the home page URL of the website can be used as the User Data Deletion Information.
Step 6: App Creation


Now it’s time to create the app. Click Basic display settings under Instagram Basic Display. Then click Create New App.


A new pop-up will show, type Display name, and click Create App.
Step 7: Information’s Fill Up


After hitting the create app button, you need to fill up and save all the information under the basic display setting like the Name, Client Oauth Setting, Deauthorize & Data Deletion Request URL. Remember, you can use the website home page URL to fill up these options.
Note: you can take the Instagram App ID and Instagram App Secret from this setting.
Step 8: User Token Generator


At this stage, scrolling down to the bottom of the basic display setting brings the option to Add or Remove Instagram Tester. Hit the button to integrate a new Instagram tester account.
Step 9: Instagram tester


In the next screen, we have a list of roles here. We need the bottom one which is Instagram Tester. Click Add Instagram Testers.
Clicking the Add New Instagram Tester Account navigates a pop-up to search for the account name. After getting the account address press the submit button to send an access request to the account holder.
Now the tester status should look like this-


Now it’s time to give the excess or permission to use the account from Instagram. To do so we need to visit instagram.com and log in to the account we requested for excess.
Step 10: Instagram Settings


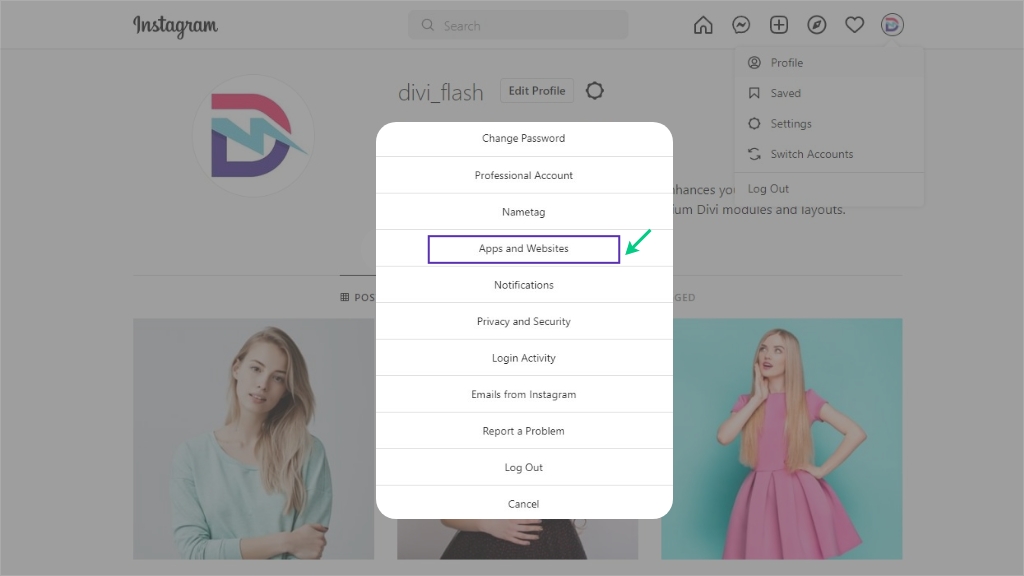
After logging in, go to your profile. Now click the setting icon next to the edit profile option here.


Now a pop-up is visible in front of you, hit the Apps and Websites option for further settings.
Step 11: Apps & Websites Settings


Go to the Tester Invitations option of the Apps & Website Setting to accept the request that was sent from the app.
Step 12: Generate Token


Now, it’s time to get back to the Instagram basic display setting. Here, you will get the Instagram account added in the User Token Generator section. So, hit the Generate Token option to get the Instagram access token instantly.
Step 13: Allow to Show Profile Information


Clicking the Generate Token asks permission for the types of information that will be displayed. Check the media and click allow here.
Step 14: Generate Token


Once the account holder gives permission, you get the token. Just hit the “I Understand” option to make the token available for you. Now, copy the token and click done.
Finally, you have the token in your hand to implement on the divi website.
Alternative Way By Instagram Access Token Generator
There is another way to get an Instagram Access token for those who think the process explained above is tedious and lengthy for them. Spotlightwp is a tool that allows you to generate Instagram access tokens online. This is really a effortless and time saving method to try.


0 Comments