

Creating an animated website with Divi is simple. First, build your page layout using Divi elements in the Visual Builder. Then apply animation effects to the element you want to animate.
There are a few ways to add animations to a Divi website.
You can use Divi’s built-in animation settings for basic entrance and scroll effects.
For more advanced animations, you can use a GSAP-powered plugin like DiviMotion to create effects triggered by scrolling, clicking, hovering, or page load.
You can also use custom CSS for lightweight effects, such as floating images, pulsing buttons, and rotating elements.
Developers who need complete control can integrate GSAP manually using GSAP Core, optional plugins, and custom JavaScript.
In this guide, we will show you how to create an animated website with Divi using all four methods. You will also learn which option best suits your skill level and animation needs.
What You Need to Create an Animated Divi Website
If you are building a Divi website from scratch, first follow our guide on how to build a Divi website. Then return to this guide to add animations.
Before getting started, make sure you have:
- A WordPress website
- The Divi Theme installed and activated
- The Divi Builder Plugin if you are using another WordPress theme
- Pages created with the Divi Visual Builder
You can animate an existing Divi page, import a pre-designed layout, or build a new layout using Divi modules. Once the page structure and content are ready, choose the animation method that best suits your needs.
Available Animation Options for a Divi Website
There are several ways to add animations to a Divi website. The right option depends on the effect you want to create, your coding experience, and how much control you need.
You will find a quick comparison of these animation methods in the table below.
| Method | Best For | Coding Required | Control |
| Divi’s built-in animation settings | Creating basic entrance, hover, and scroll effects | No | Basic |
DiviMotion Plugin | Creating advanced GSAP-powered animations on page load, click, hover, and scroll with timeline control in the Divi Visual Builder | No | Advanced |
| Custom CSS | Lightweight and repeating animations | Basic CSS | Moderate |
| Custom GSAP | Custom interactions using GSAP Core, optional plugins, and JavaScript | JavaScript | Complete |
You do not need to use all four methods on the same website. Just choose one based on your needs.
Method 1: Use Divi’s Built-In Animation Settings
Divi includes built-in settings for adding basic animations directly in the Visual Builder. You can create entrance animations, scroll effects, sticky effects, and other simple interactions without additional plugins or custom code.
In this method, we will show you how to add a slide-in entrance animation and apply scroll effects to elements on your Divi website using these built-in settings.
To add an entrance animation:
Entrance animations run when an element enters the visitor’s viewport. You can apply them to any Divi element. Here is how to create one:
- Open your page with the Divi Visual Builder
- Select a Divi element (section, row, column, or module) you want to animate
- Go to the Design tab and open Animation
- Choose an animation style, such as Fade, Slide, Bounce, Zoom, Flip, or Fold
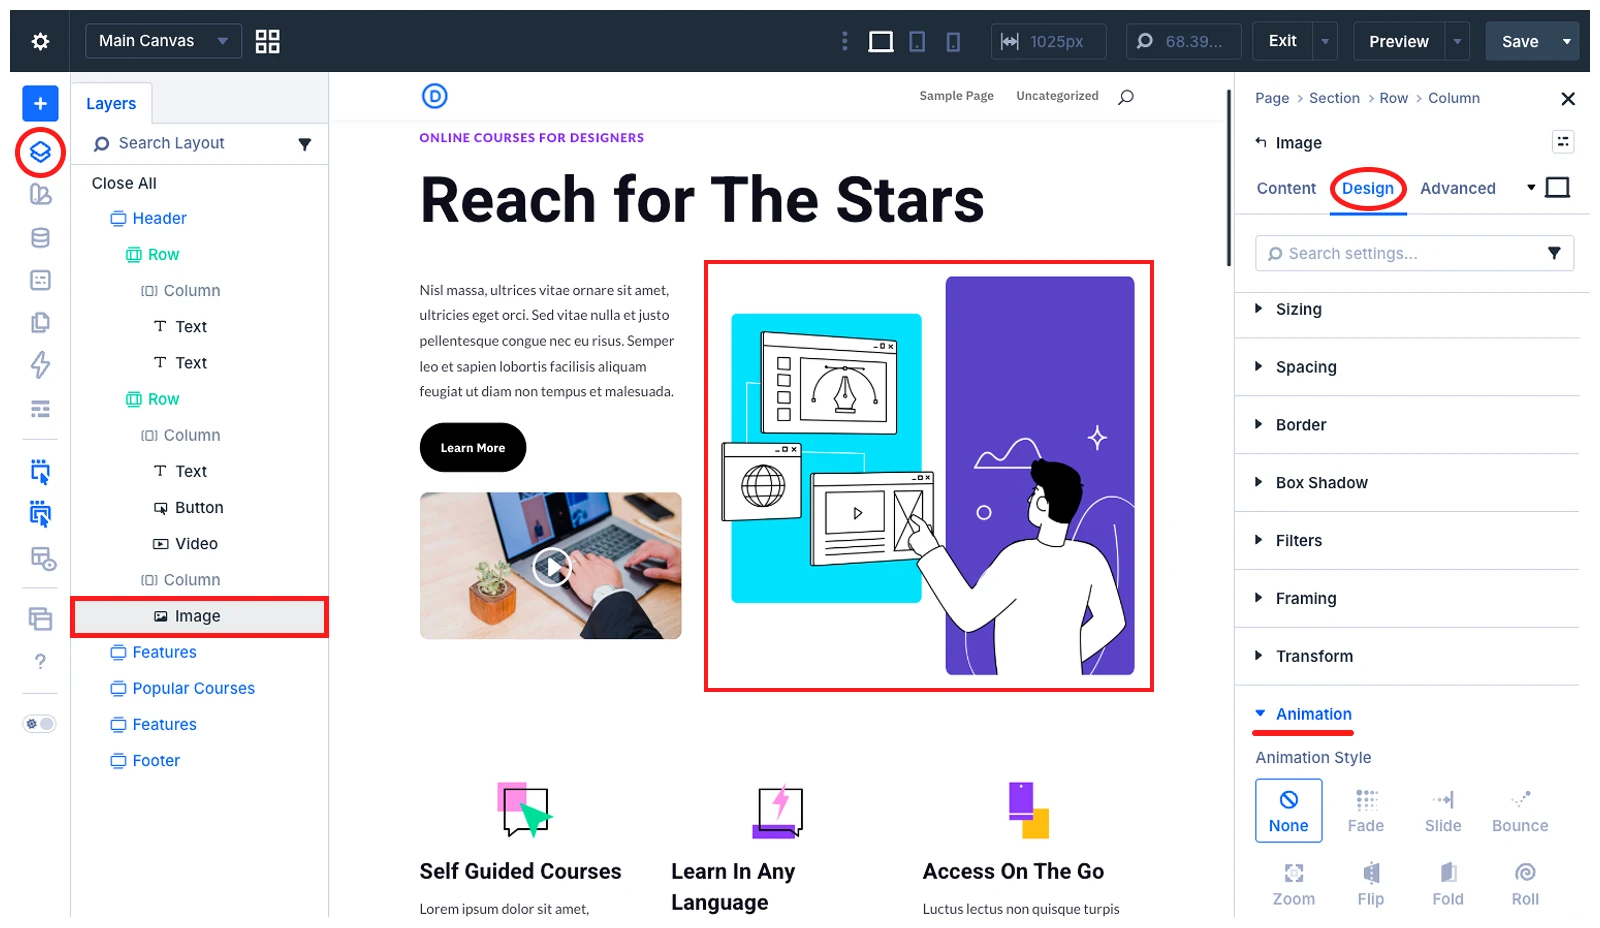
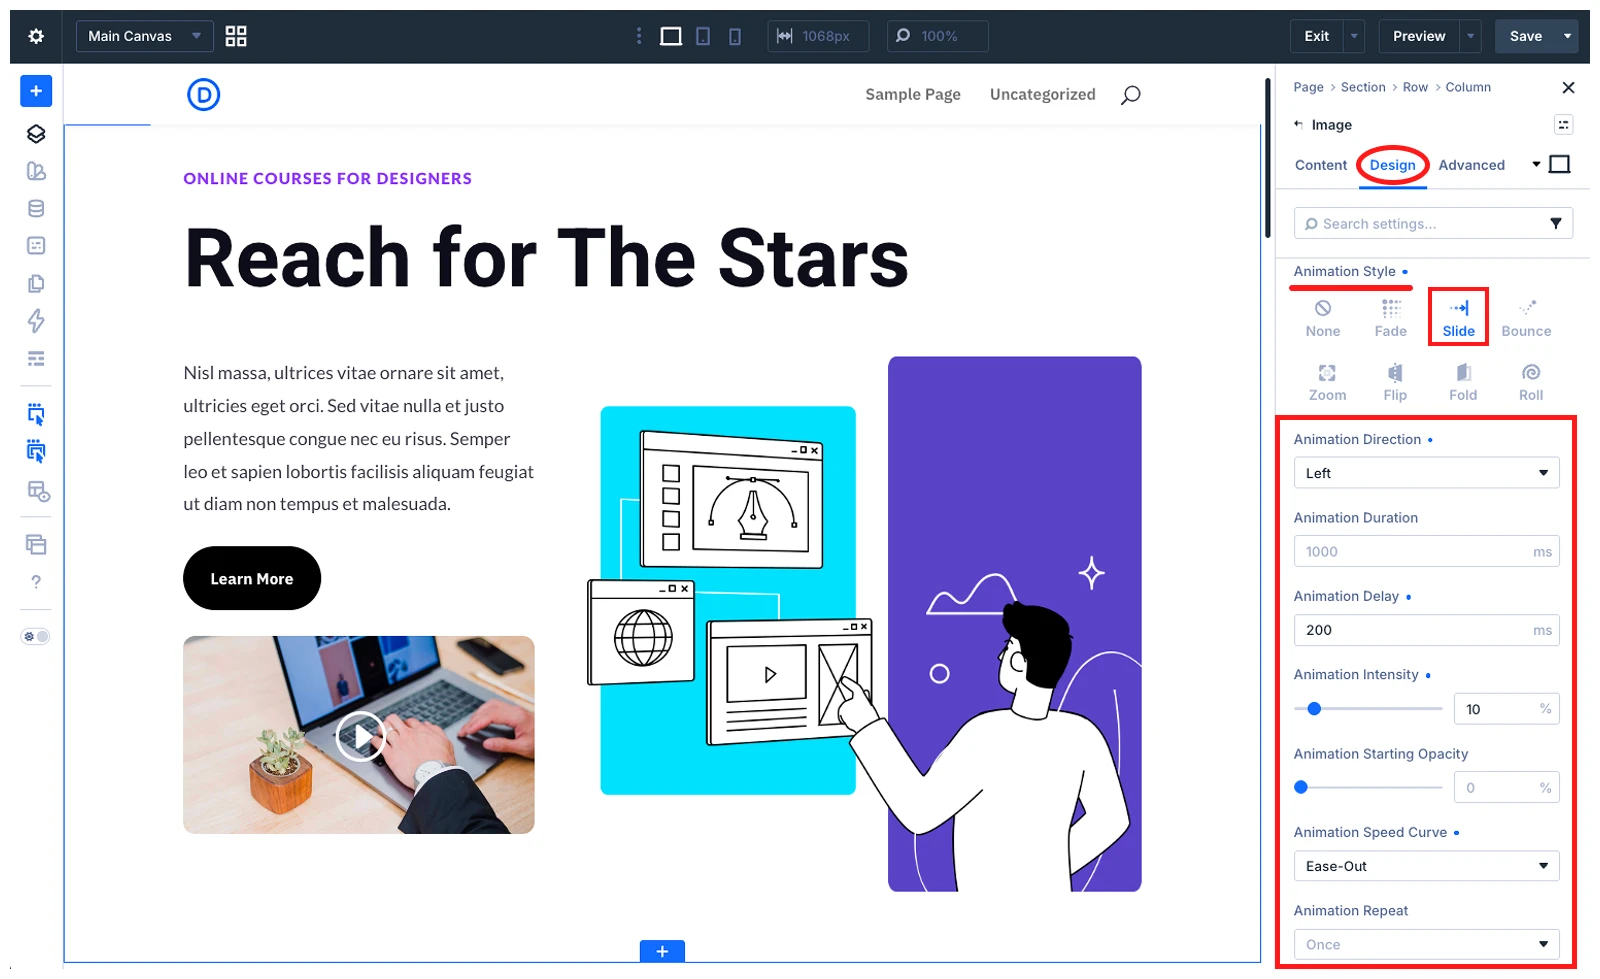
In this example, we are animating the Image module placed in the right column of a hero section. We selected Slide as the Animation Style and used the following values:
- Animation Direction: Right
- Animation Duration: 1000ms
- Animation Delay: 200ms
- Animation Intensity: 10%
- Animation Starting Opacity: 0%
- Animation Speed Curve: Ease-Out
- Animation Repeat: Once
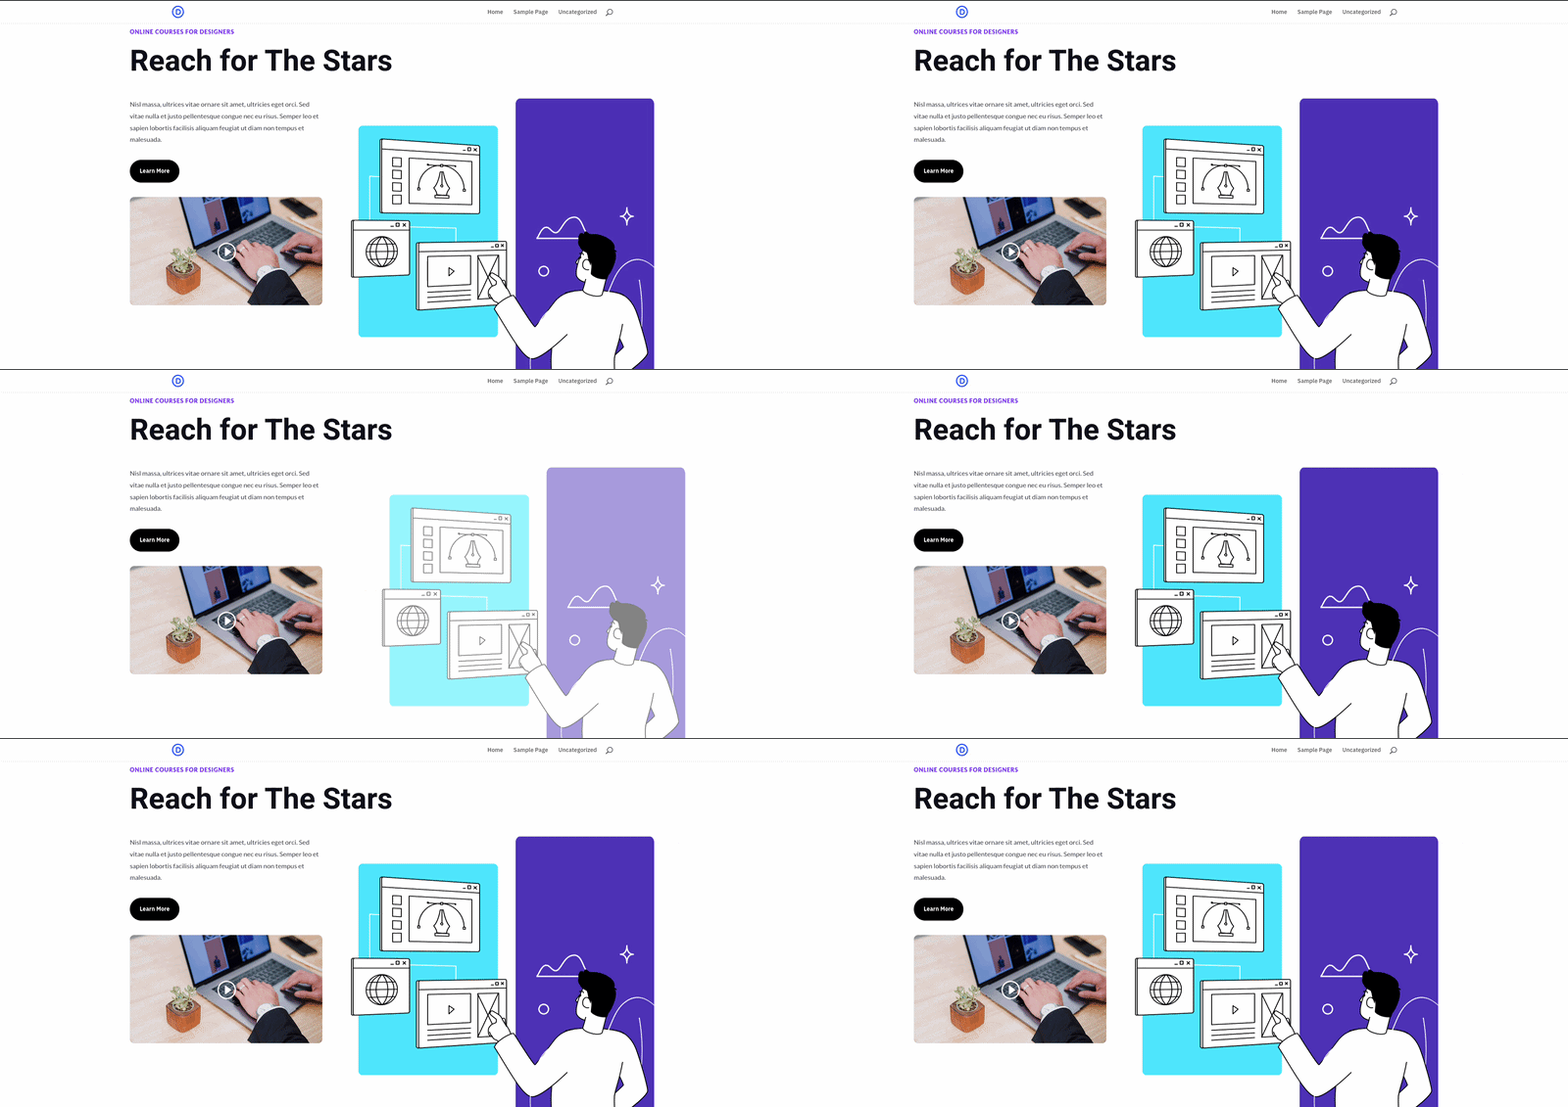
- After adding the values, save the page and open it on the frontend.
When the page loads and the hero section enters the viewport, the image will slide in from the right instead of appearing instantly.
Add a Scroll Effect
Divi Scroll Effects let you change the position or appearance of an element based on the visitor’s scrolling movement.
In this example, we will add a Vertical Motion effect to the six course cards in a layout. Since each card is placed inside a separate column, we will apply the effect to each Column individually.
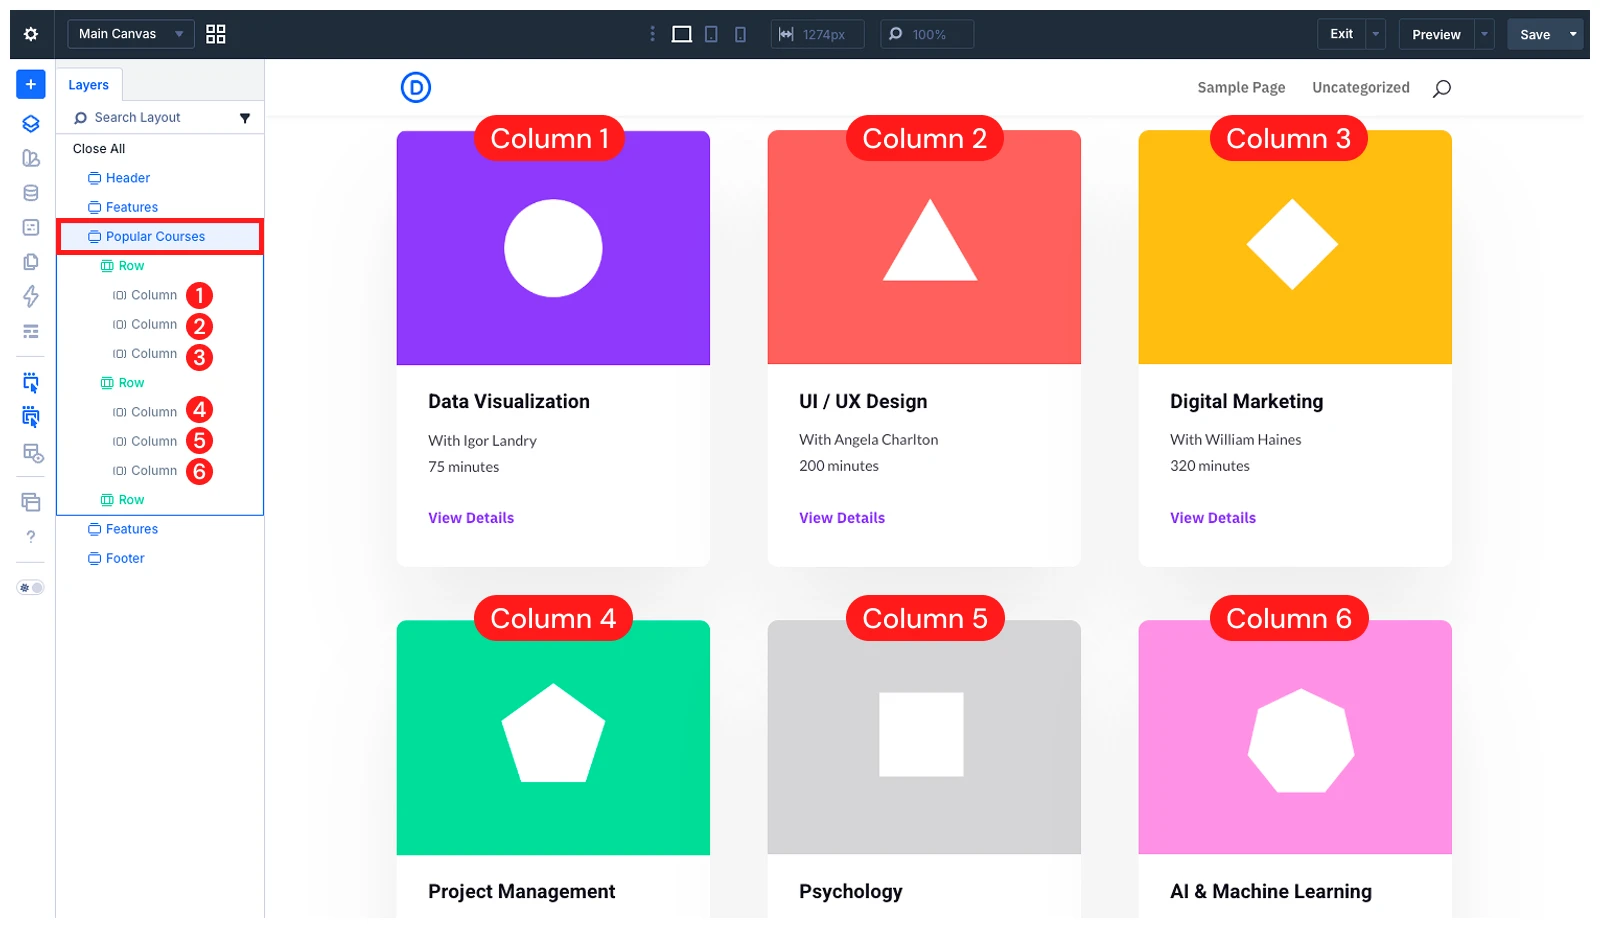
To add the scroll effect:
- Open the Layers panel and expand the section you want to animate
- Expand the first Row and select the first Column
- Go to Advanced > Scroll Effects
- Open Scroll Transform Effects and enable Vertical Motion
- Apply the following values:
- Starting Offset: 2
- Mid Offset: 0
- Ending Offset: -2
- Motion Effect Trigger: Middle of Element
Keep the offsets small to prevent the cards from overlapping. You should also preview the effect on tablet and mobile devices and reduce or disable it if the movement affects readability.
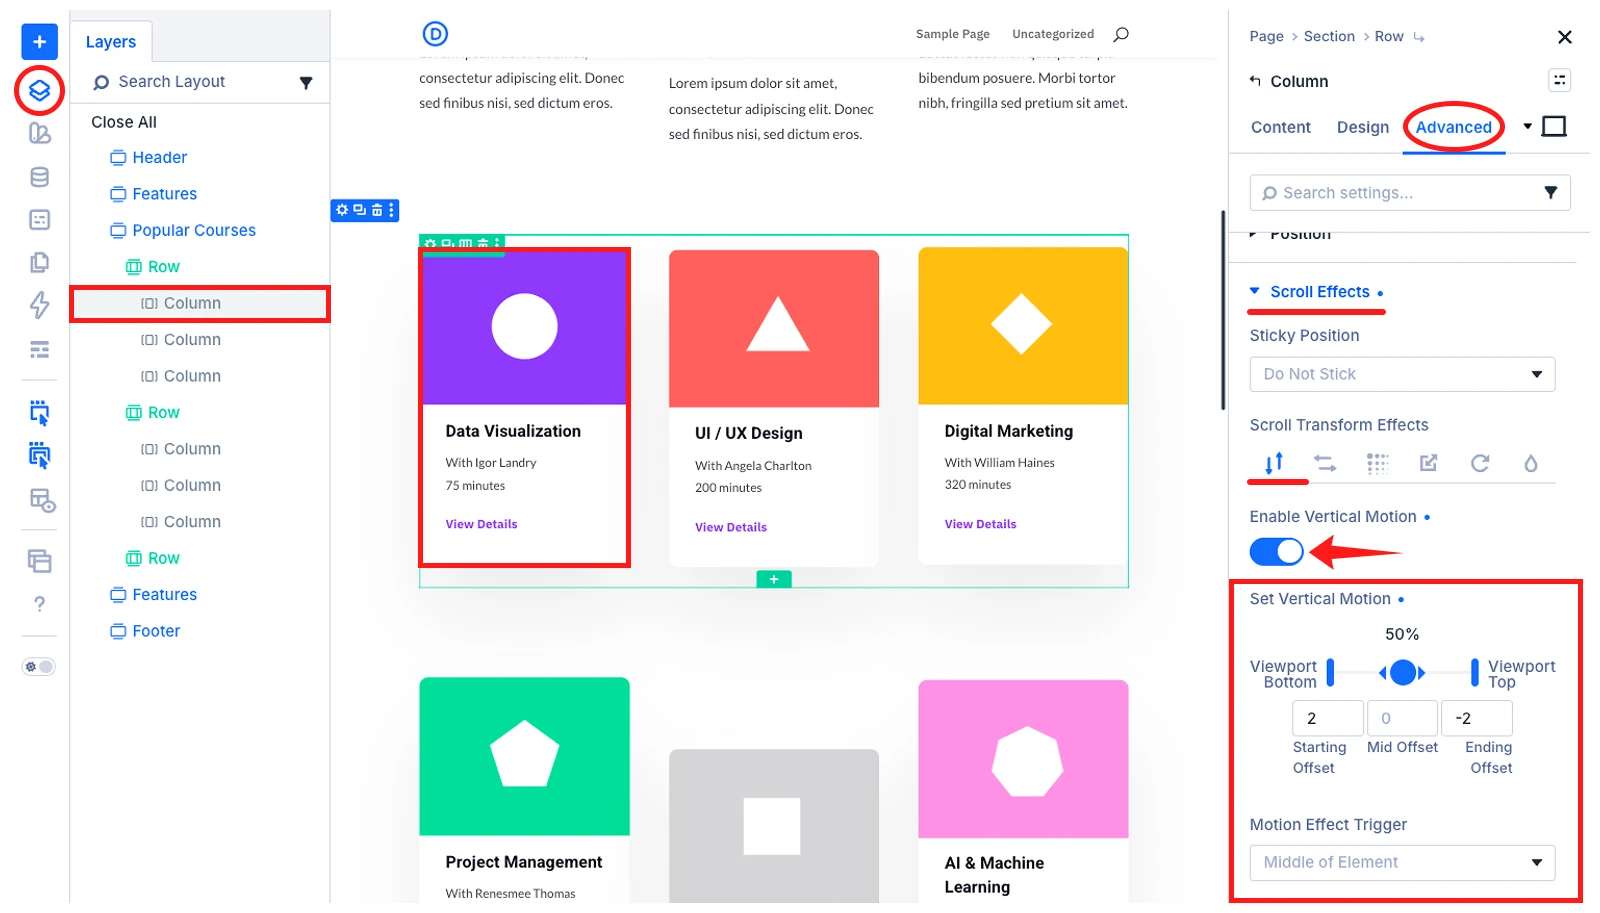
- Adjust the starting, middle, and ending viewport positions so the movement remains smooth while scrolling.
These values will make the card move slightly upward as visitors scroll through the section. Repeat the same process for the remaining columns in both rows.
To make the movement feel less uniform, you can use smaller offsets for alternating cards:
- Columns 1, 3, and 5: Start at 2 and end at -2
- Columns 2, 4, and 6: Start at 1 and end at -1
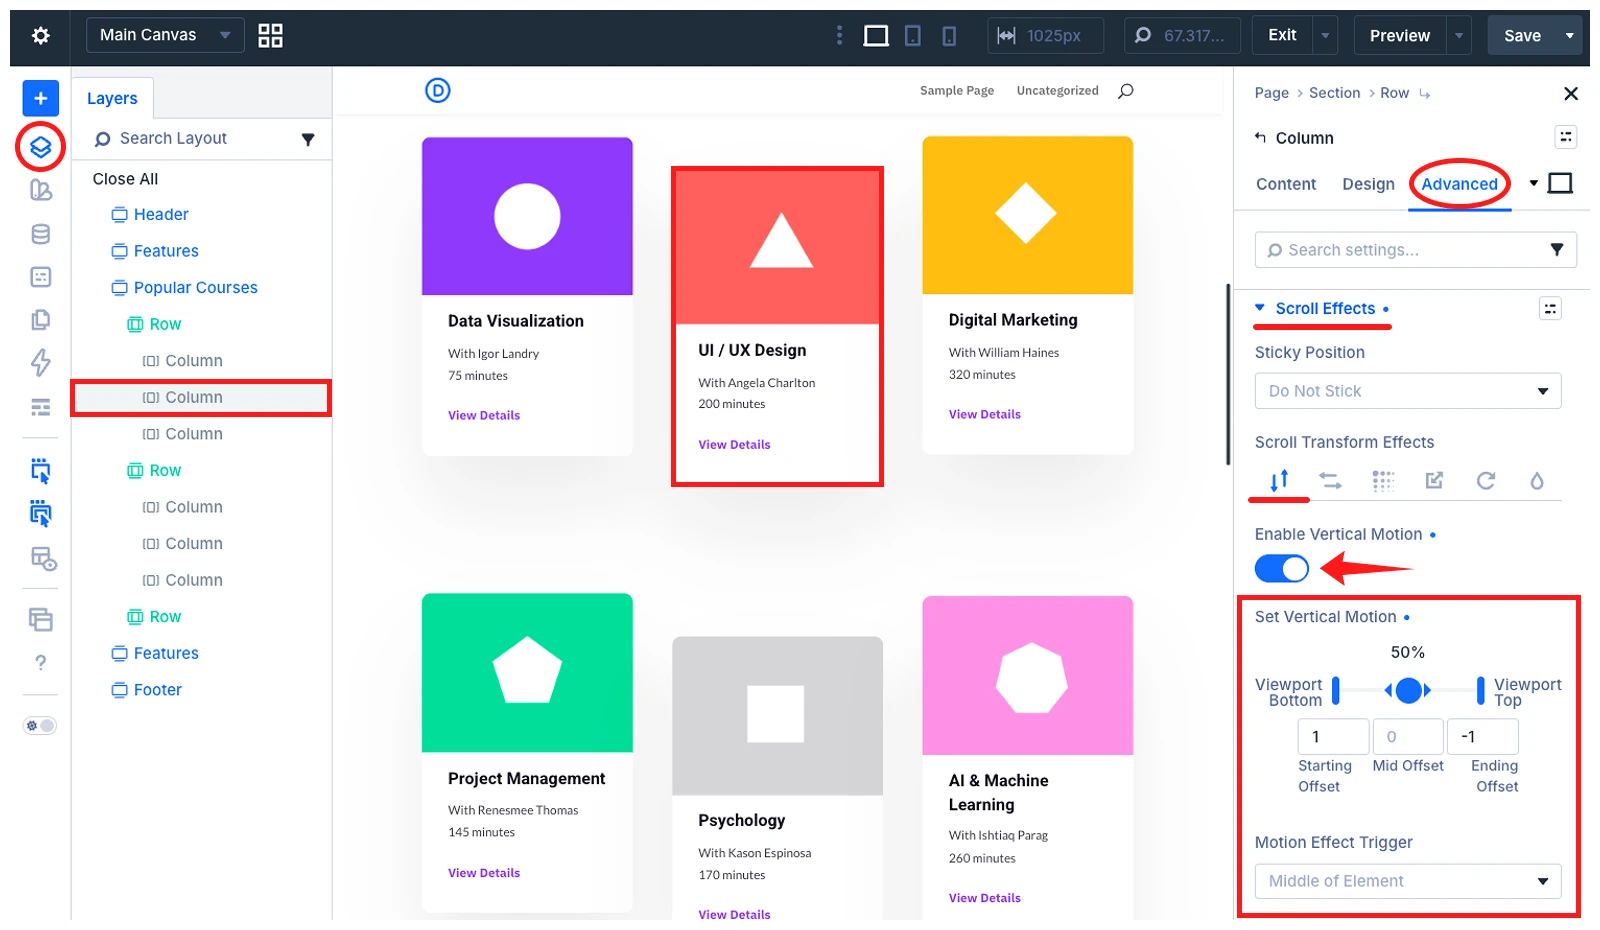
After setting all six columns, save and preview the page. The cards will move upward at slightly different speeds as you scroll through the section.
Something like this:
Method 2: Create Advanced Animations with DiviMotion
Divi’s built-in settings work well for basic animation effects but become limited when you need multiple targets, custom triggers, staggered sequences, scrubbing, or timeline-based control.
If you are using Divi 5, the DiviMotion plugin brings advanced GSAP-powered animation controls directly into the Divi Visual Builder, allowing you to create advanced animation effects without writing custom code.
In this method, we will show you how to install DiviMotion, where to access its controls, how its animation workflow works, and how to create a vertical scrolling effect using it.
Install and Activate DiviMotion
- Purchase DiviMotion and download the plugin ZIP file from your account.
- Install and activate DiviMotion like any other premium WordPress plugin.
Next, go to WordPress Dashboard > DiviMotion and open the Integrations, Modules, and Extensions sections. Enable only the features you plan to use, then save the changes.
Where to Access DiviMotion
After activating DiviMotion, you can access it directly inside the Divi Visual Builder. Here is how:
- Open any page with the Divi Builder
- Select a section, row, column or module you want to animate
- Go to the Design tab in the settings panel
- Scroll down to find the DiviMotion panel
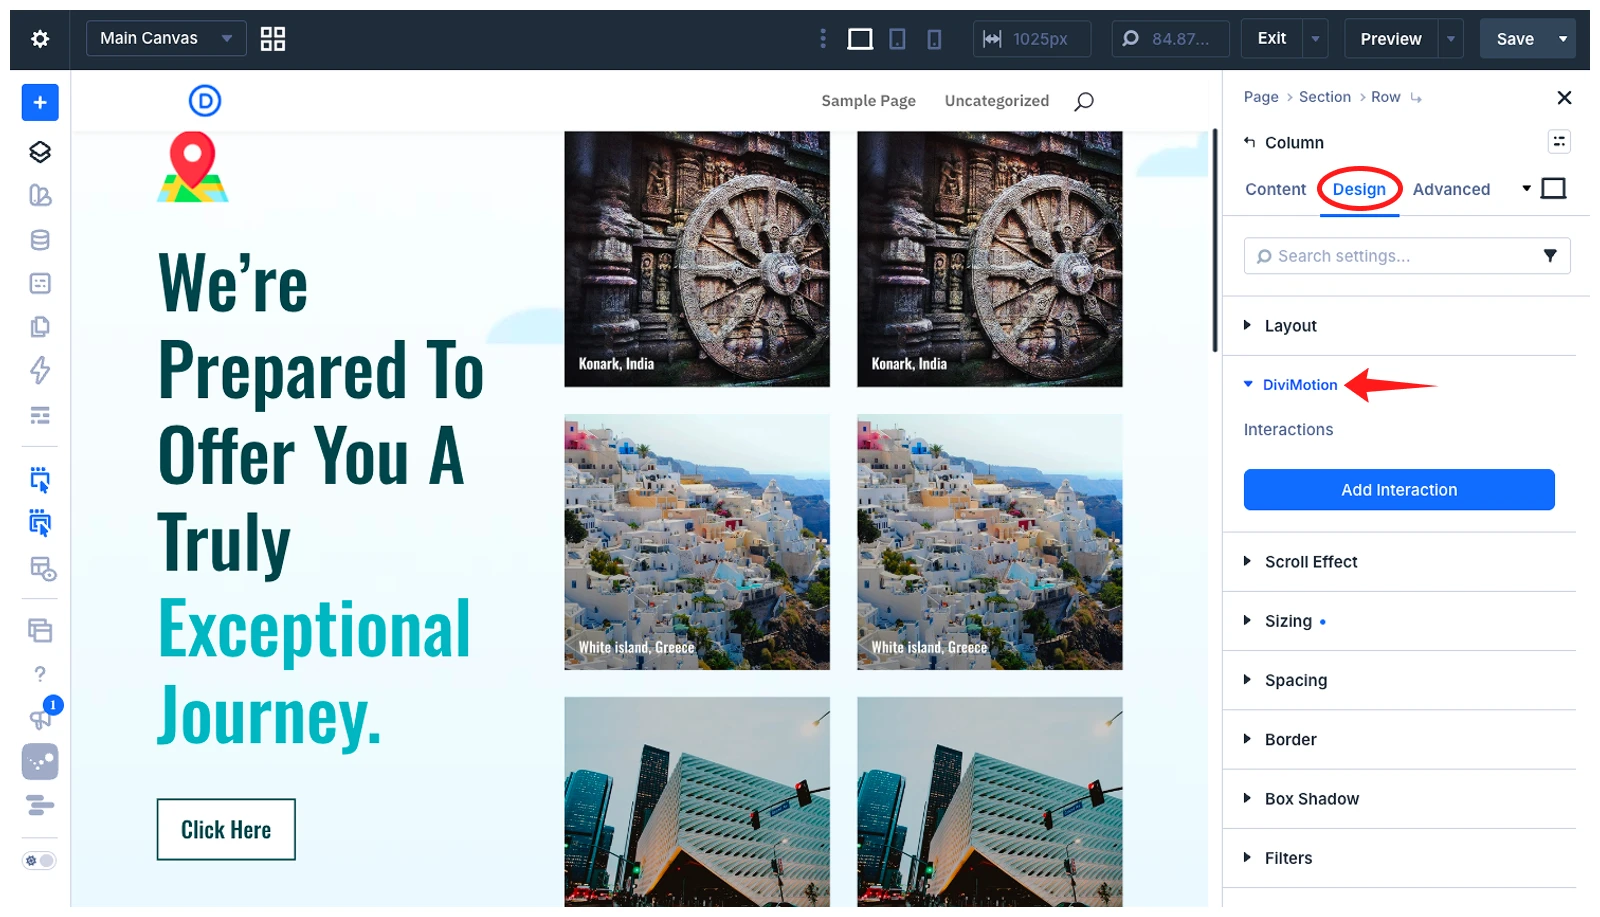
This panel lets you add interactions, set triggers, and add animations.
Understand How DiviMotion Animations Work
DiviMotion follows a simple three-part workflow:
- Interaction: Defines when the animation starts
- Action: Defines what happens to the selected element
- Properties: Control how the element changes, including its position, opacity, scale, rotation, and other CSS properties
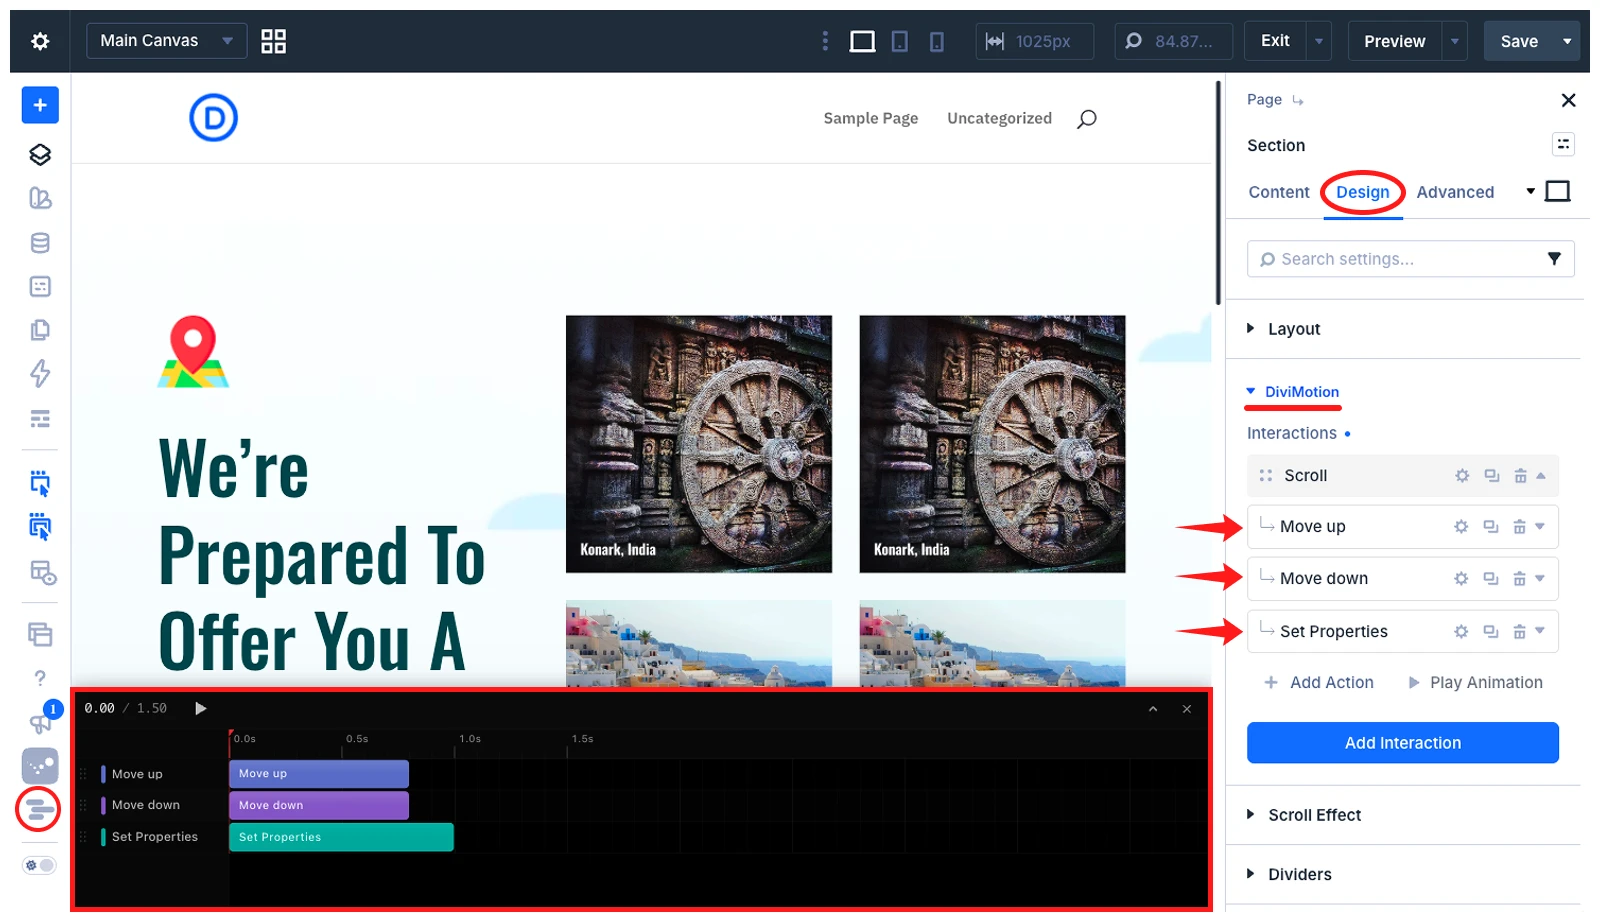
At the bottom, you will find a timeline that shows the animation actions in sequence, including their start times and durations.
Using its timeline control, you can easily adjust the animation duration, direction, and properties by dragging the controls. Click the play icon to preview the animation effect instantly inside the Visual Builder.
Now, we are going to create a vertical scroll animation effect using DiviMotion so you can create your own.
Create a Vertical Scroll Animation with DiviMotion
In this example, we are going to apply a vertical scrolling animation effect to a layout that contains two Group modules in a single column.
Each Group module contains multiple images arranged vertically inside it.
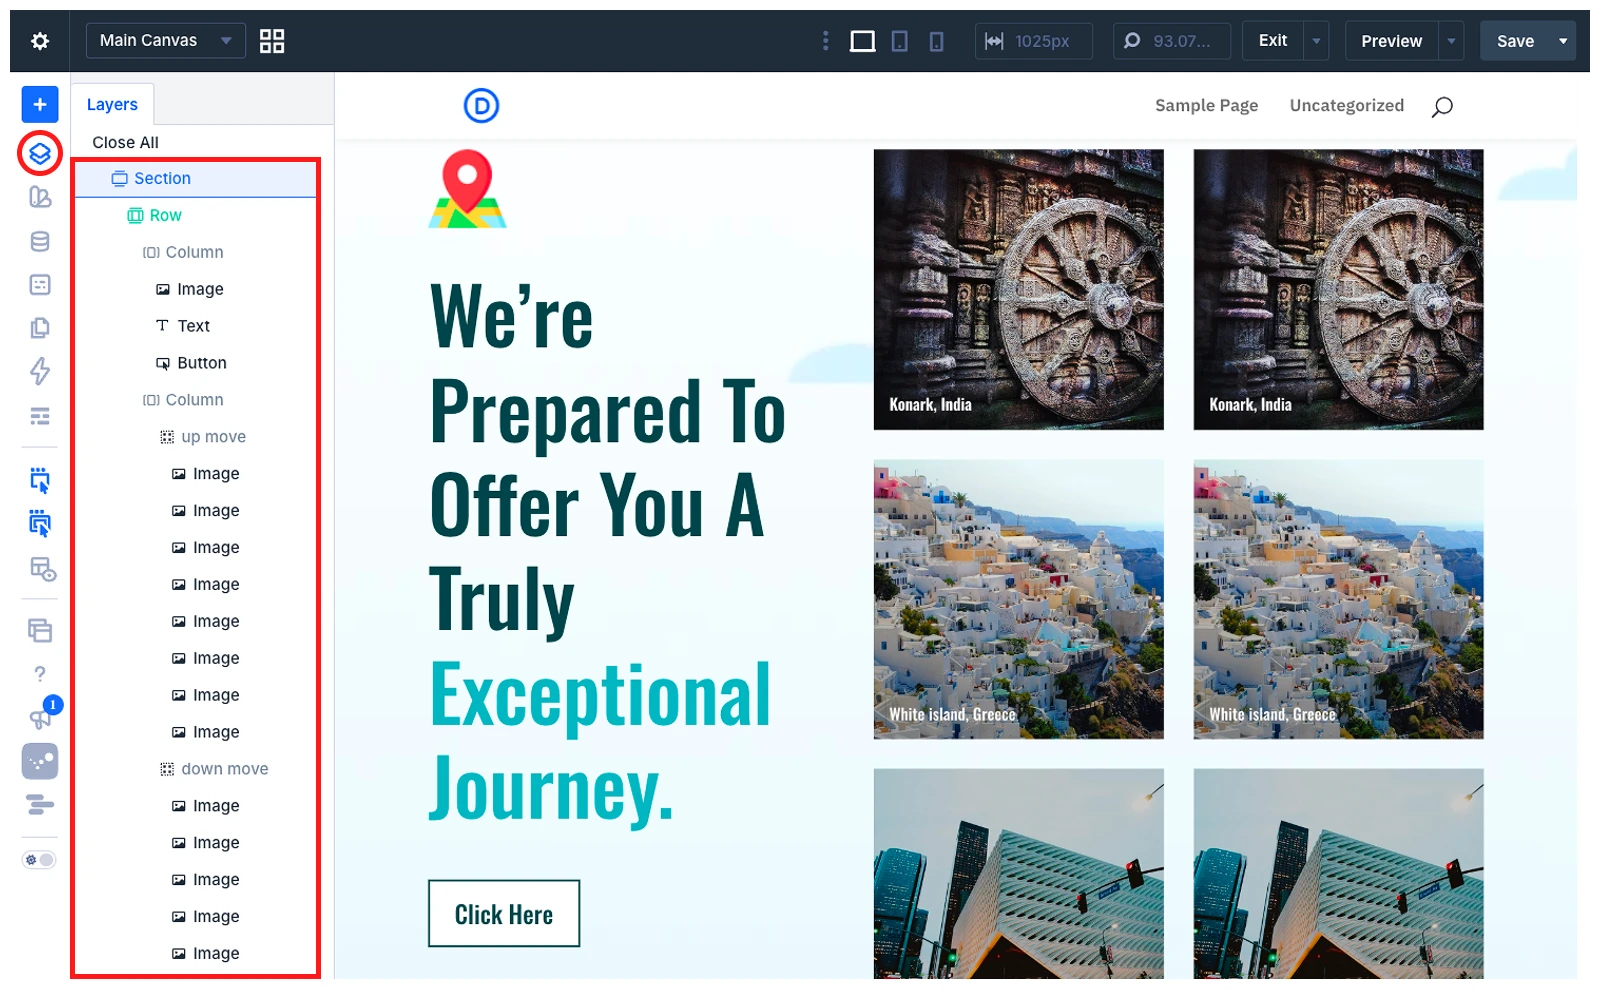
Let’s see how you can apply a vertical scrolling effect here step by step:
Step 1: Set the Element Label to identify it later
- Select the Module > Go to Content tab > Meta > Element Label
- Assign an Element Label to the module.
- Save the changes
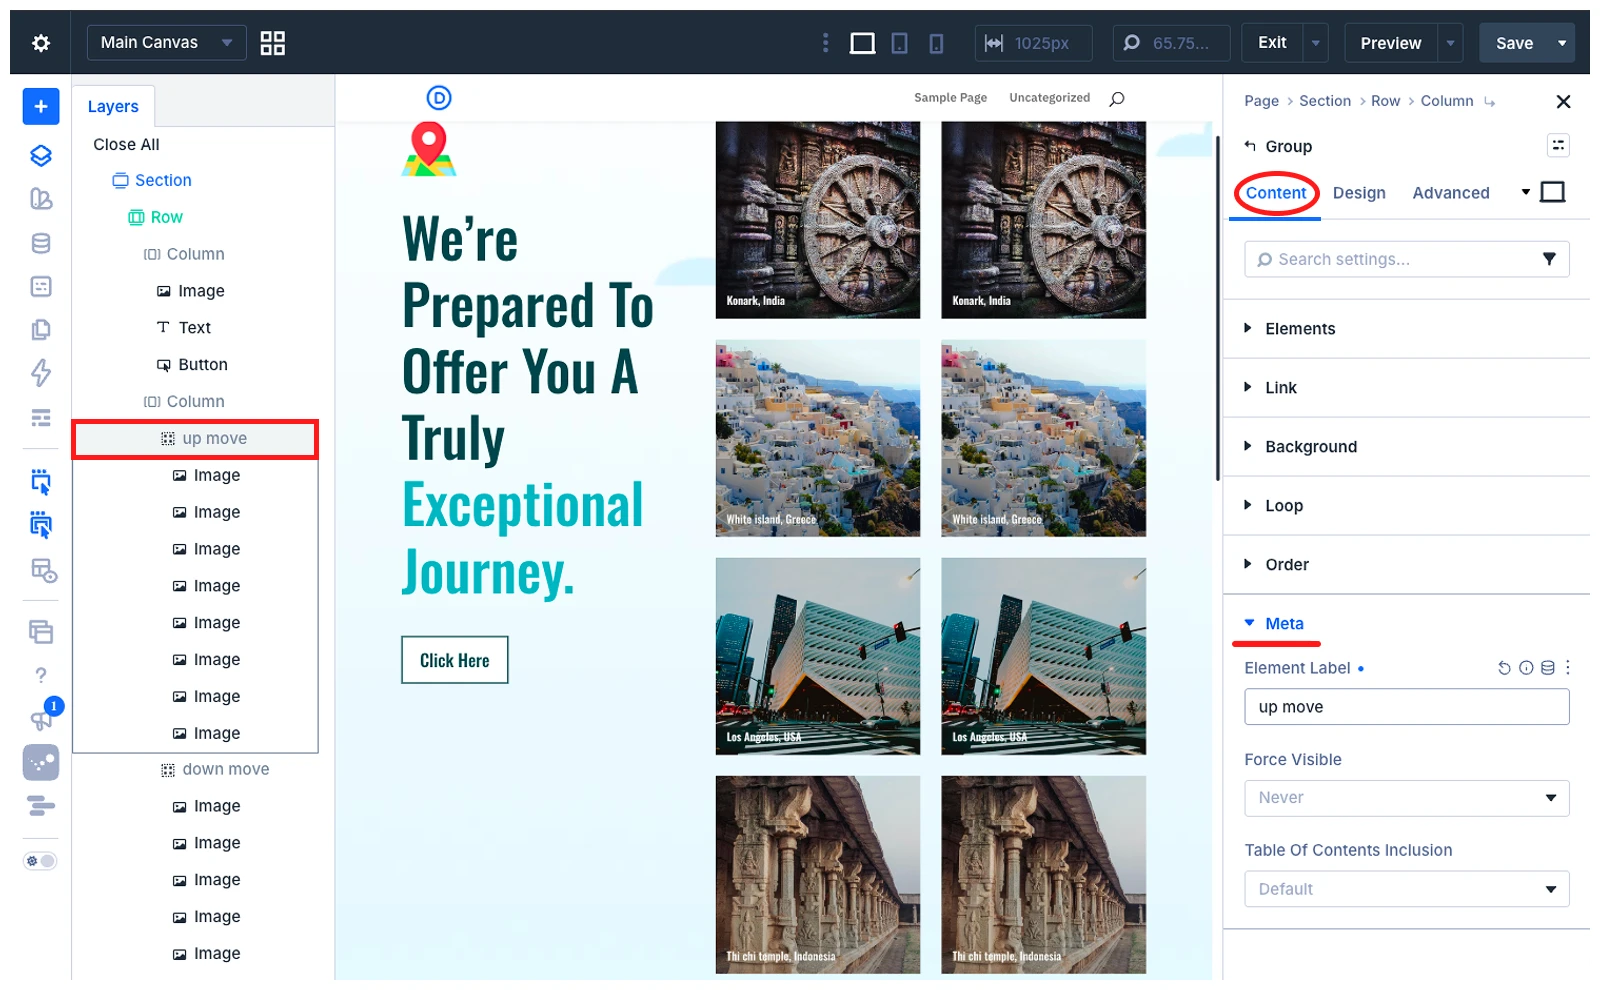
Now, you can easily identify the module in the Layers panel on the left.
Step 2: Add the Scroll Interaction
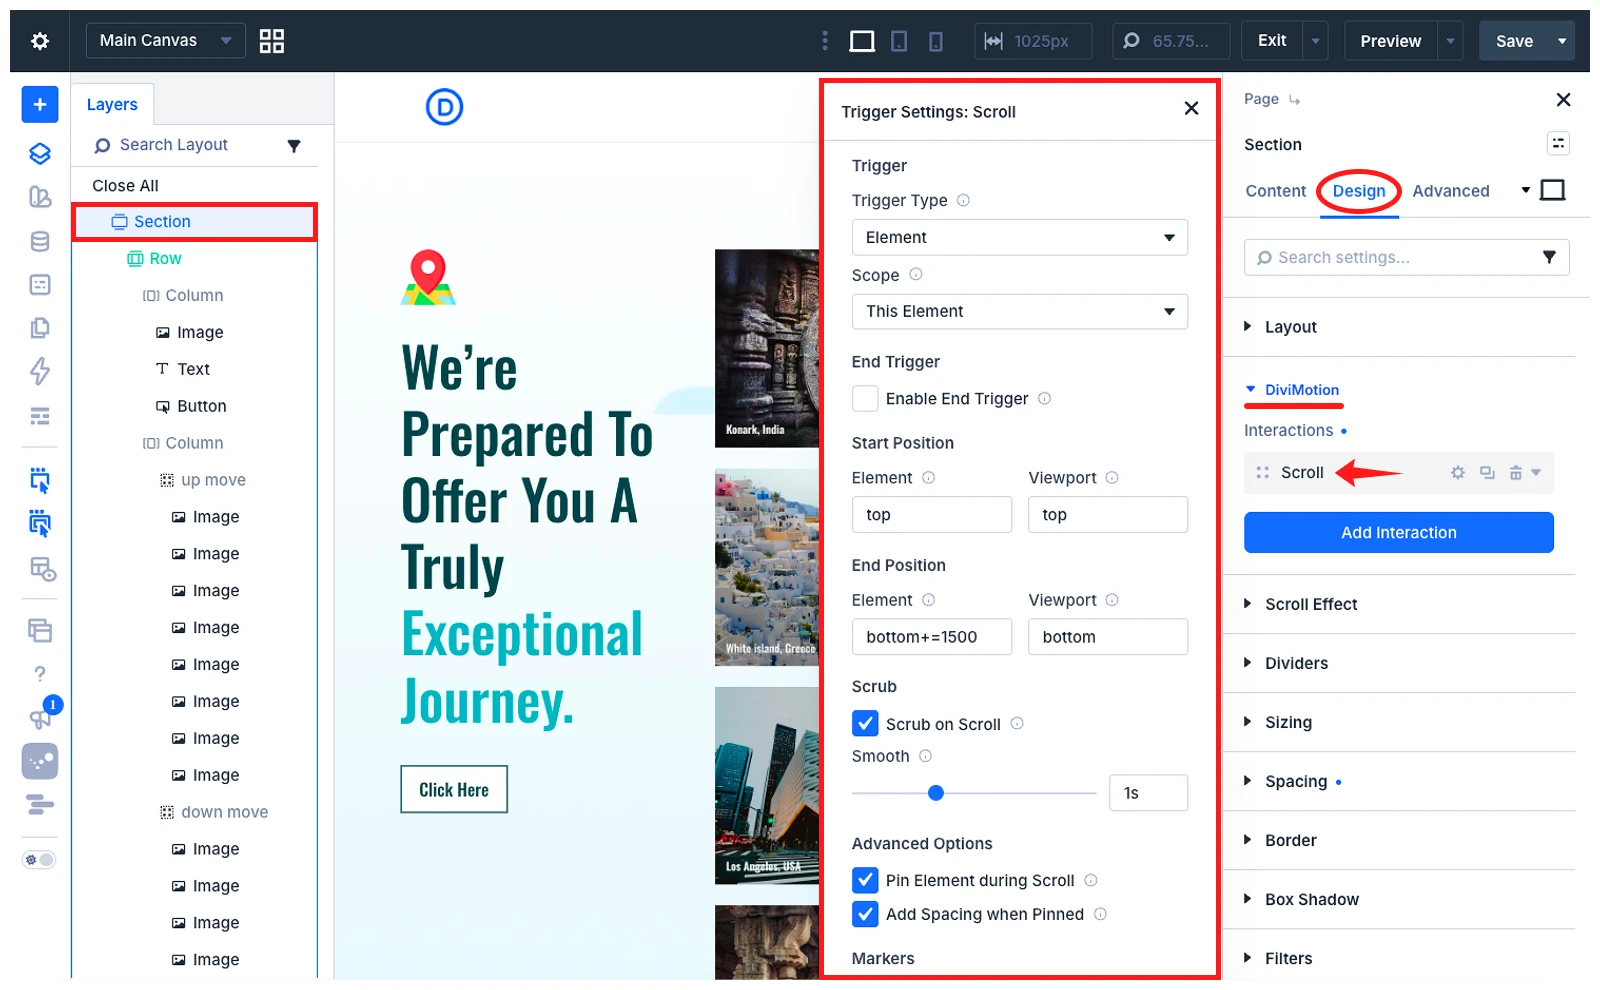
Now, add a scroll interaction to the section you want to animate by following the steps below:
- Select the Section and go to Design > DiviMotion.
- Click Add Interaction > select Scroll as the Interaction type
- Configure the trigger settings from the interaction card:
- Start Element: Top
- Start Viewport: Top
- End Element: bottom+=1500
- End Viewport: Bottom
- Scrub on Scroll: Enabled
- Smooth: 1 second
- Pin Element During Scroll: Enabled
- Disable Animation: Tablet and Phone
Step 3: Animate the Move Up Group
Under the Scroll interaction, click Add Action and select Custom Action.
Configure the target:
- Target Type: Element by ID
- Target Element: Move Up Group
- Scope: Inherit from Interaction
- Action Name: Move Up
Then add these animation settings:
- Duration: 0.8 seconds
- Start Time: 0 seconds
- Easing: Linear
- Animation Property: Move Y
- From: -90px
- To: -79%
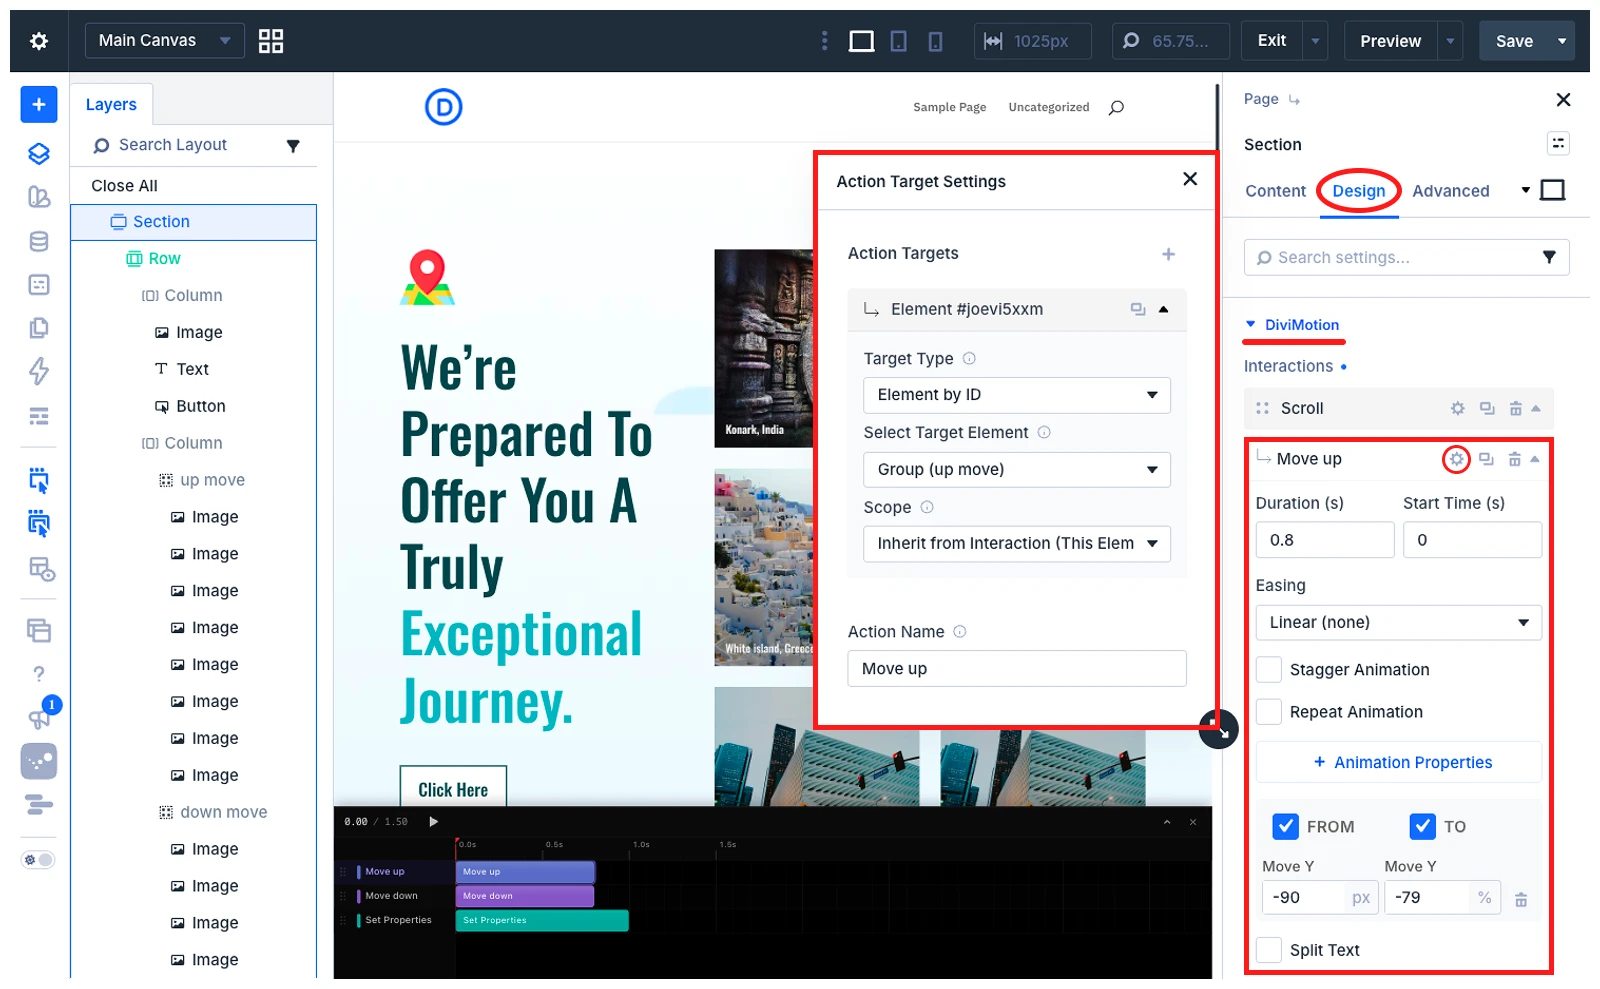
This action moves the first image group upward while visitors scroll.
Step 4: Animate the Move Down Group
Add another Custom Action under the same interaction and select the Move Down Group as the target.
Apply the following values:
- Duration: 0.8 seconds
- Start Time: 0 seconds
- Easing: Linear
- Animation Property: Move Y
- From: -81%
- To: -100px
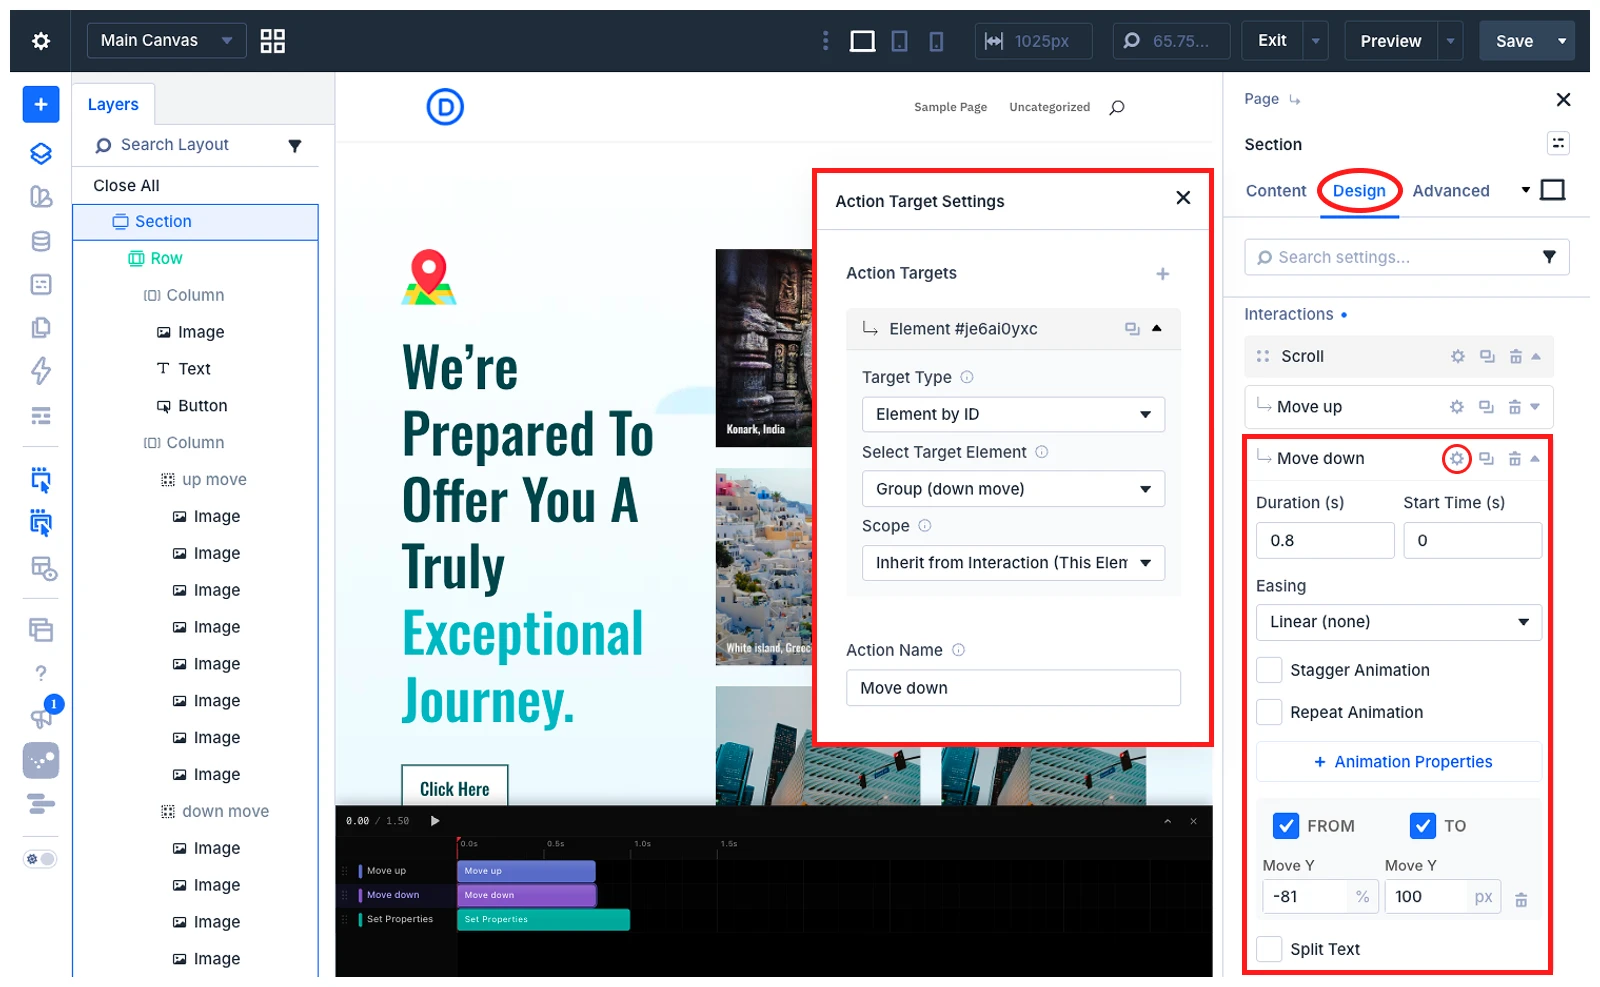
Both actions start at the same point on the DiviMotion timeline. As a result, one group moves upward while the other moves downward.
Step 5: Set the Section Properties
Click Add Action again and choose Set Properties.
Enable the following CSS properties:
- Height: 100vh
- Overflow: Hidden
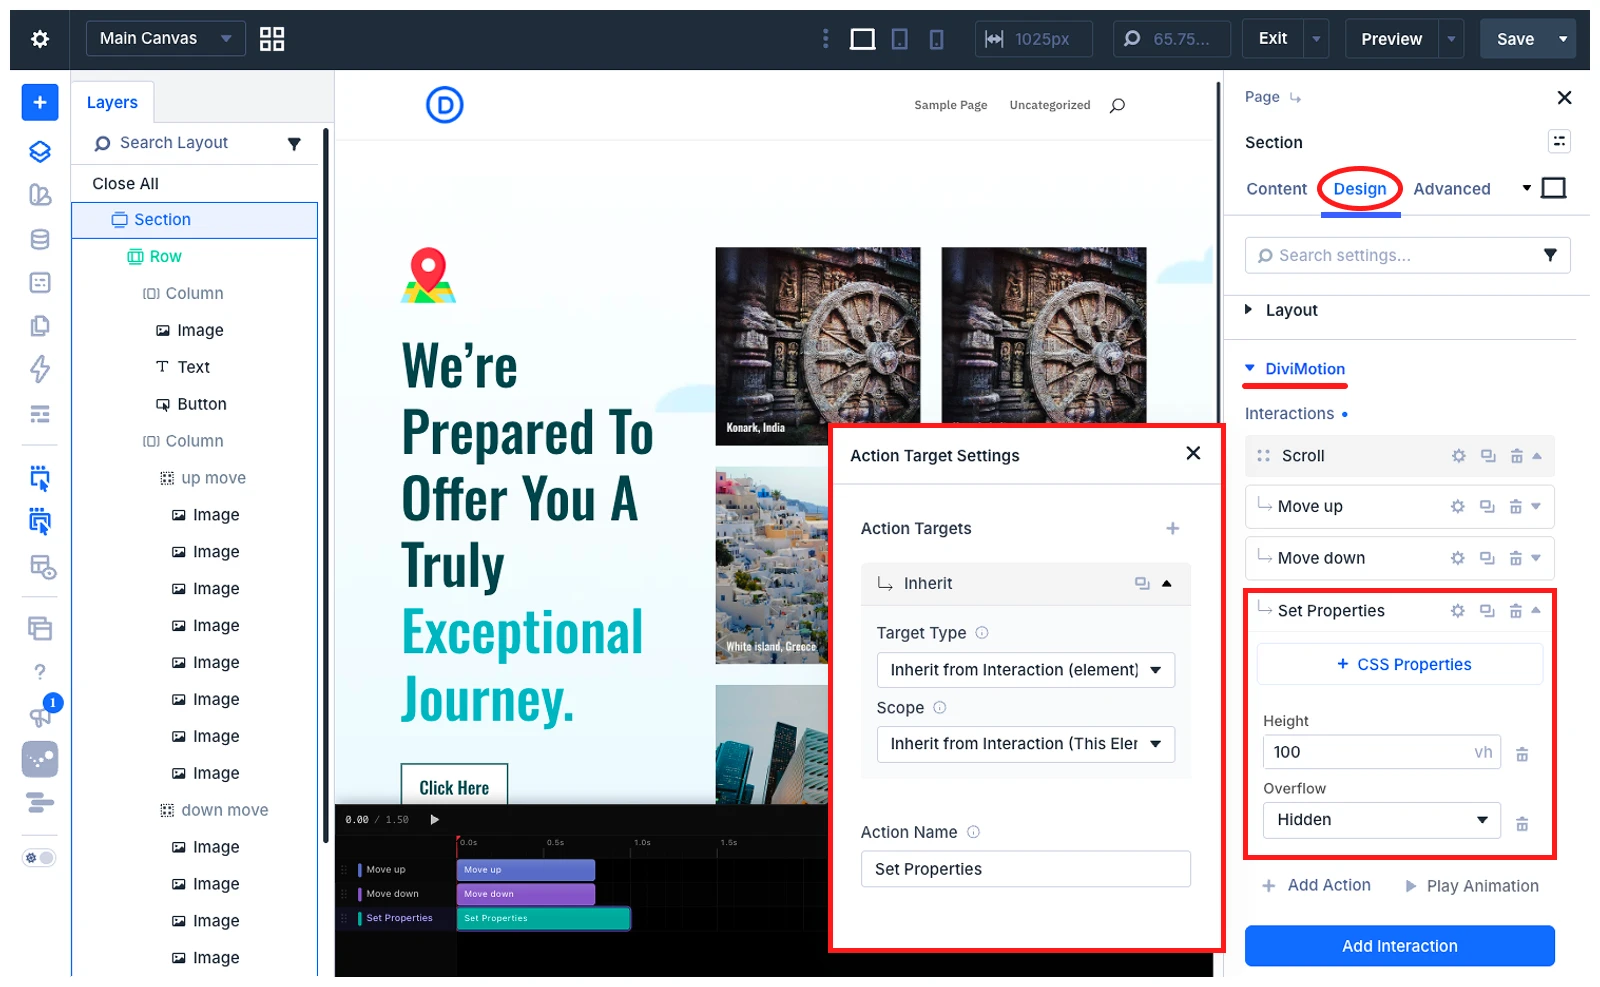
The fixed viewport height creates a full-screen animation area, while the hidden overflow prevents the moving images from appearing outside the section.
Step 6: Preview the Animation
Use the timeline and Play Animation button to check the movement inside the Visual Builder. You can drag the action blocks to adjust their timing or duration.
Once the sequence looks right, save the page and preview it on the frontend. As you scroll, the section will remain pinned while the two image groups move in opposite vertical directions.
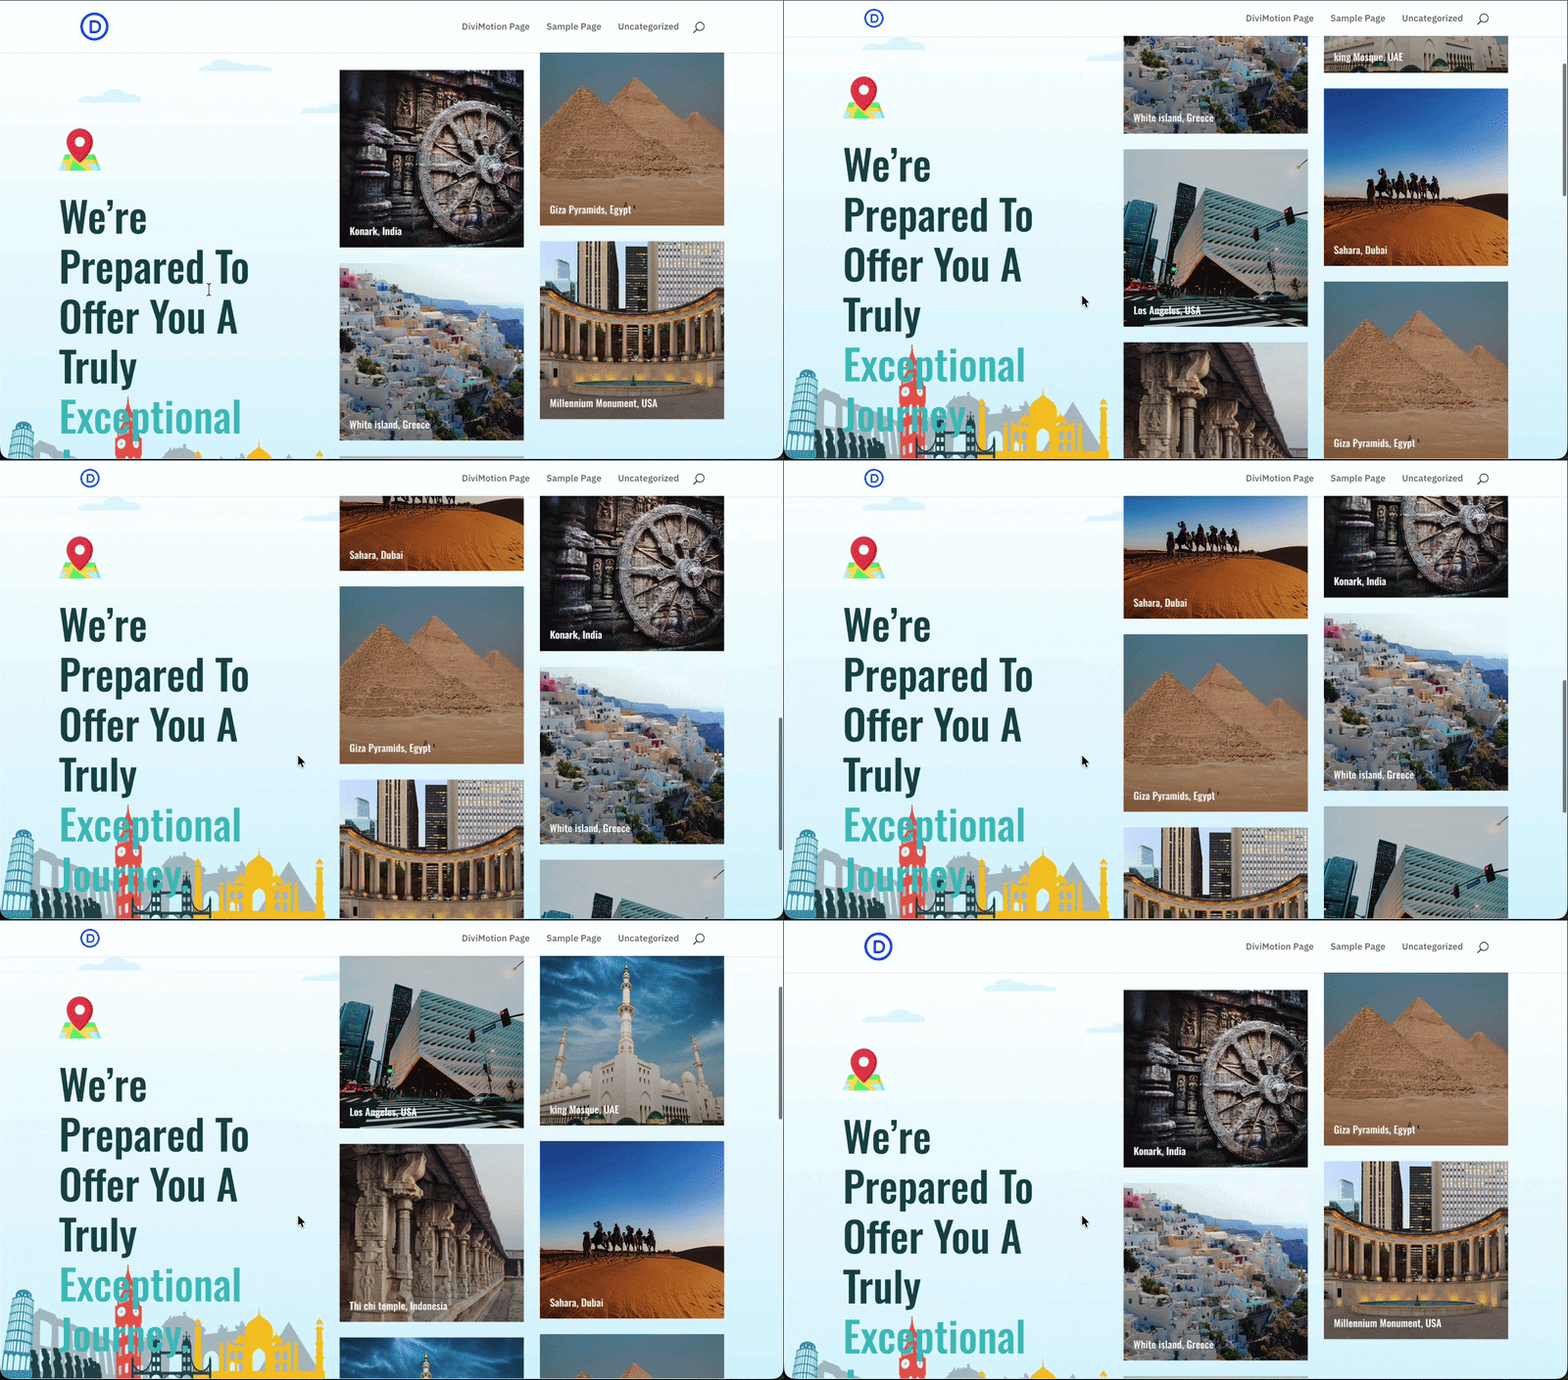
This example shows how DiviMotion combines scroll interactions, actions, and timeline controls to create a scroll-based animation. You can create other animations by choosing different interactions, triggers, and actions.
Method 3: Add Custom CSS Animations in Divi
Custom CSS is useful for lightweight effects that do not need advanced triggers or timeline controls. You can use it to create floating images, pulsing buttons, rotating icons, and simple hover effects.
In this example, we will add a continuous floating animation to an Image module.
Step 1: Add a CSS Class to the Image Module
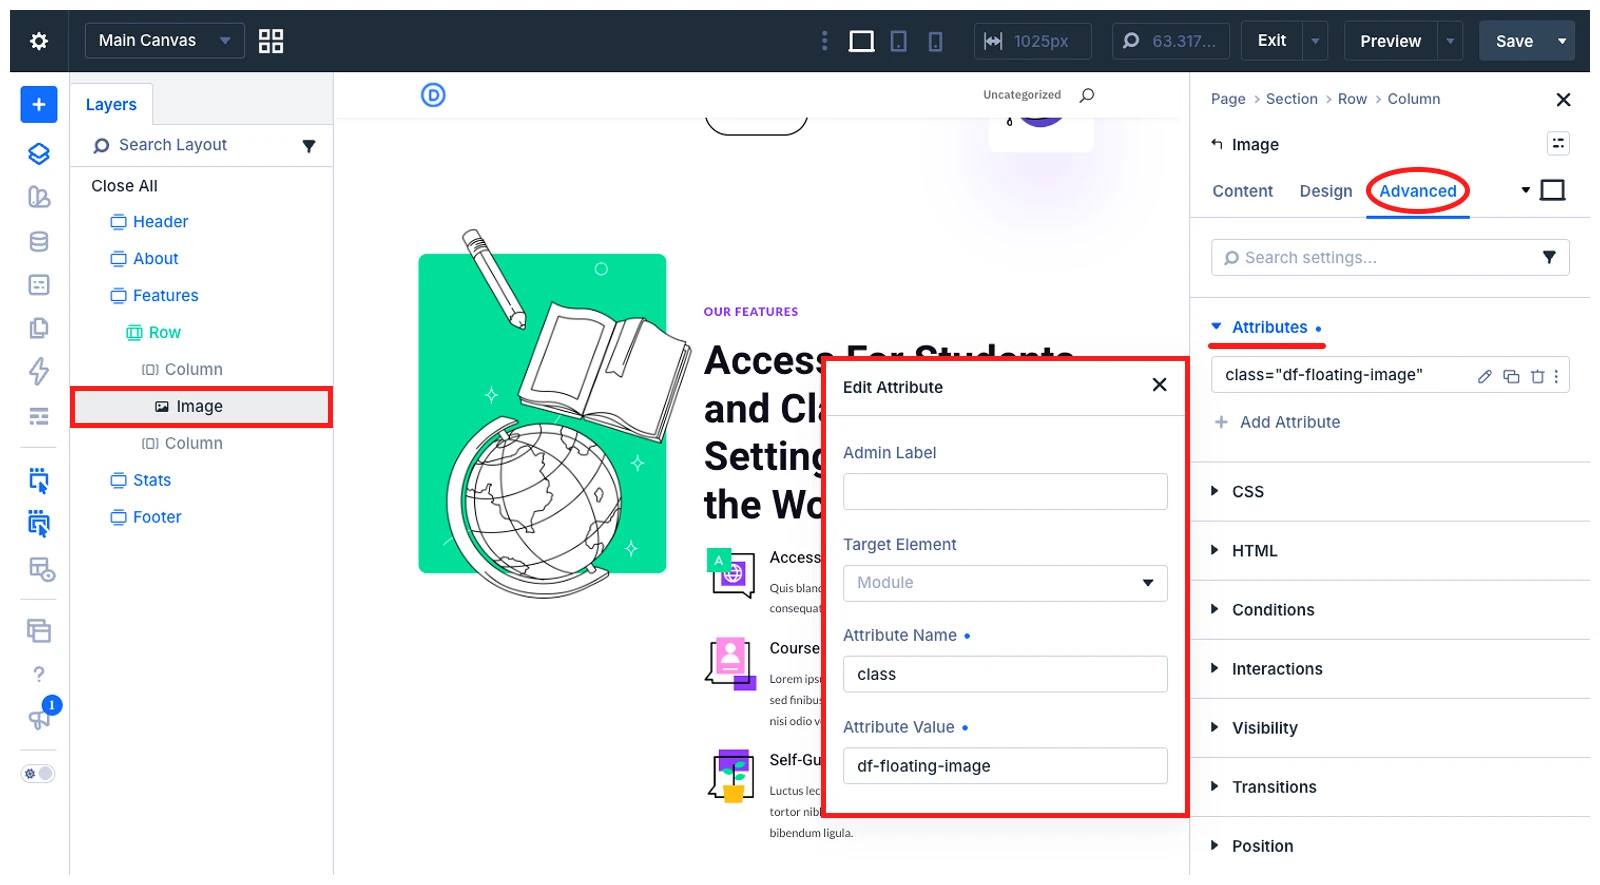
In Divi, you can add CSS classes through the Attributes settings in the Advanced tab. Here is how:
- Open the page in Divi Visual Builder
- Select the module you want to animate
- Go to the Advanced tab
- Open Attributes > Add Attribute > class
- Enter the Attribute Value and save changes
In this example, we have entered df-floating-image as the attribute value. You can enter anything you prefer.
Step 2: Add the Floating Animation CSS
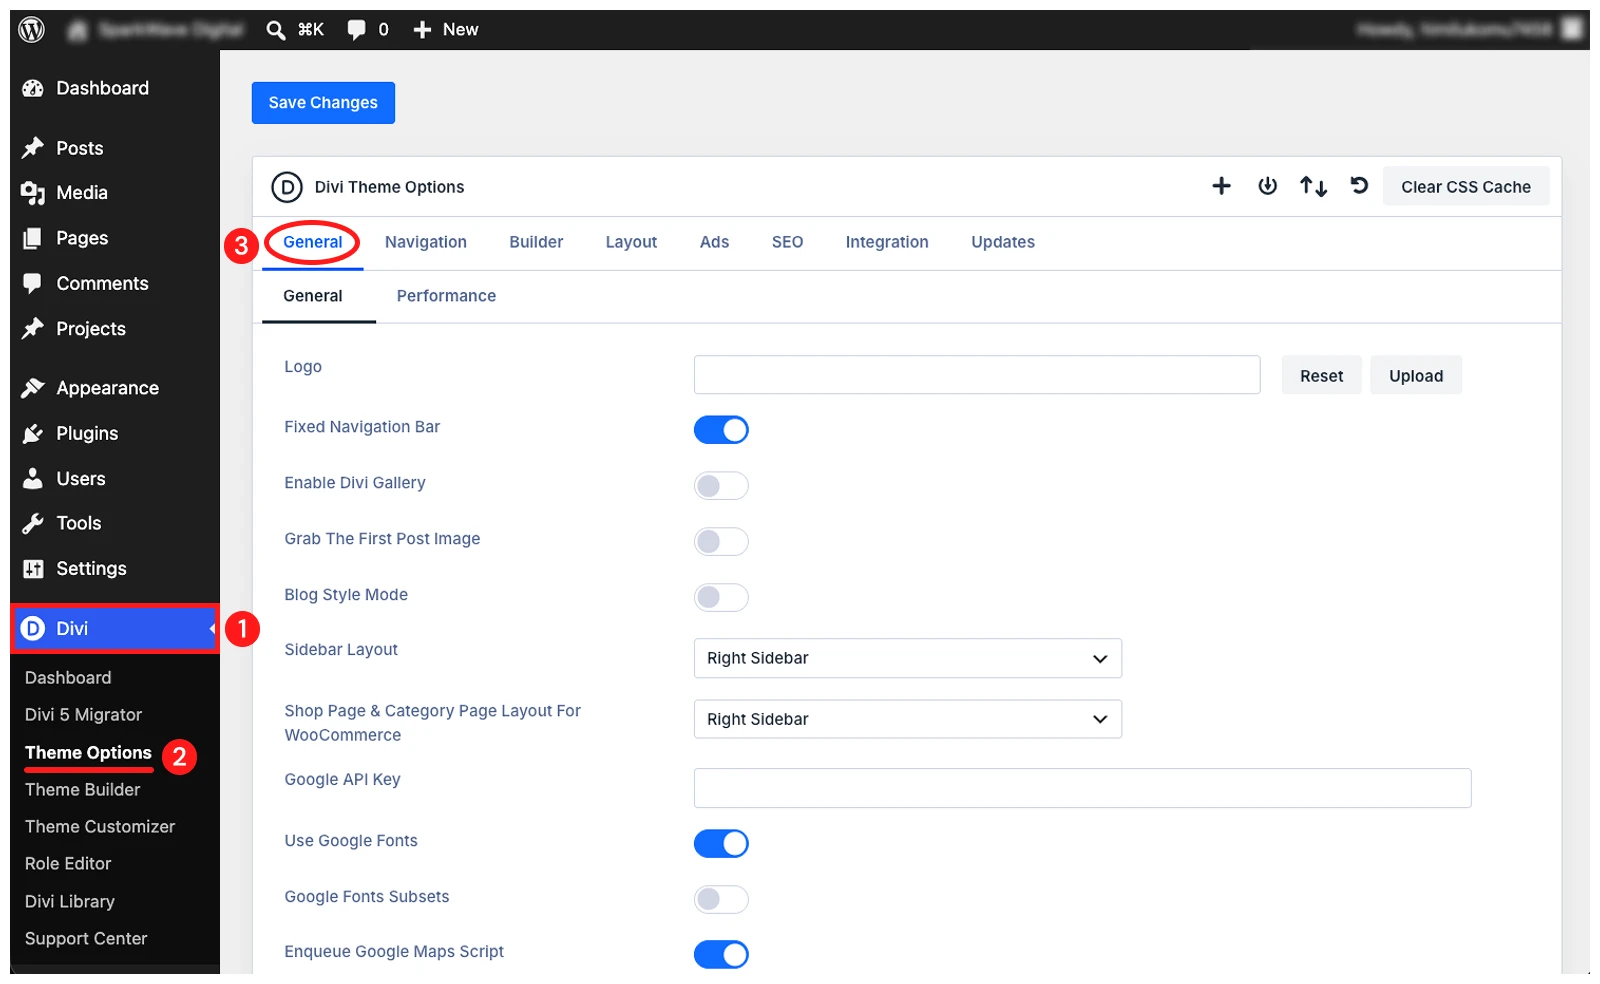
Next, add the CSS code that controls the floating movement of this image. Follow these steps to do this:
- Go to WordPress Dashboard > Divi > Theme Options > General
- Scroll down to the Custom CSS field and paste the CSS code you created to animate this element.
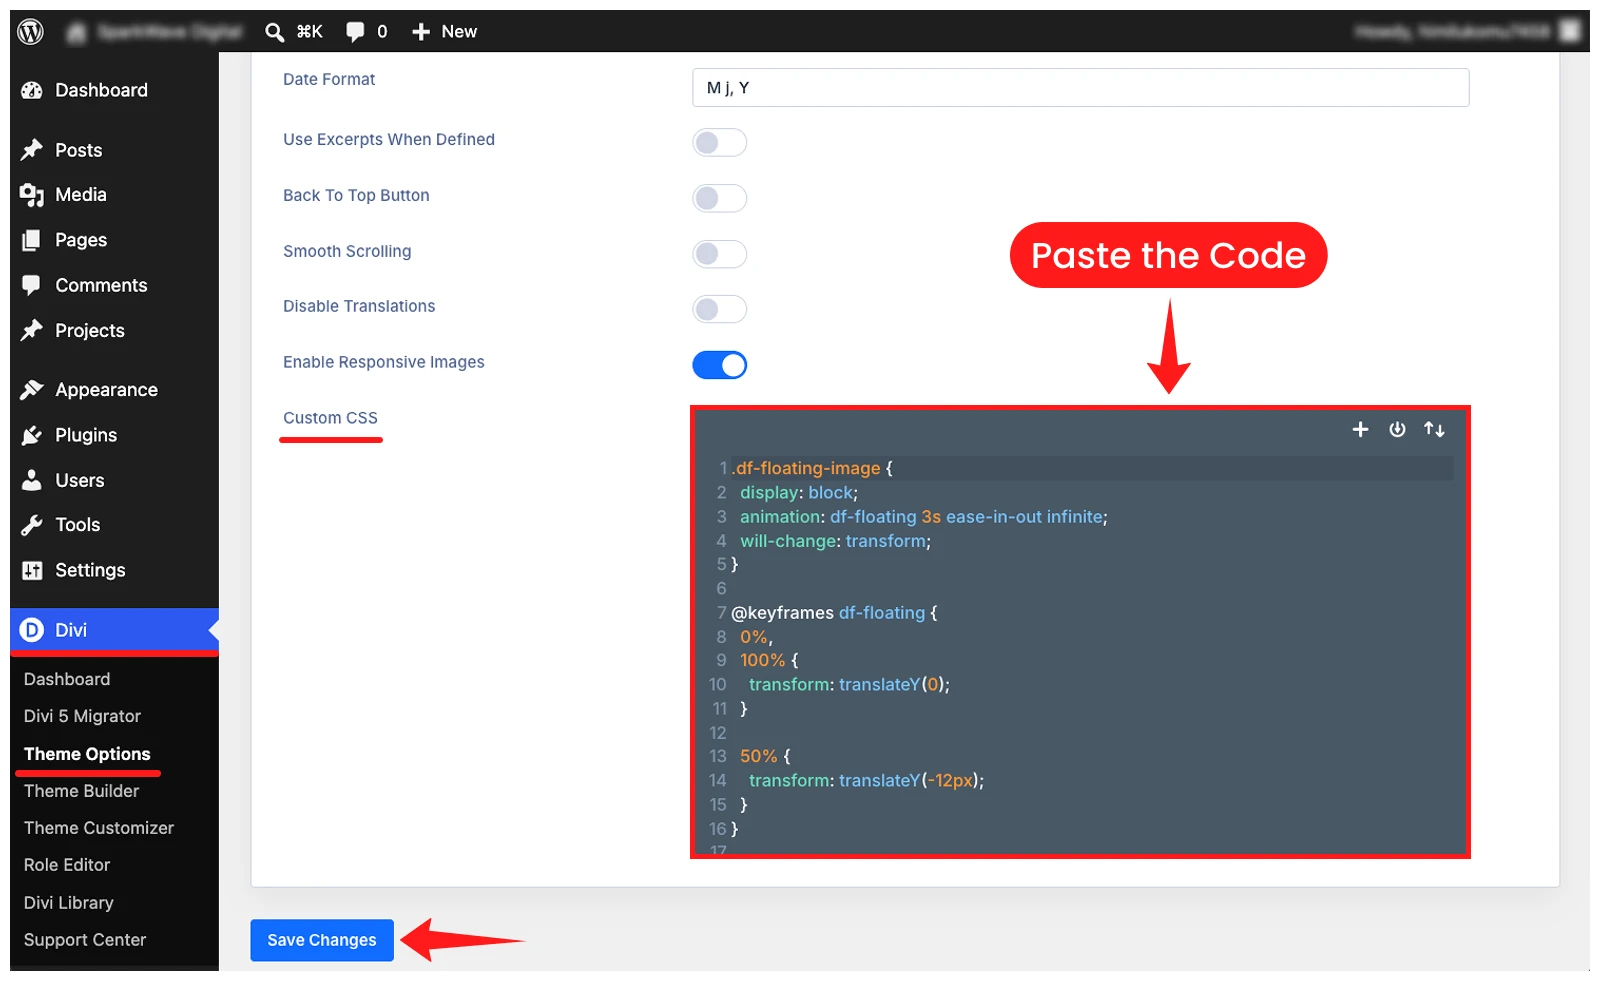
- Then click Save Changes.
In this example, we are using the following CSS code to create a floating animation effect for the selected Image module:
.df-floating-image {
  display: block;
  animation: df-floating 3s ease-in-out infinite;
  will-change: transform;
}

@keyframes df-floating {
  0%,
  100% {
    transform: translateY(0);
  }

  50% {
    transform: translateY(-12px);
  }
}

@media (prefers-reduced-motion: reduce) {
  .df-floating-image {
    animation: none;
  }
}
This code will move the image upward by 12px and then return it to its original position. Each animation cycle takes three seconds and repeats continuously with a smooth easing effect.
Step 3: Save the Page and Preview the Animation
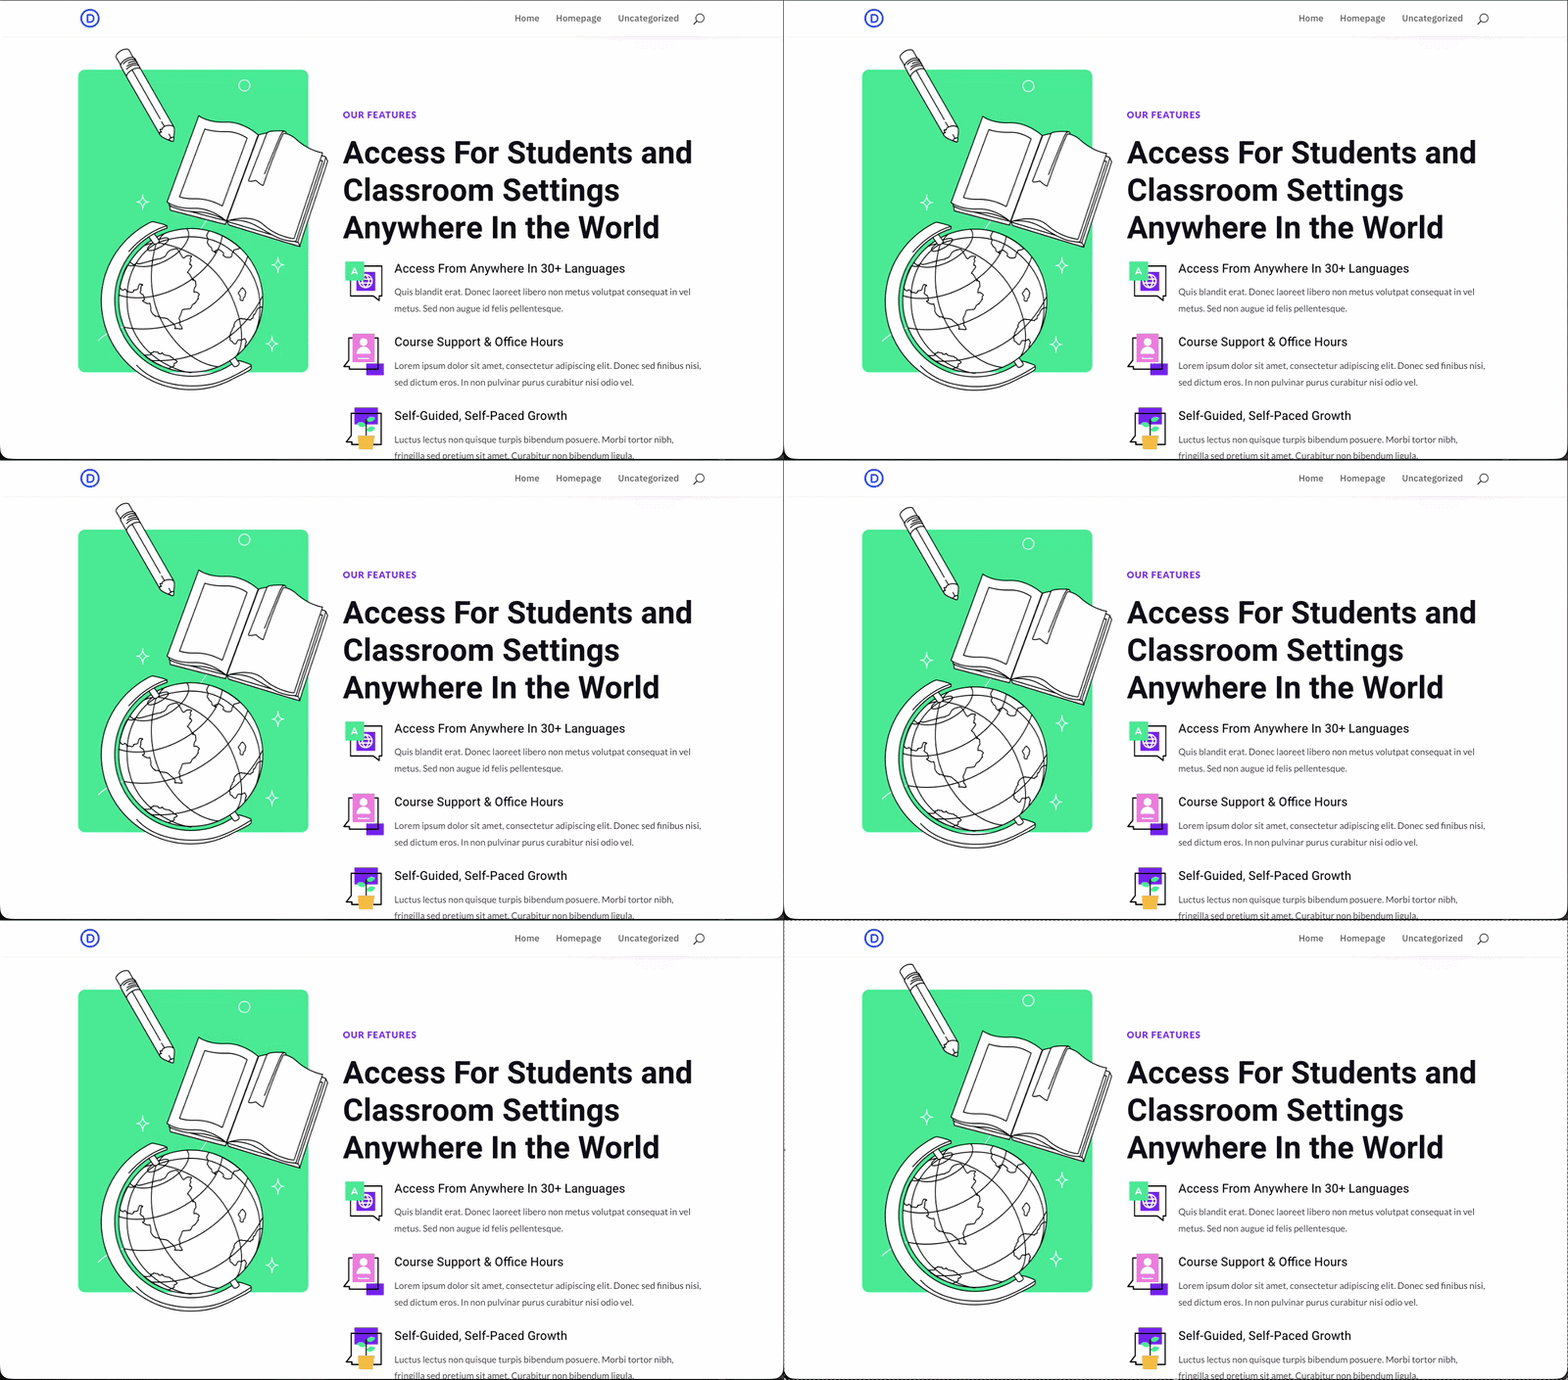
Now, save or publish the page where you applied the animation and check the effect on the frontend. The Image module should now move gently upward and downward in a continuous loop like the following:
Method 4: Add Custom GSAP Animations Using a CDN
You can also add GSAP animations to your Divi website by adding the GSAP Core script to your website header. But you need to add and maintain the script manually.
Now, we will show you how to add GSAP Core to your website and create a hover animation effect using it.
You can also create other animations by adding scripts for effects such as scroll triggers, scroll-based effects, SplitText effects, and more.
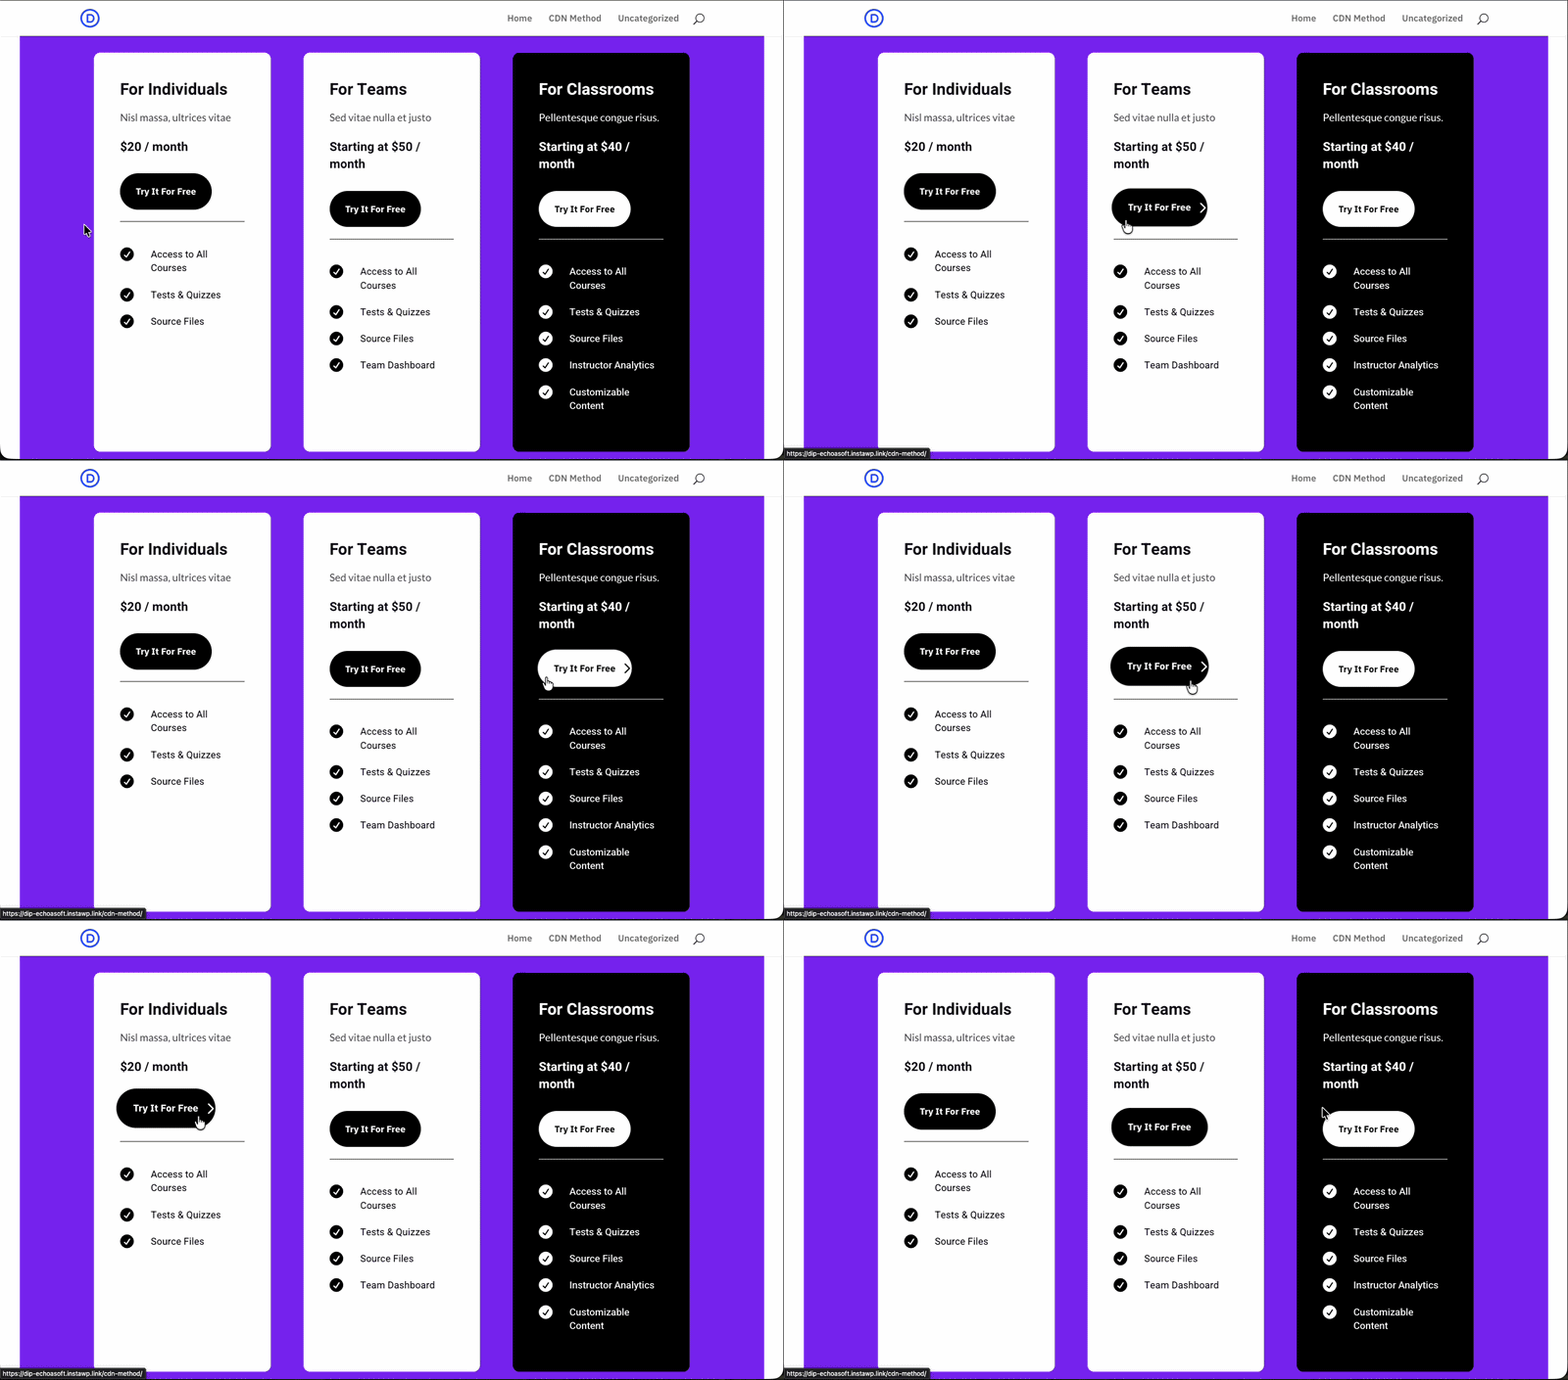
In this example, we are going to apply a hover effect to the Button modules of a three-tier pricing column created with Divi.
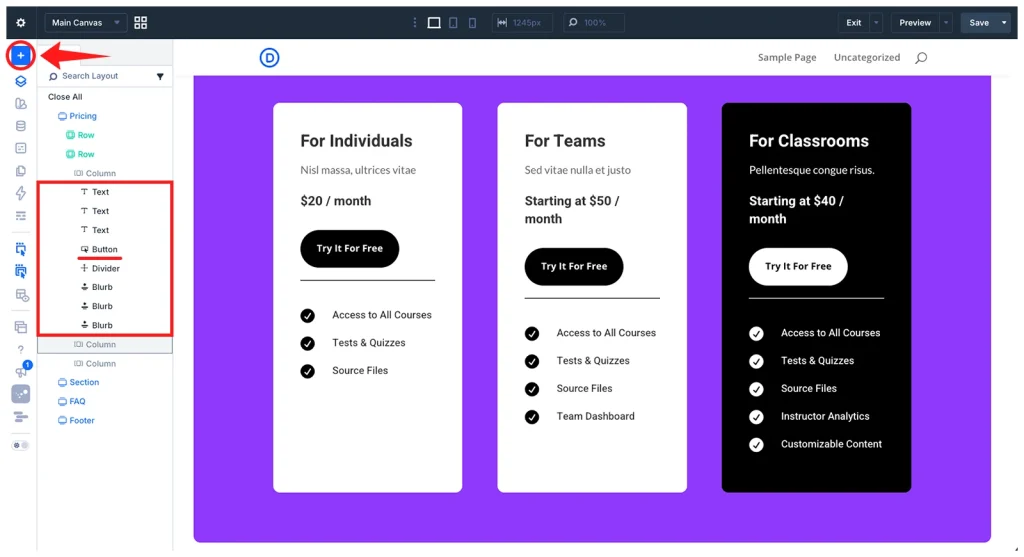
Step 1: Add the CSS Class to Each Button
First, we are going to assign a common CSS class to each button because we want the same hover effect on each one. To do this:
- Open the page with the Divi Visual Builder
- Select each Button module and go to the Advanced tab
- Open the Attributes settings > Click Add Attribute > Class
- Enter the Attribute value you prefer
- Save changes
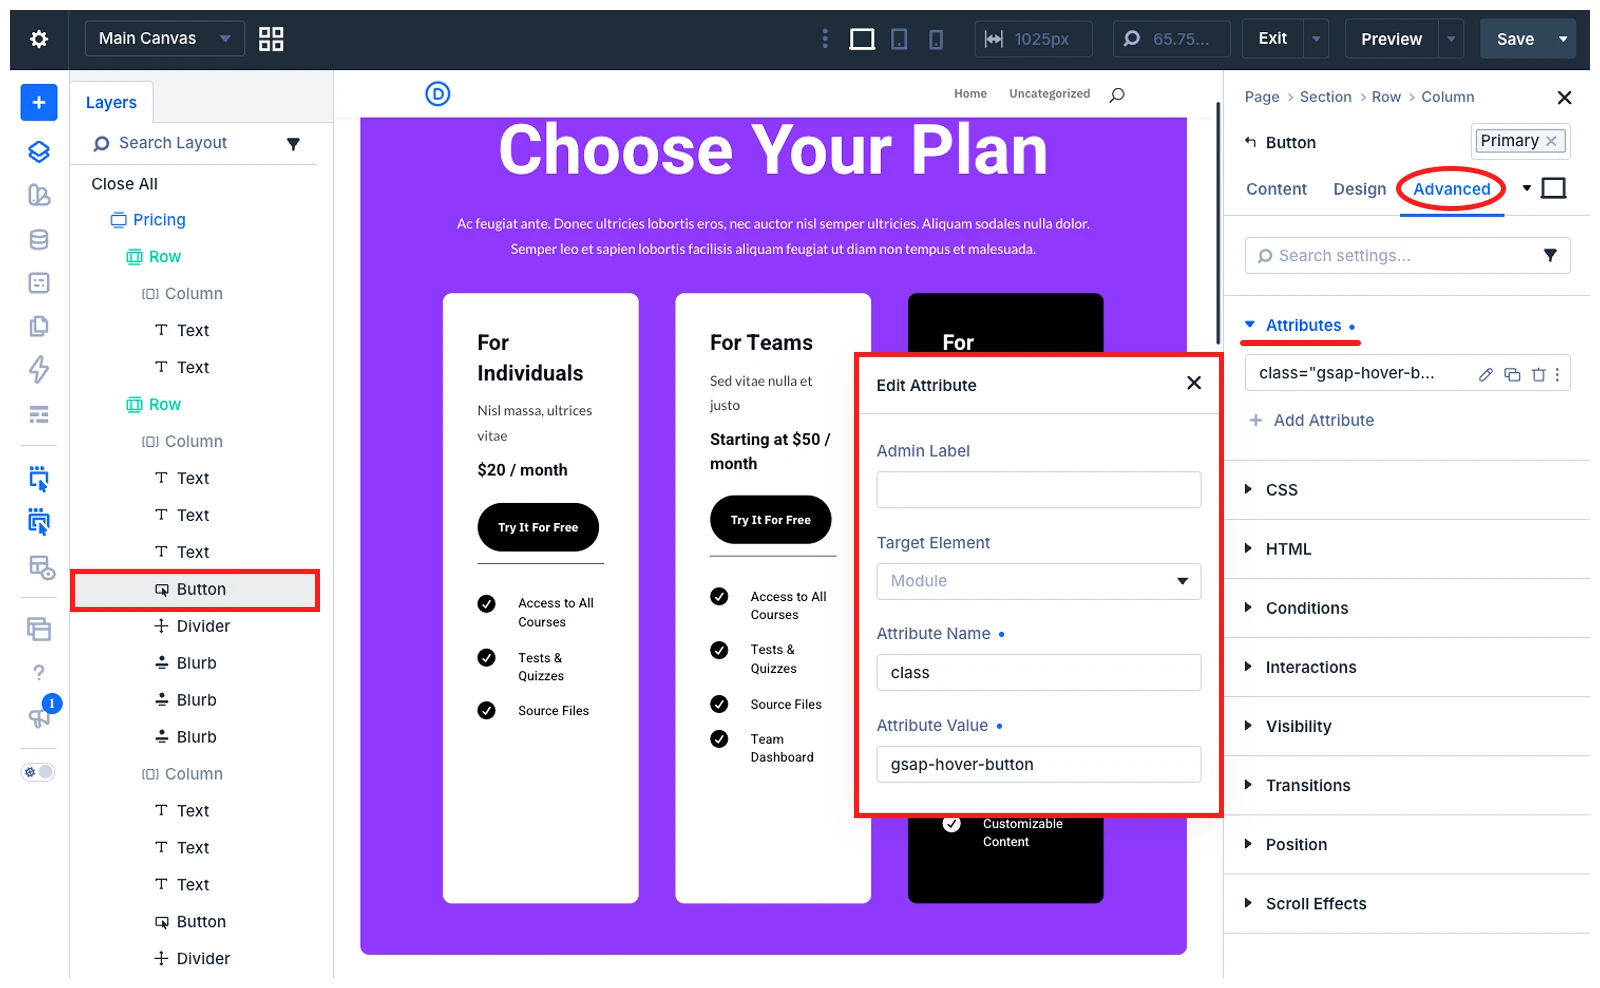
In this example, we have added gsap-hover-button as the attribute value to each module.
Step 2: Get the GSAP Script
Next, get the GSAP Core script from the official GSAP installation page.
- Find the GSAP Install Helper
- Select the CDN tab
- Copy the script shown under Include this script tag
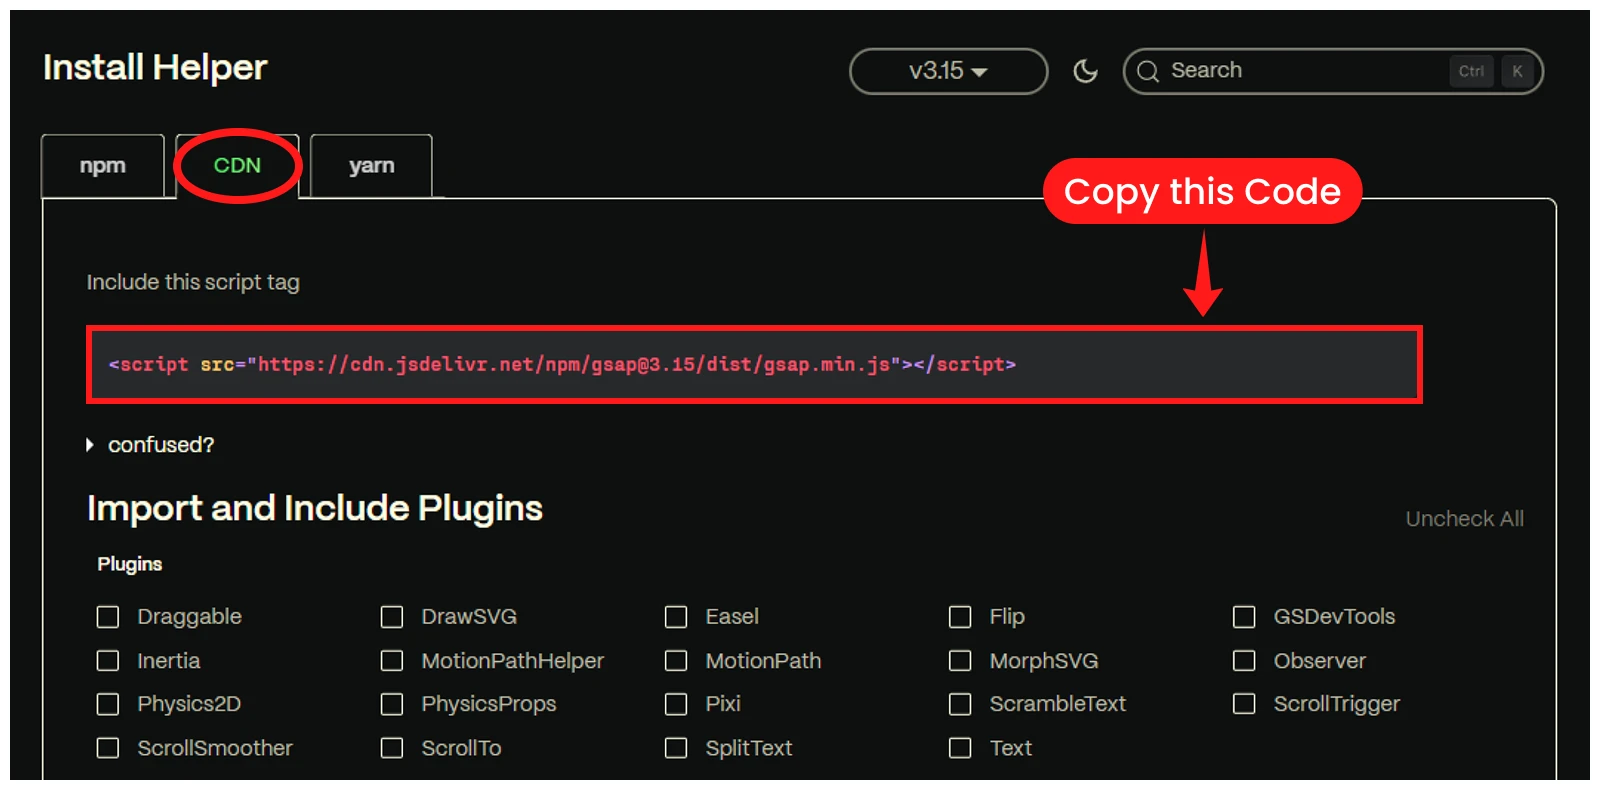
It should look similar to this:
<script src="https://cdn.jsdelivr.net/npm/[email protected]/dist/gsap.min.js"></script>Keep the Import and Include Plugins options unchecked
- Keep all options under Import and Include Plugins unchecked
For this button hover effect, you only need GSAP Core. Keep the GSAP Core script ready for the next step.
The Install Helper also provides optional plugins for creating other types of animations. For example, you can select ScrollTrigger for scroll-based effects, SplitText for text animations, and more.
Step 3: Create the GSAP Hover Animation
Next, combine the GSAP Core script with your animation script to create the button hover effect.
To do this, open a code editor and paste the GSAP Core script first.
After that, you can add your own custom animation script below it as needed.
For example, we are using the following hover animation script:
<!-- Load GSAP Core -->
<script src="https://cdn.jsdelivr.net/npm/[email protected]/dist/gsap.min.js"></script>

<!-- Animate the pricing table buttons -->
<script>
document.addEventListener("DOMContentLoaded", function () {
  const buttons = document.querySelectorAll(".gsap-hover-button");

  if (!buttons.length) {
    return;
  }

  if (window.matchMedia("(prefers-reduced-motion: reduce)").matches) {
    return;
  }

  buttons.forEach(function (button) {
    button.addEventListener("mouseenter", function () {
      gsap.to(button, {
        scale: 1.08,
        y: -5,
        duration: 0.3,
        ease: "power2.out",
        overwrite: "auto"
      });
    });

    button.addEventListener("mouseleave", function () {
      gsap.to(button, {
        scale: 1,
        y: 0,
        duration: 0.3,
        ease: "power2.out",
        overwrite: "auto"
      });
    });
  });
});
</script>
The script targets every element using the .gsap-hover-button selector. In Step 1, we added gsap-hover-button as the class value to all three Button modules through Advanced > Attributes.
Step 4: Add the GSAP Script to Divi
Now, add the complete GSAP script to the Integration settings in Divi Theme Options. Here is how to do it:
- Go to WordPress Dashboard > Divi > Theme Options.
- Open the Integration tab.
- Enable Header Code.
- Find the Add Code to the <head> of Your Blog field.
- Paste the complete code from the previous step.
- Click Save Changes.
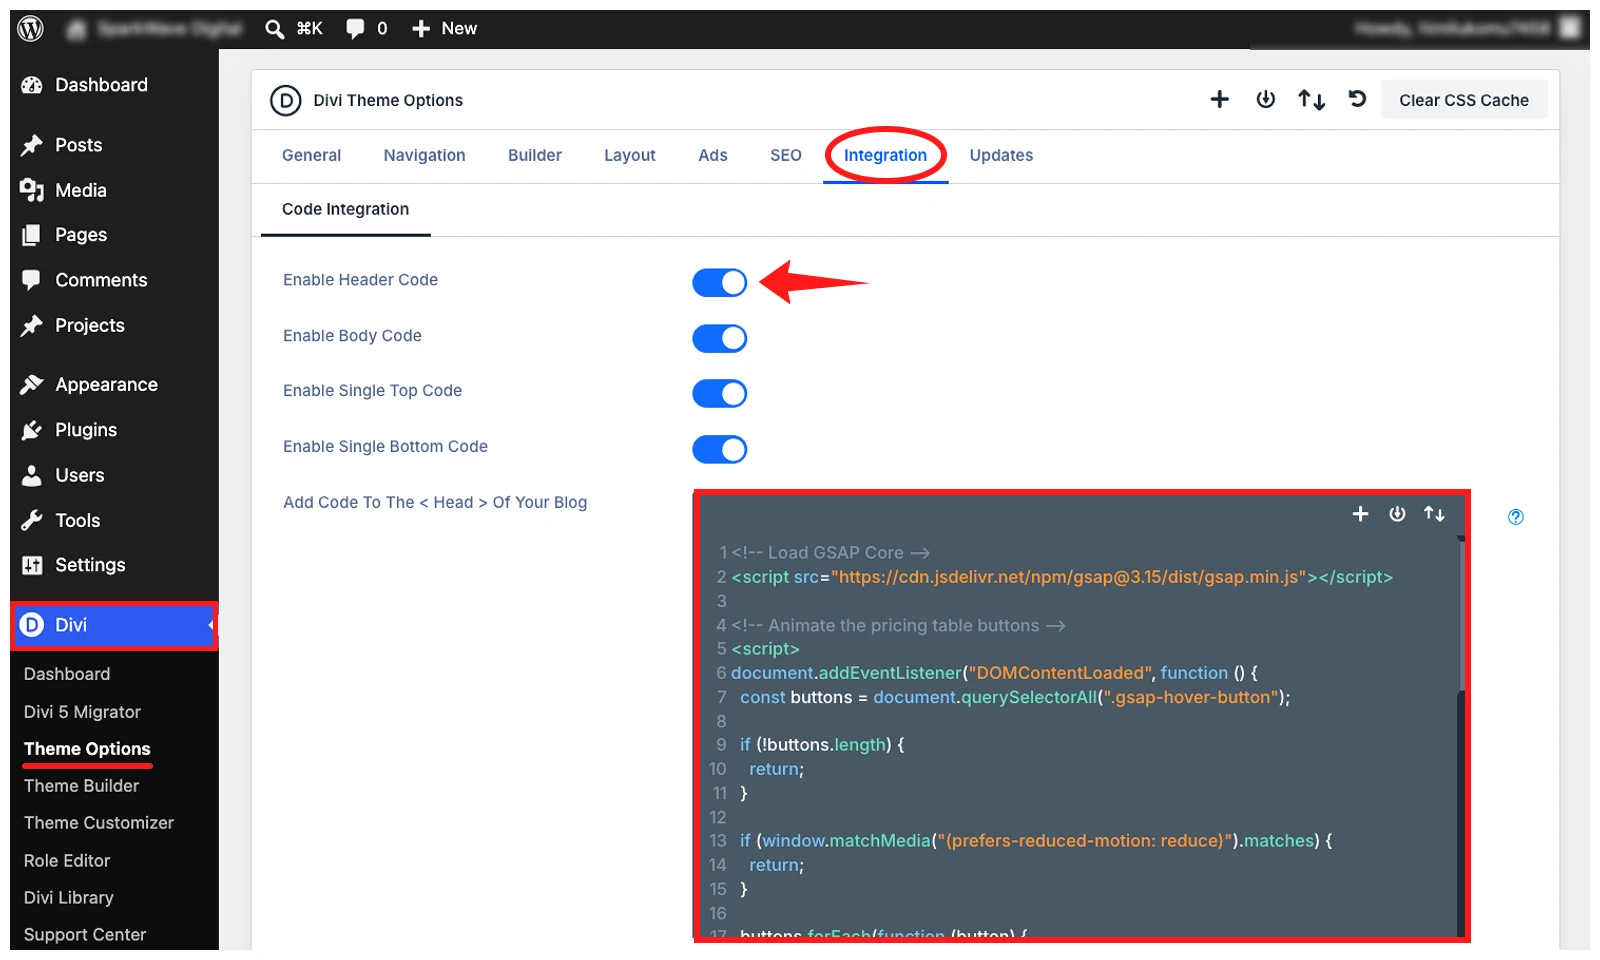
This code will apply across your entire site. Any element that uses the gsap-hover-button class will automatically have this animation.
Step 5: Test the GSAP Animation on the Frontend
- Save or publish the page where you added the attribute in Step 1.
- Hover over the buttons and check whether the animation is applied properly.
Optimize the Animations and Launch Your Website
Before launching, preview the page on the frontend and test the complete animation flow.
Check that:
- Animations start at the right time
- Text and buttons remain easy to access
- Animated elements do not overlap
- Multiple effects run smoothly together
- Scroll animations work in both directions
Keep animation timing and movement moderate, limit simultaneous effects, optimize media, remove unused code, and avoid loading GSAP more than once.
On tablet and mobile, reduce or disable pinned, scrubbed, continuous, and hover effects if they affect usability. Also, respect prefers-reduced-motion by limiting non-essential motion.
Finally, clear Divi, plugin, and browser caches, then test the published site again.
Frequently Asked Questions
Can I create an animated Divi website without coding?
Yes. Divi offers built-in entrance and scroll effects you can set up in the Visual Builder. For more advanced animations without coding, DiviMotion lets you create scroll, load, hover, click, text, SVG, pinned, scrubbed, and timeline-based animations visually.
Does Divi include built-in animation effects?
Yes. Divi includes entrance styles like Fade, Slide, Bounce, Zoom, Flip, Fold, and Roll. It also provides Scroll Effects for movement, fading, scaling, rotating, and blurring on scroll. Divi 5 Interactions add trigger-based effects like click, hover, page load, and viewport actions.
Can I use GSAP with Divi?
Yes. You can load GSAP via CDN in Divi’s Integration settings and target elements with CSS classes. GSAP Core handles basic animations, while plugins like ScrollTrigger or SplitText add more control. DiviMotion offers a visual GSAP-based workflow without coding.
Do animations slow down a Divi website?
Animation can slow down a Divi website if overused or poorly optimized. For better performance, use transform and opacity, optimize media, limit continuous effects, and load only necessary scripts.
Can I disable Divi animations on mobile?
Yes. Divi’s responsive settings let you adjust or disable effects per device.
DiviMotion also supports device-specific controls, and custom CSS or GSAP can use media queries or conditions to limit animations on smaller screens.
Wrap Up
Creating an animated website with Divi doesn’t mean animating everything. Start with a clean layout and use motion only where it improves clarity or interaction.
You can use DiviFlash to add extra modules and layouts before applying animations, giving you more flexibility in design.
Keep animations purposeful, test across devices, and optimize before launch. A few well-placed effects work better than overusing motion.


0 Comments