

To add GSAP animation in Divi, you can follow several approach like:
- Use a GSAP-powered plugin like DiviMotion.
- Manually using the CDN option in GSAP’s Install Helper.
DiviMotion lets you create GSAP animations visually inside the Divi Builder. On the other hand, the manual method requires you to add GSAP library, write custom code, and more.
In this guide, we will show you how to add GSAP animation to a Divi website using both methods step by step.
Let's start with the easiest method.
Method 1: Add GSAP Animation to Divi Using a Plugin
One of the easiest ways to use GSAP in Divi is using DiviMotion. With this, you can start with a free pre-made demo or build your animation from scratch.
To use a demo, get DiviMotion, visit its demo page, download and import a demo to your site. For more creative control, you can create your own animation by choosing the trigger, target, effects, timing, and sequence.
Here is how to build one from scratch:
Step 1: Install DiviMotion
- First, purchase and download the DiviMotion plugin.
- Then, install and activate it like any other premium WordPress plugin.
- After activation, go to: DiviMotion dashboard > Integrations, Modules and Extensions
- Enable the features and extensions you plan to use.
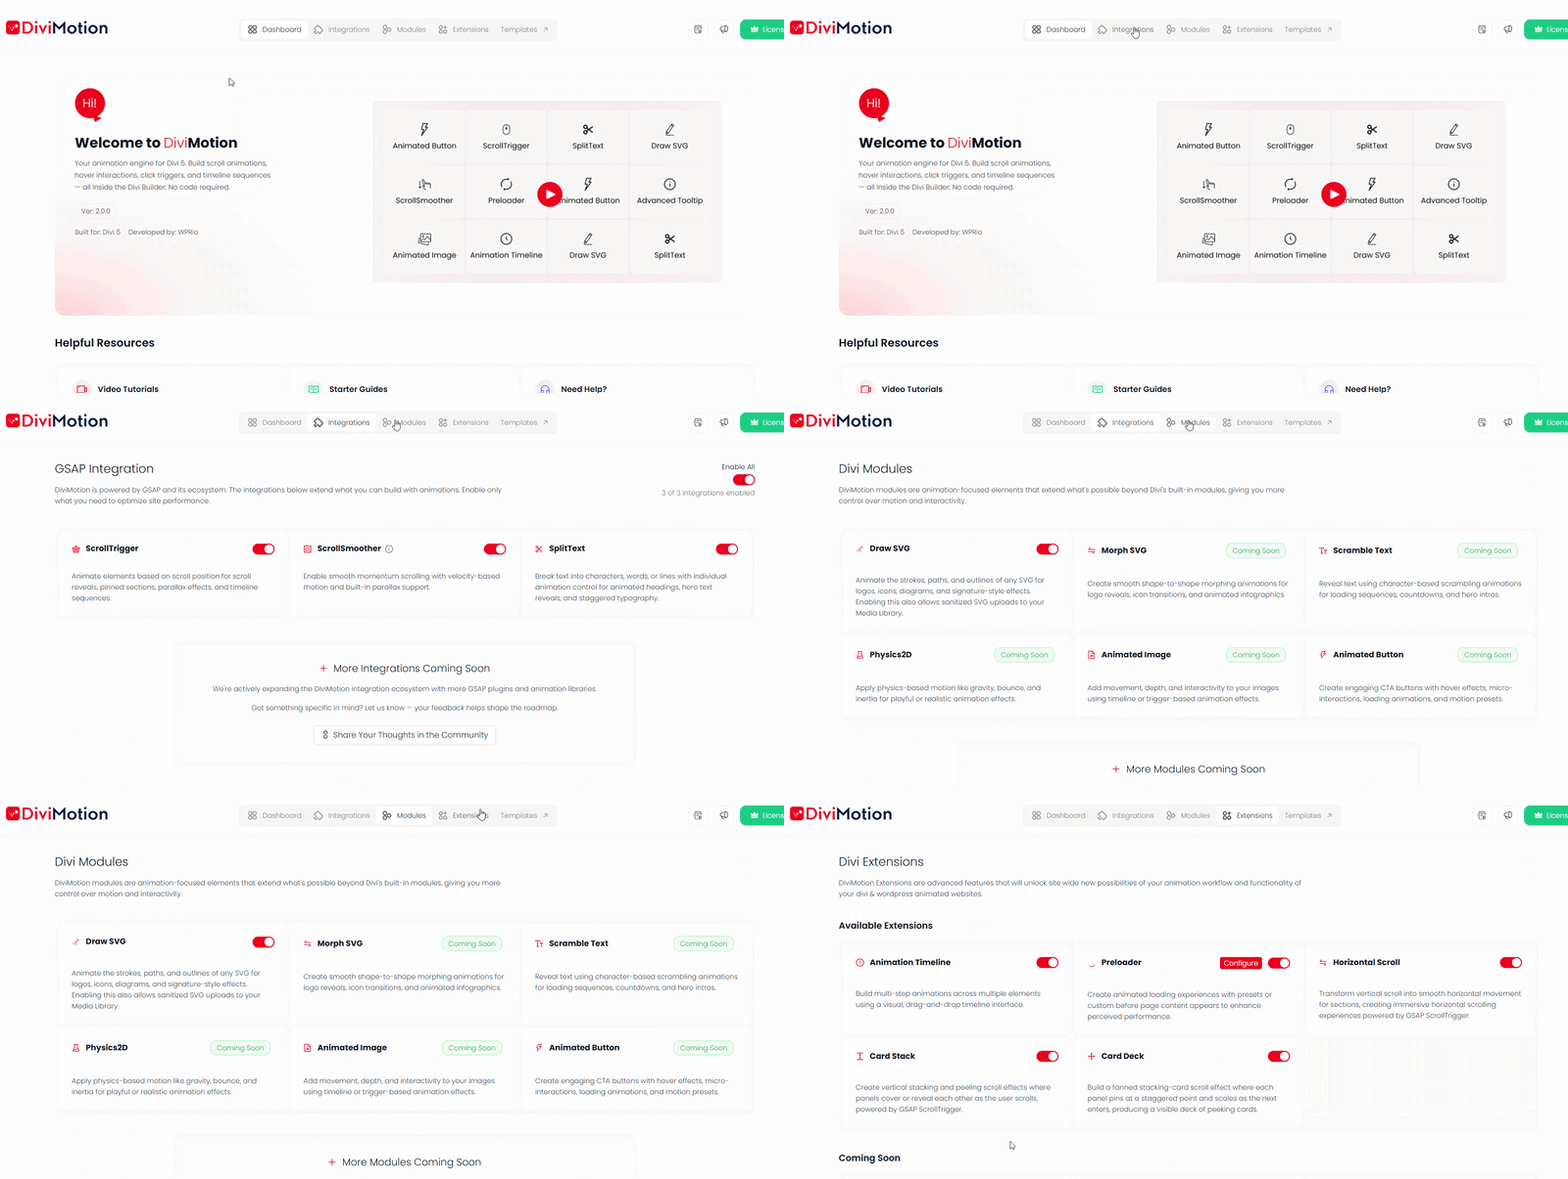
Note: DiviMotion is only made for Divi 5 and it doesn’t work with Divi 4.
Step 2: Set Up Your Divi Layout
Open your page using the Divi Visual Builder and prepare the elements you want to animate. For this example, follow these steps:
- Add a new section with a single row.
- Configure the row to have five columns.
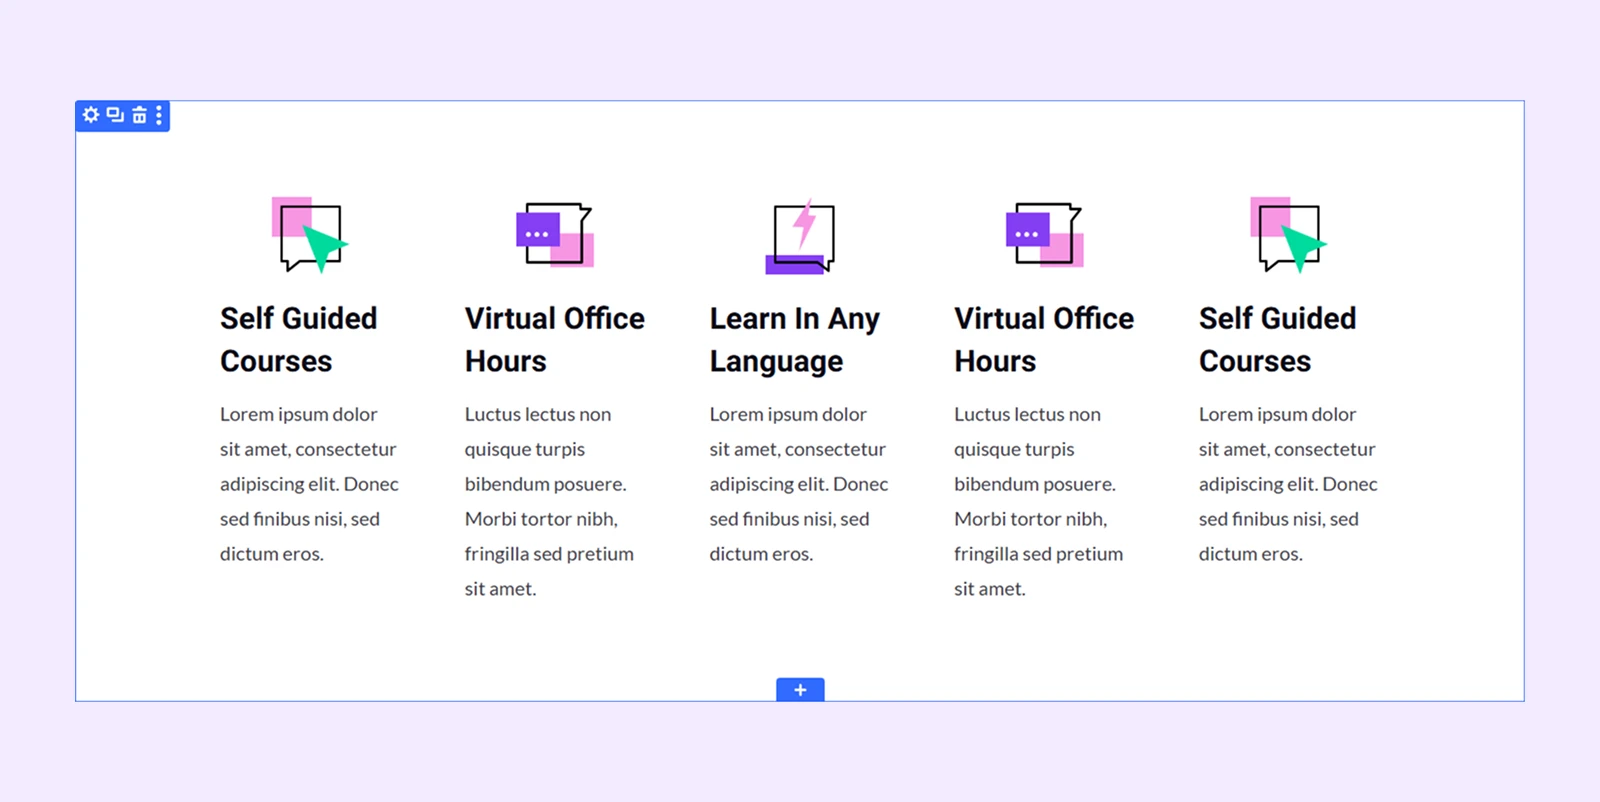
- Insert a Blurb module into each column and add the necessary content. Something like:
- To keep things organized, rename the section to Feature Section and the row to Feature Row. Here is how to do it:
- Open the section/row settings.
- Go to Content tab > Meta.
- Enter names in the Element Label field.
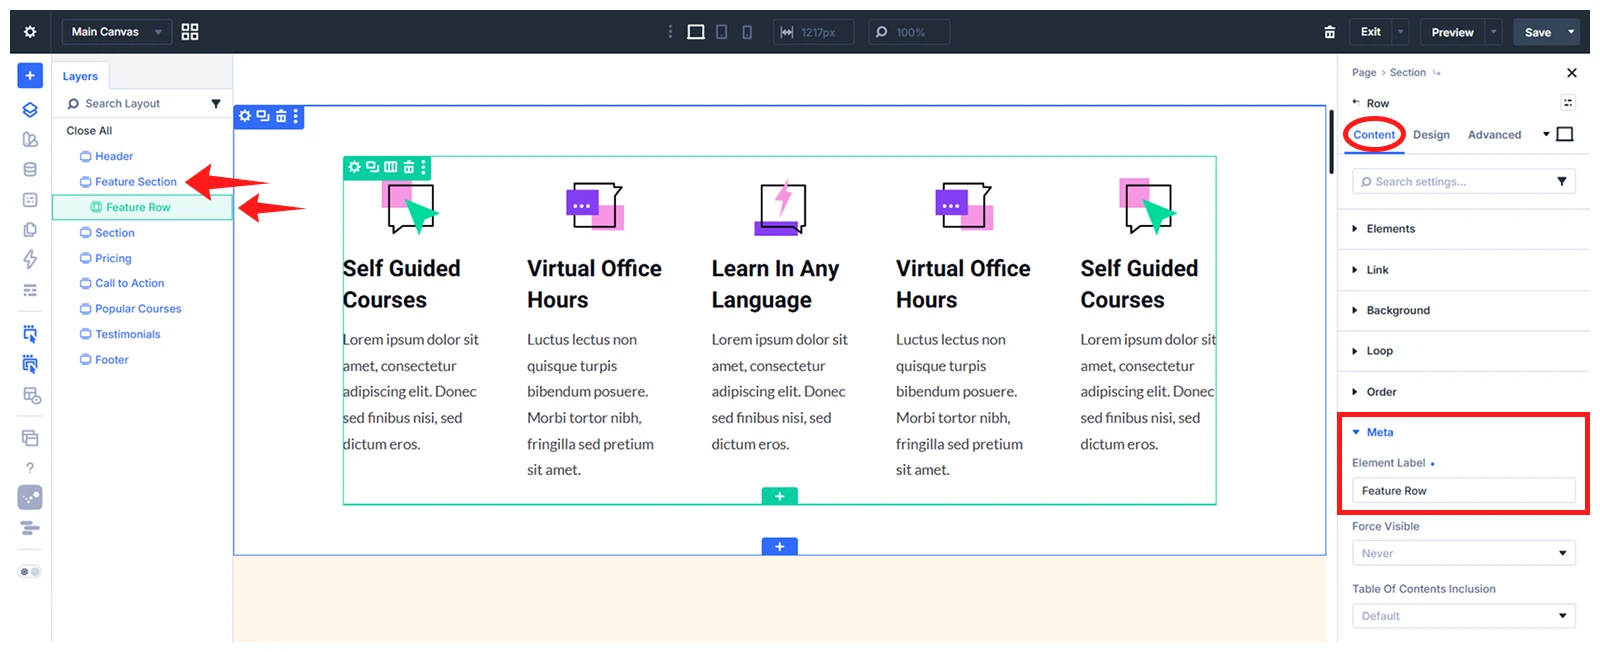
This makes the section and row easier to identify later when choosing the scroll trigger and animation targets.
Step 3: Select the Animation Trigger
In DiviMotion, an interaction determines when the animation starts. Currently, you can choose from four main interaction types:
- On Scroll
- On Hover
- On Click
- On Load
To add one, open the settings of the section, row, or column you want to use as the trigger. Then go to: Design tab > DiviMotion > Add Interaction
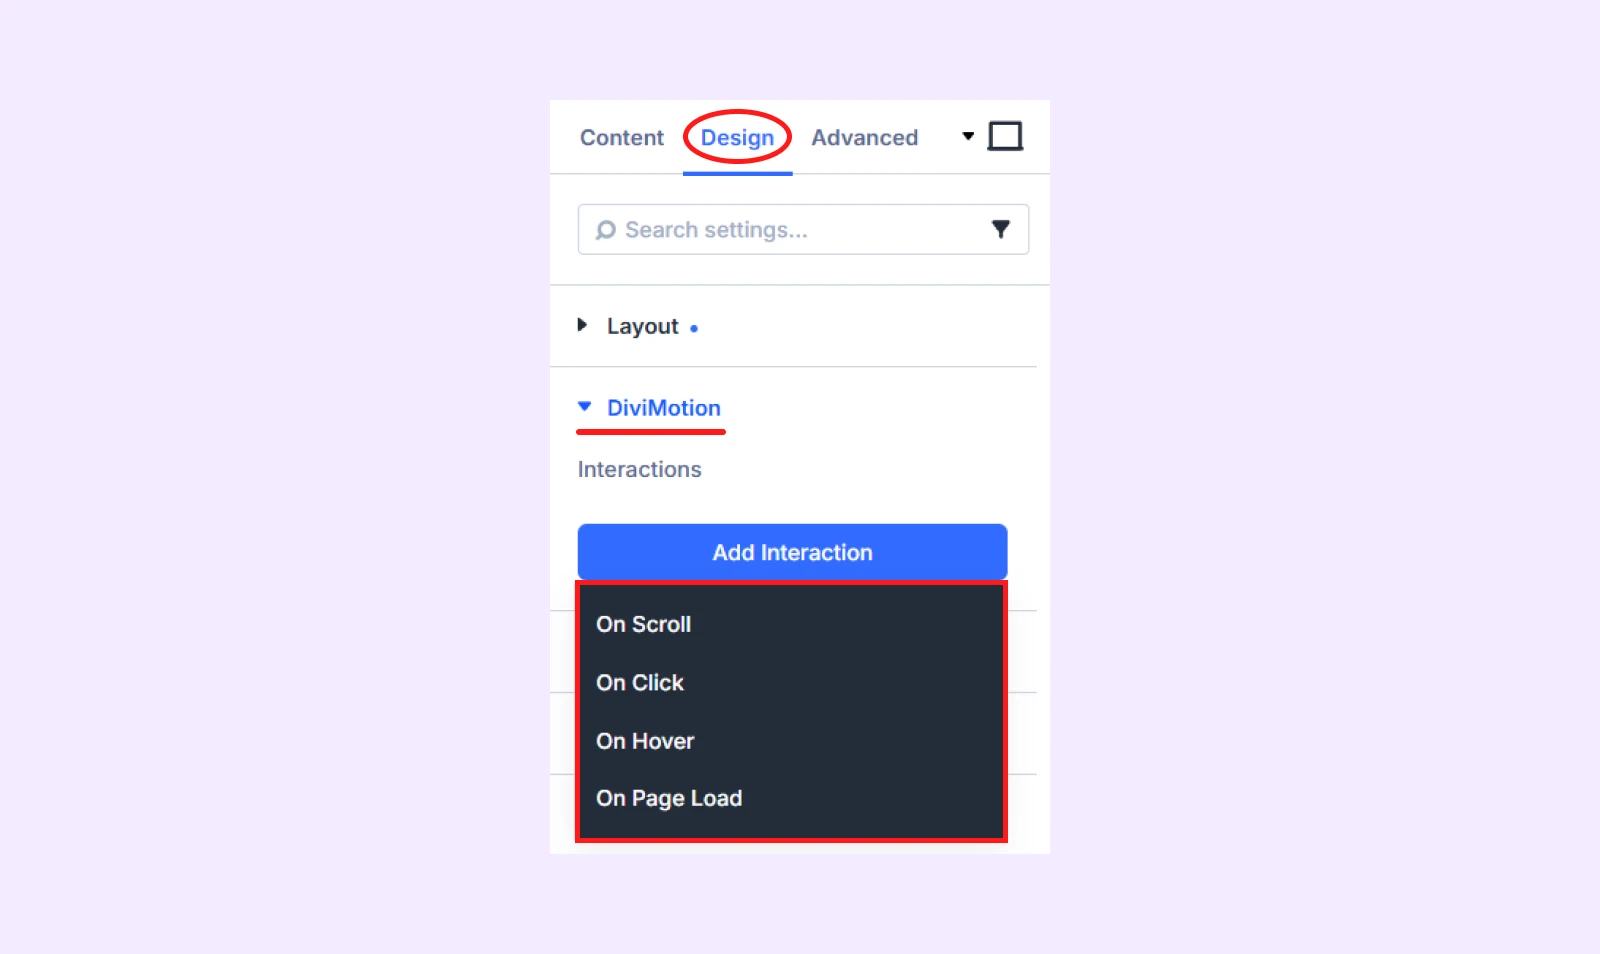
For this example, open the Feature Section settings go to Design tab > DiviMotion > Add Interaction and select On Scroll. The section will trigger the animation when visitors reach it while scrolling.
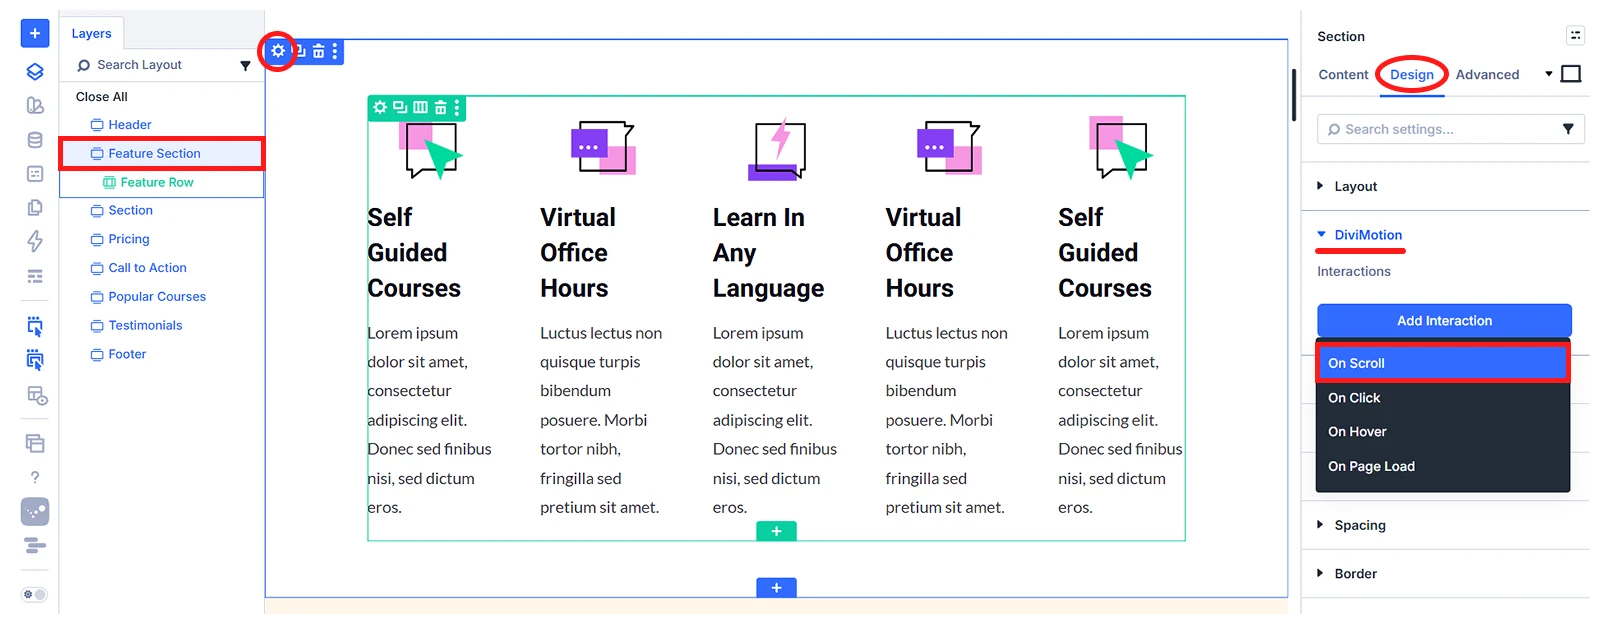
Note: You can add DiviMotion interactions to any section, row, column, or module for flexible animation control.
Step 4: Configure Your Selected Trigger Type
After selecting an interaction, its settings appear, where you can configure the behavior and timing of your selected trigger.
We selected On Scroll and used the following settings:
- Start Position: Element Top, Viewport 60%
- End Position: Element Bottom, Viewport Bottom
- Scrub on Scroll: Enabled
- Smooth: 1 second
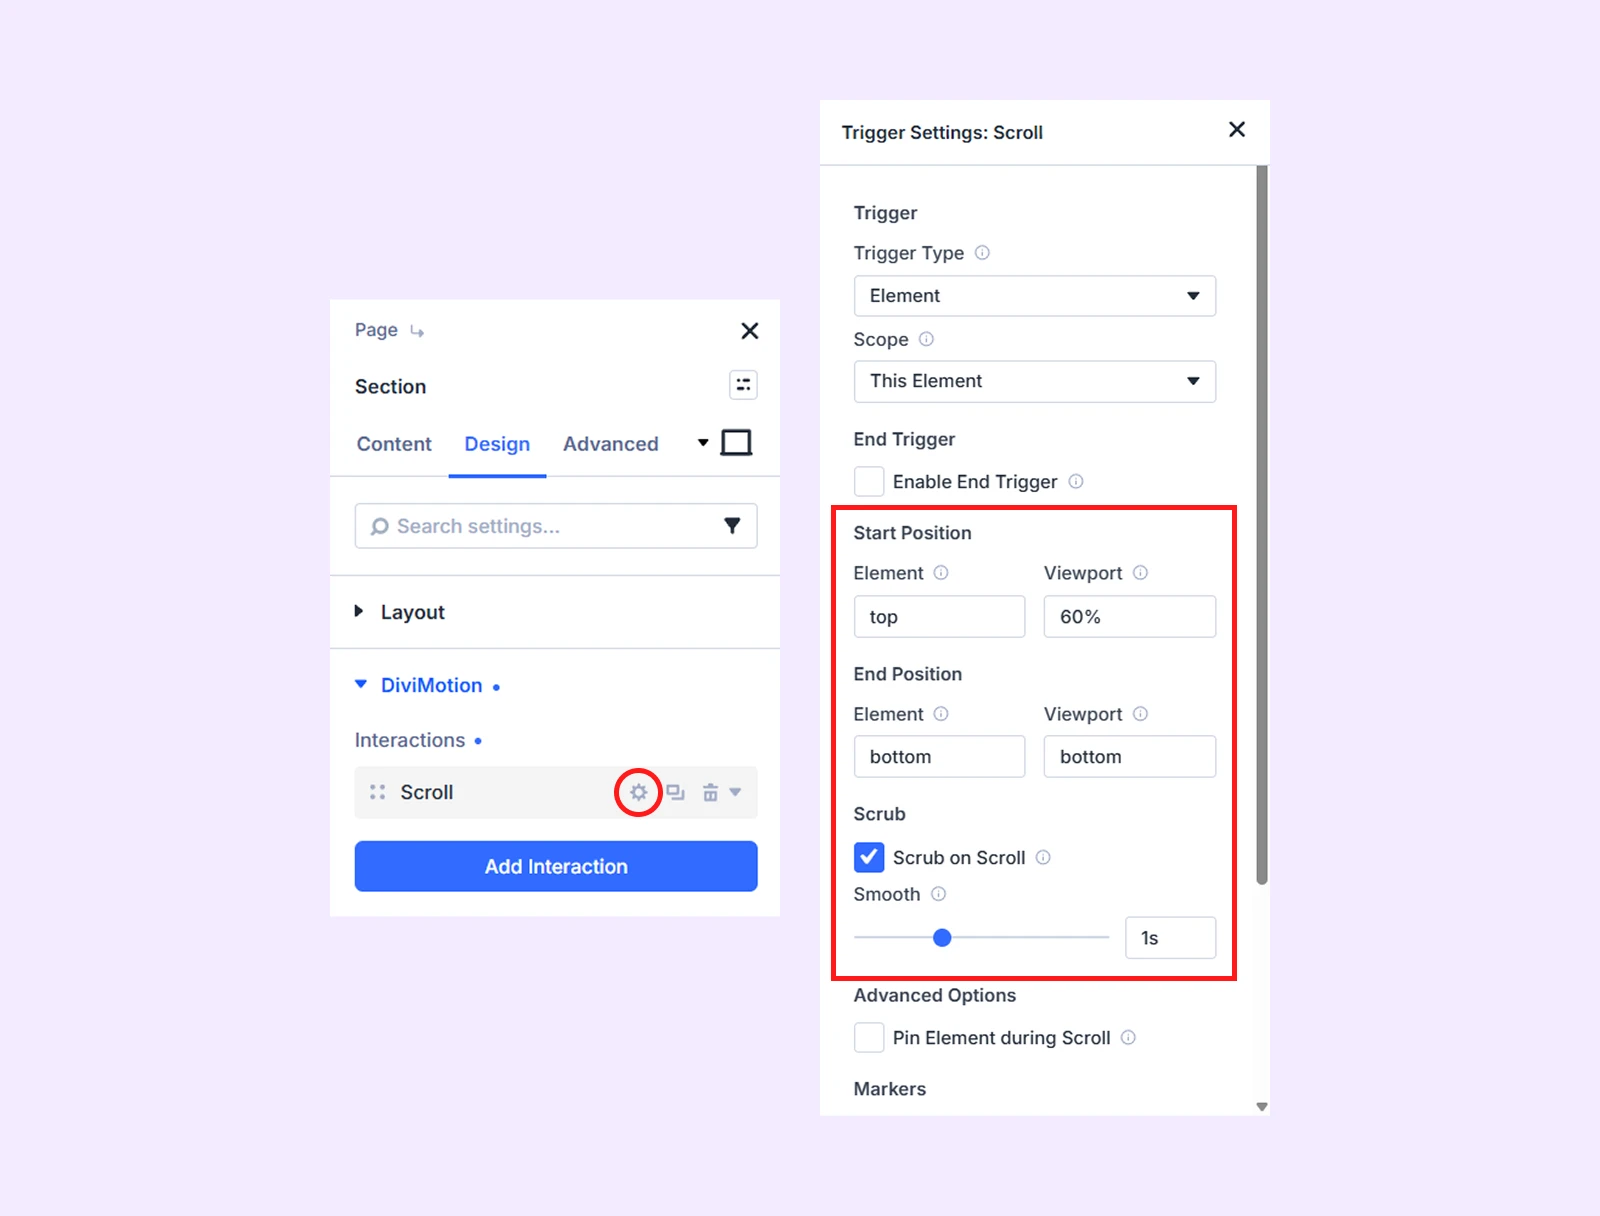
With this setup, the animation begins when the top of the Feature Section reaches 60% of the viewport. It then progresses with the visitor’s scrolling until the bottom of the section reaches the bottom of the viewport.
Step 5: Add an Animation Action
The interaction determines when the animation begins, while the action defines what happens. You can add a single action to an interaction or combine multiple actions to create a complete sequence.
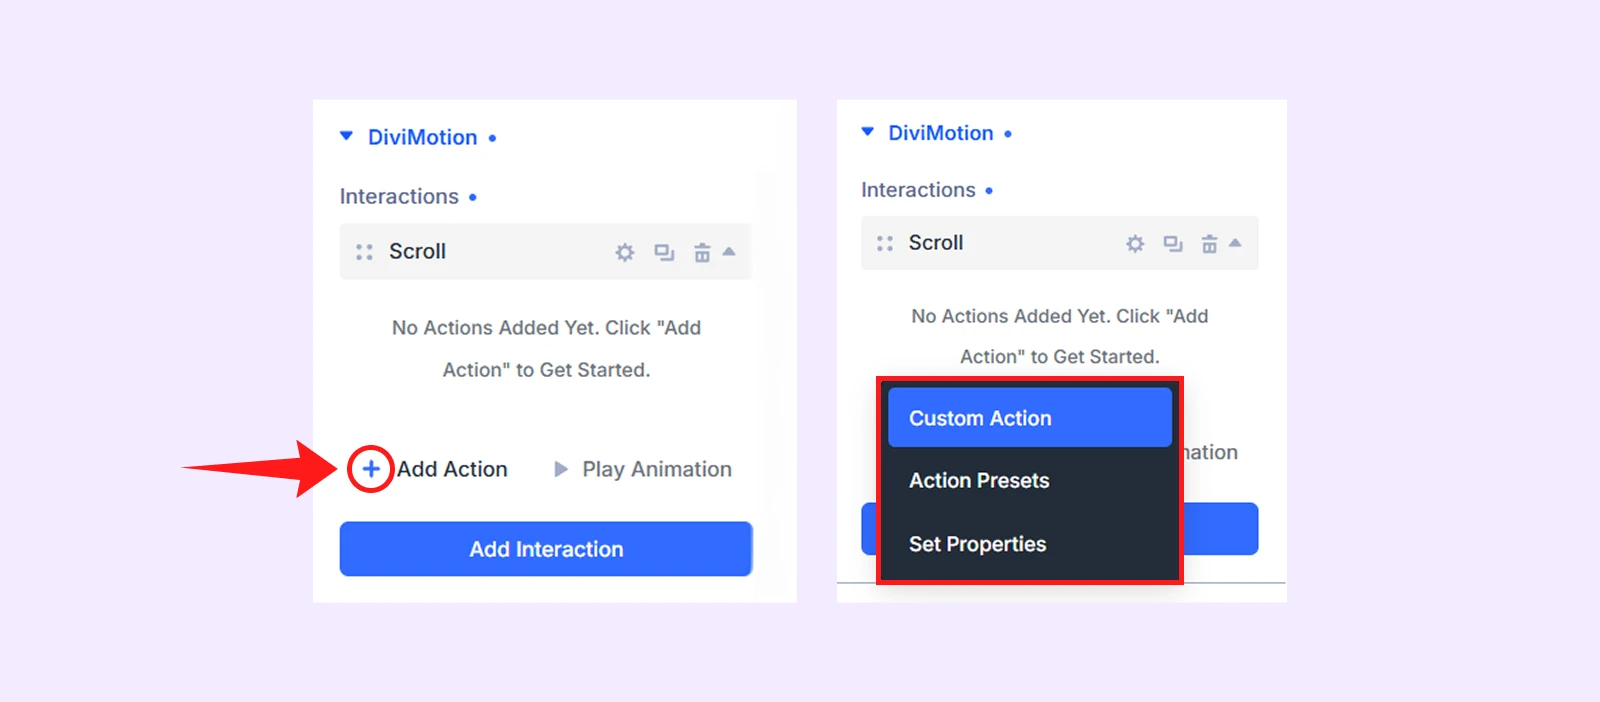
Click + Add Action inside the interaction card. You will find three action types:
- Custom Action: Create an animation with your own properties and timing.
- Action Presets: Apply a ready-made animation.
- Set Properties: Change an element’s state instantly.
5.1: Create a Custom Action
Choose Custom Action when you need full control over the animation. First, open Action Target and select the element you want to animate. You can target:
- The element you are editing
- A specific element by ID
- An element using a custom CSS selector
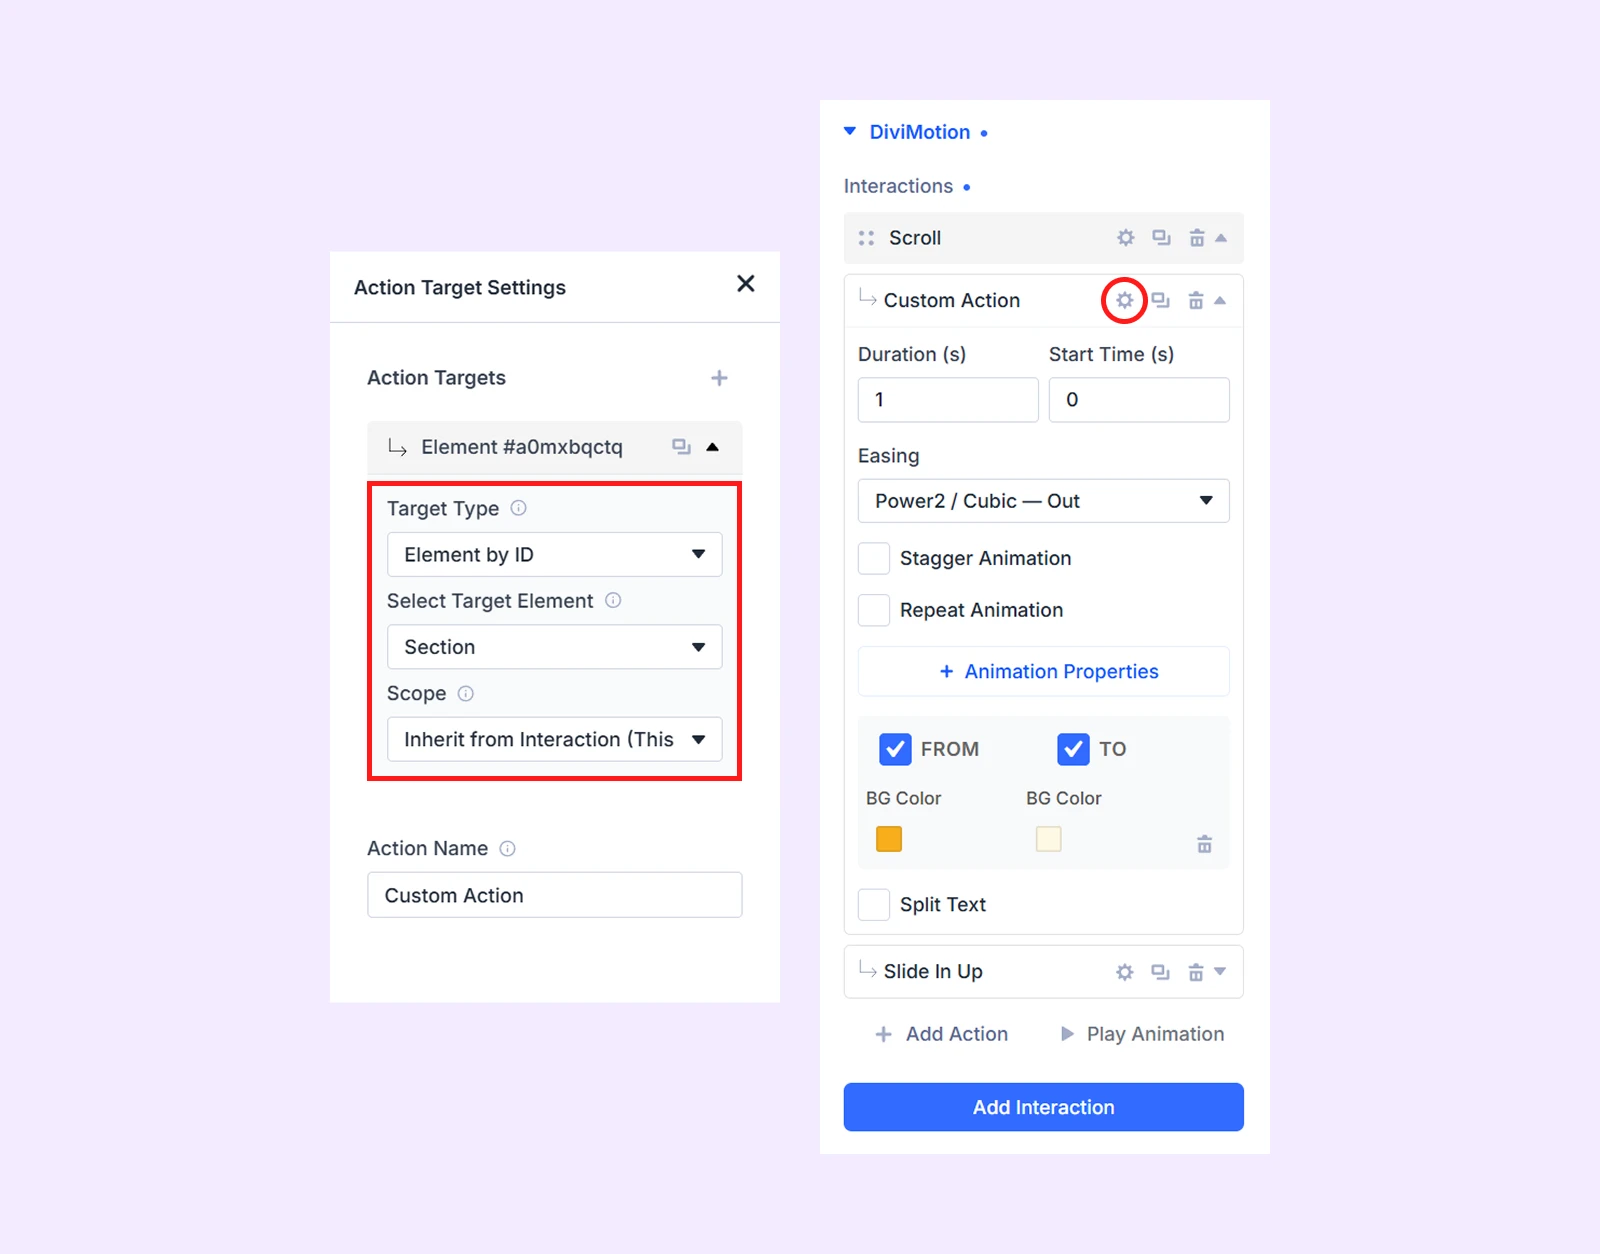
The trigger and animation target can be different. For example, the Section can trigger the interaction while the Row or its Blurb modules are animated.
After selecting the target, you can configure:
- Duration and start time
- Easing
- Stagger
- Repeat
- Animation properties such as movement, opacity, scale, rotation, skew, blur, etc.
- From and To (define where the animation starts and where it ends.)
For this example, select the Feature Section as the target. Then choose BG Color under Animation Properties and set:
- From: #f7ae1c
- To: #fff8e4
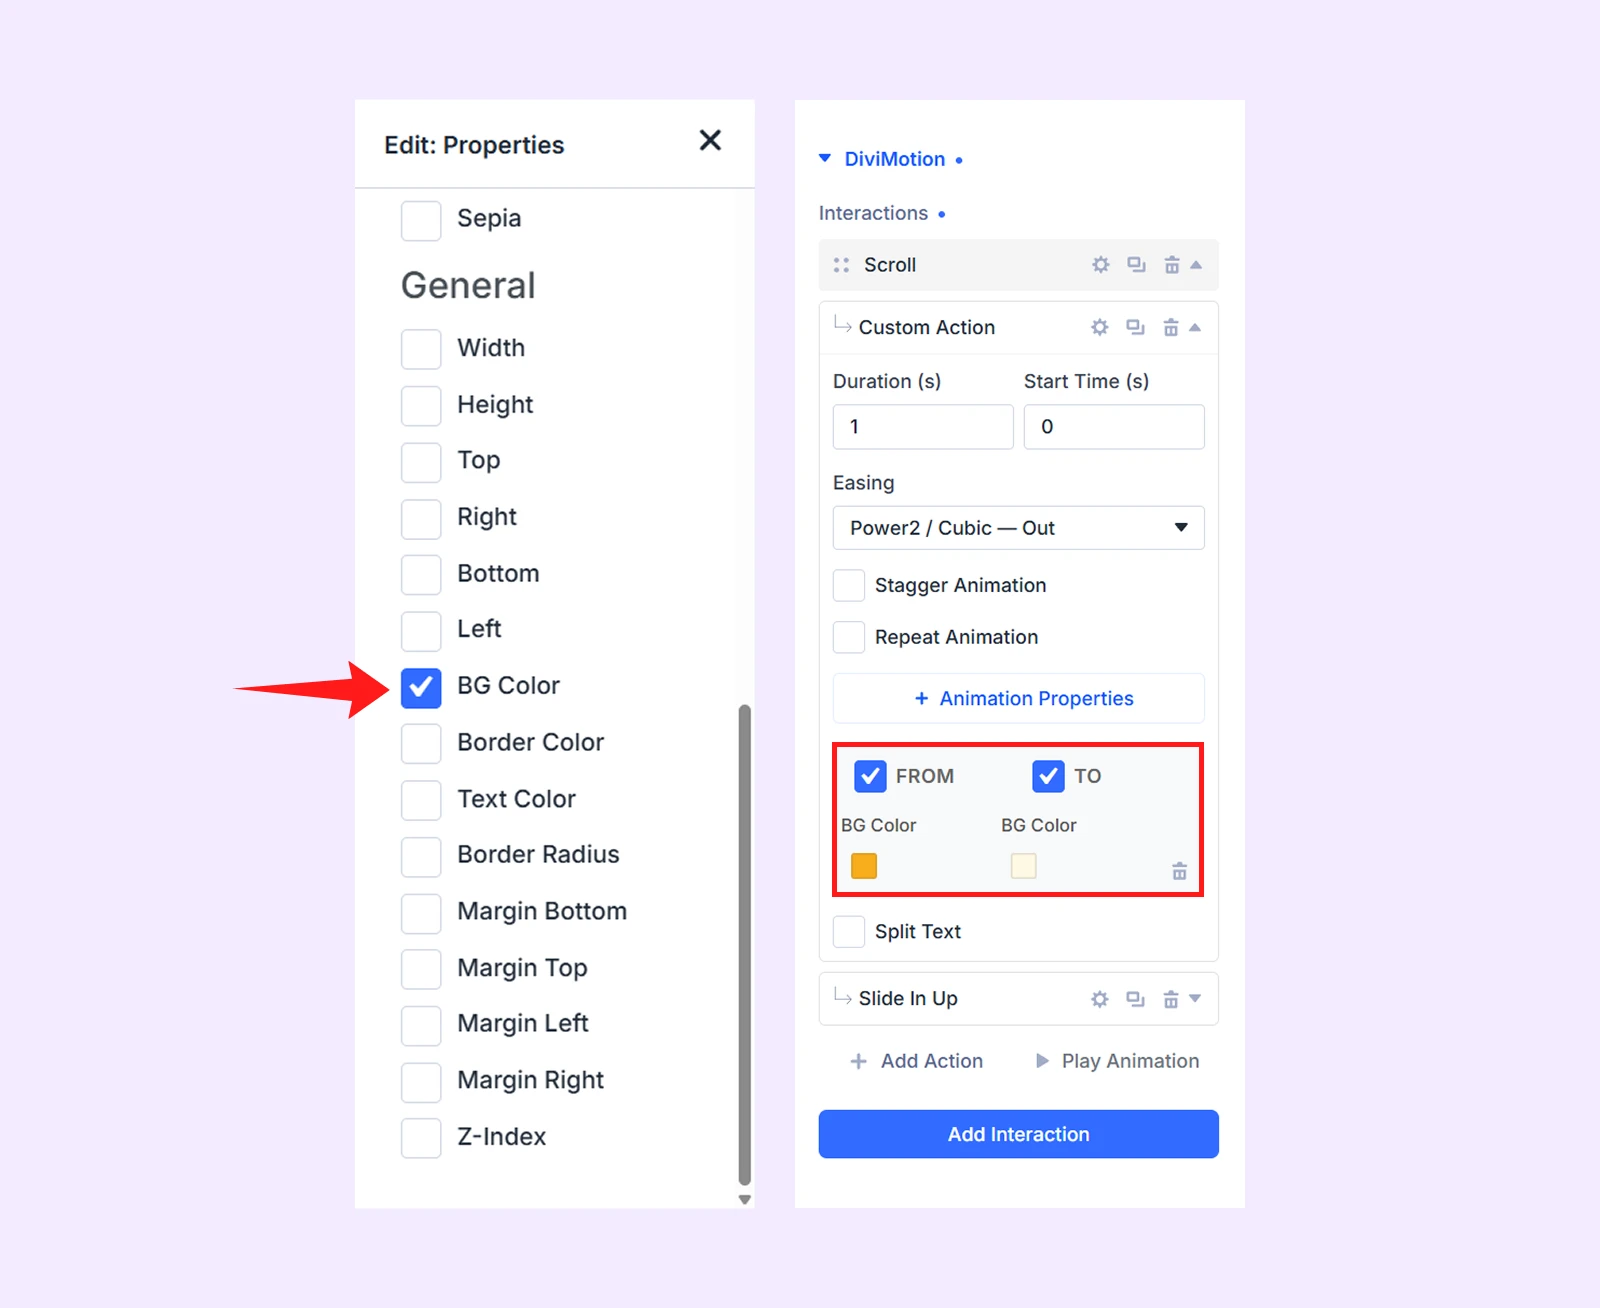
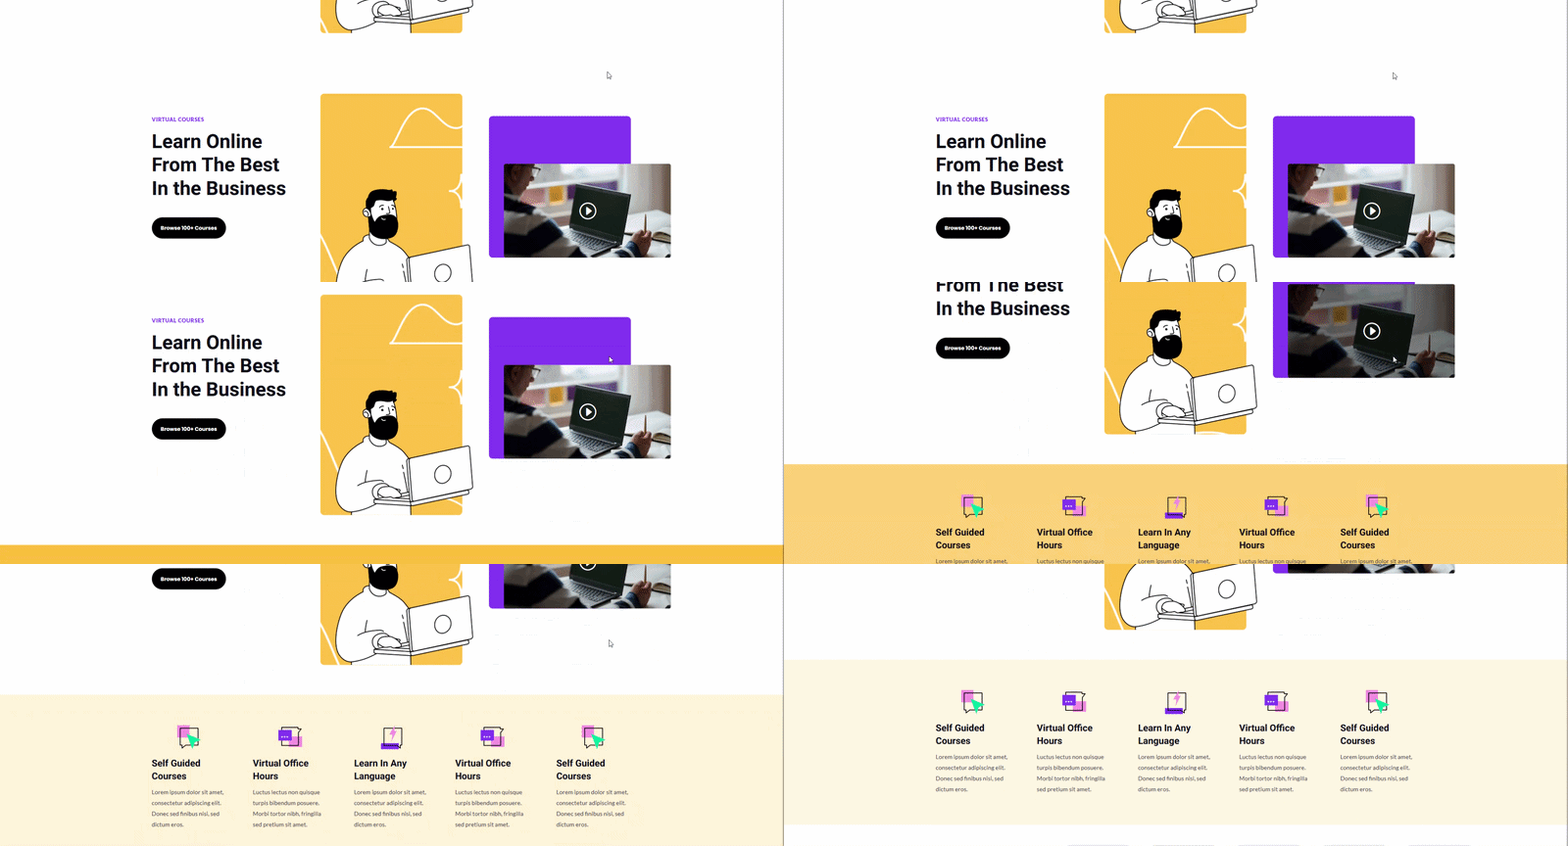
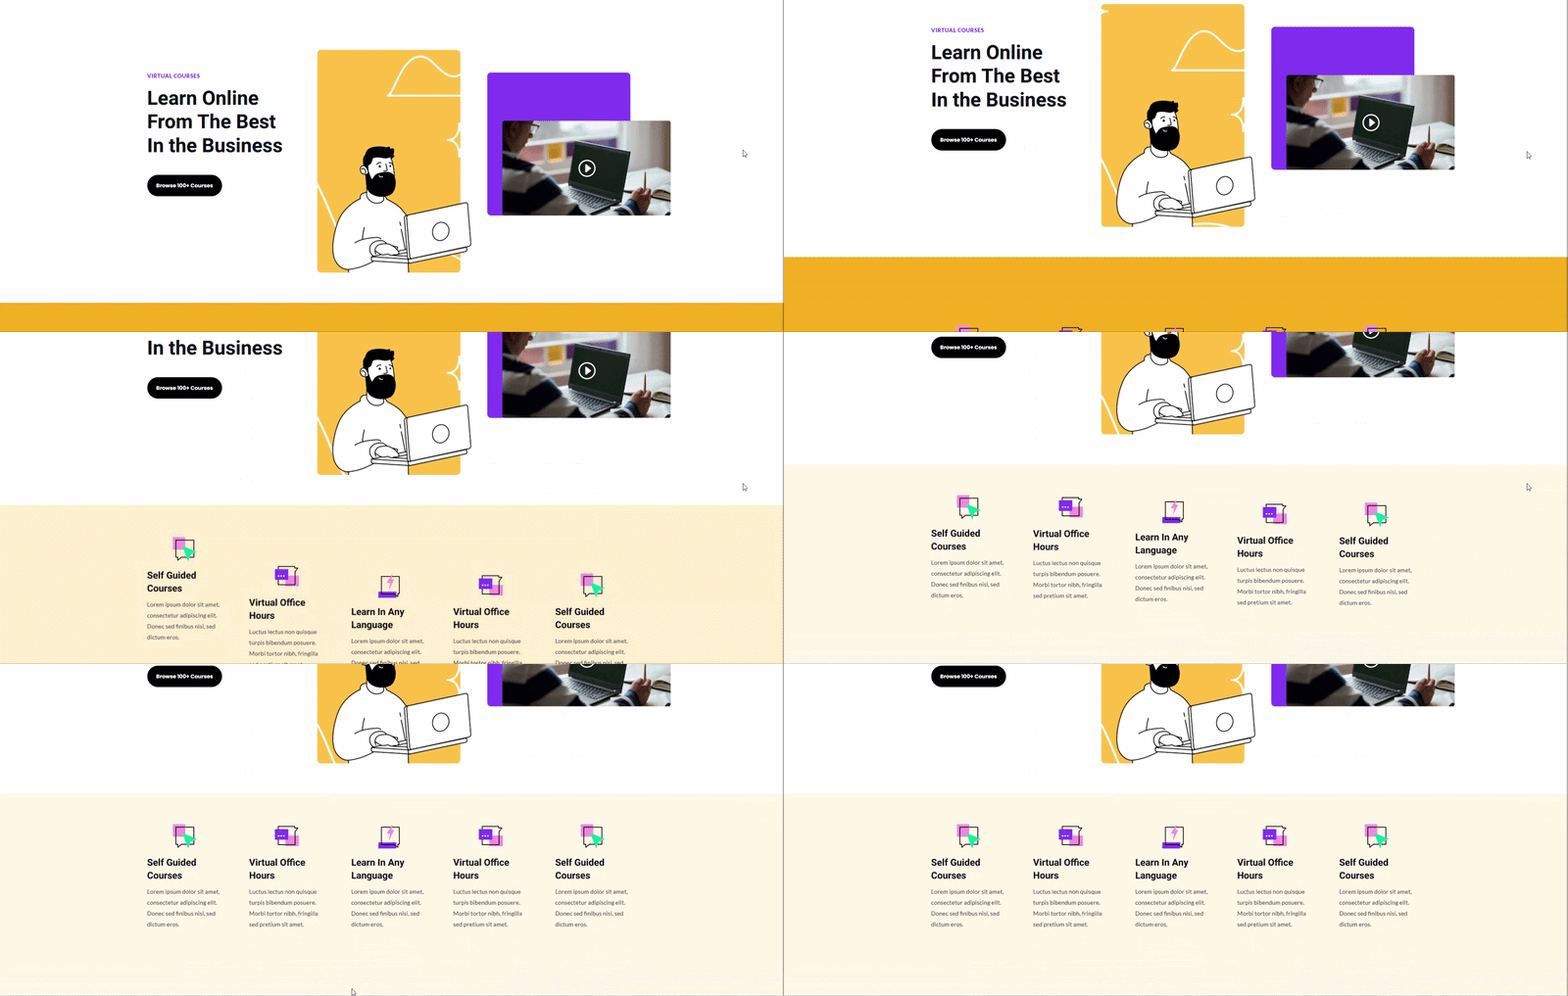
This will gradually change the section background from orange to light cream as visitors scroll. Something like:
5.2: Apply an Action Preset
Choose Action Presets when you want to add an animation quickly without setting every property manually. You can also combine a preset with the Custom Action already added to the same interaction. For example:
- Click + Add Action again and select Action Presets.
- Choose Slide In Up.
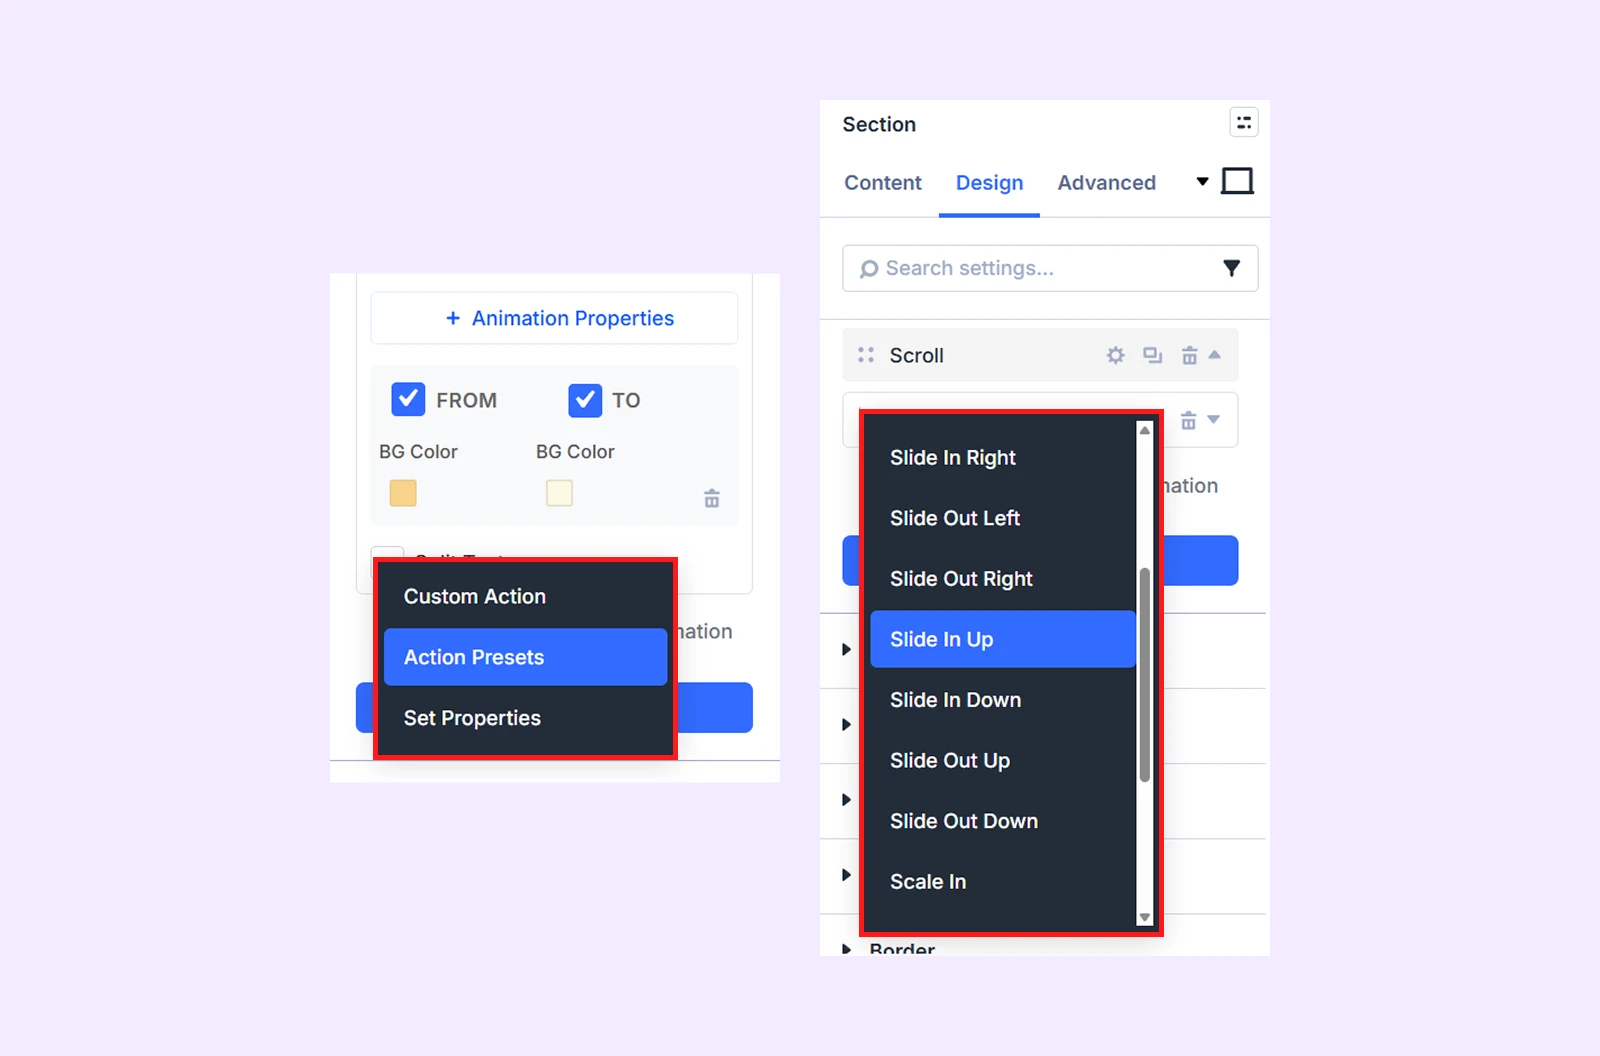
- Set the Feature Row as the target and Children as the scope.
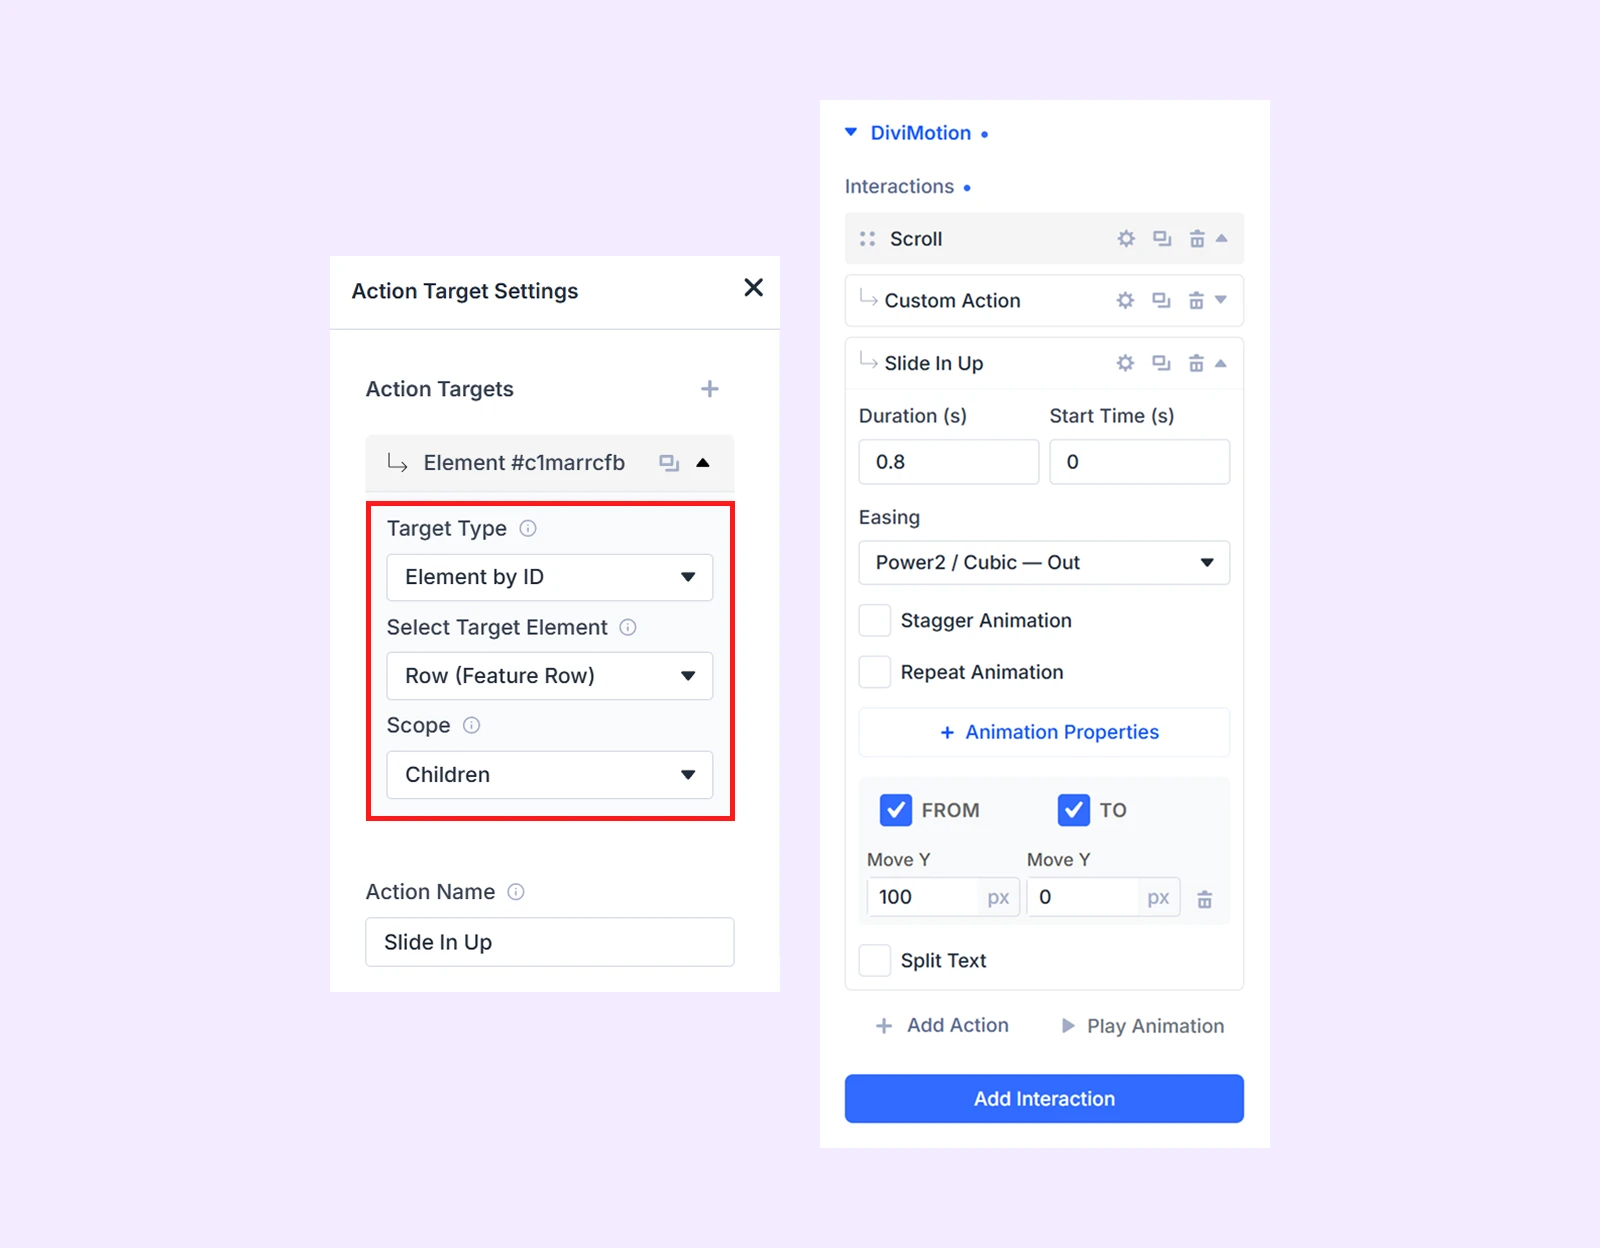
- Enable Stagger Animation.
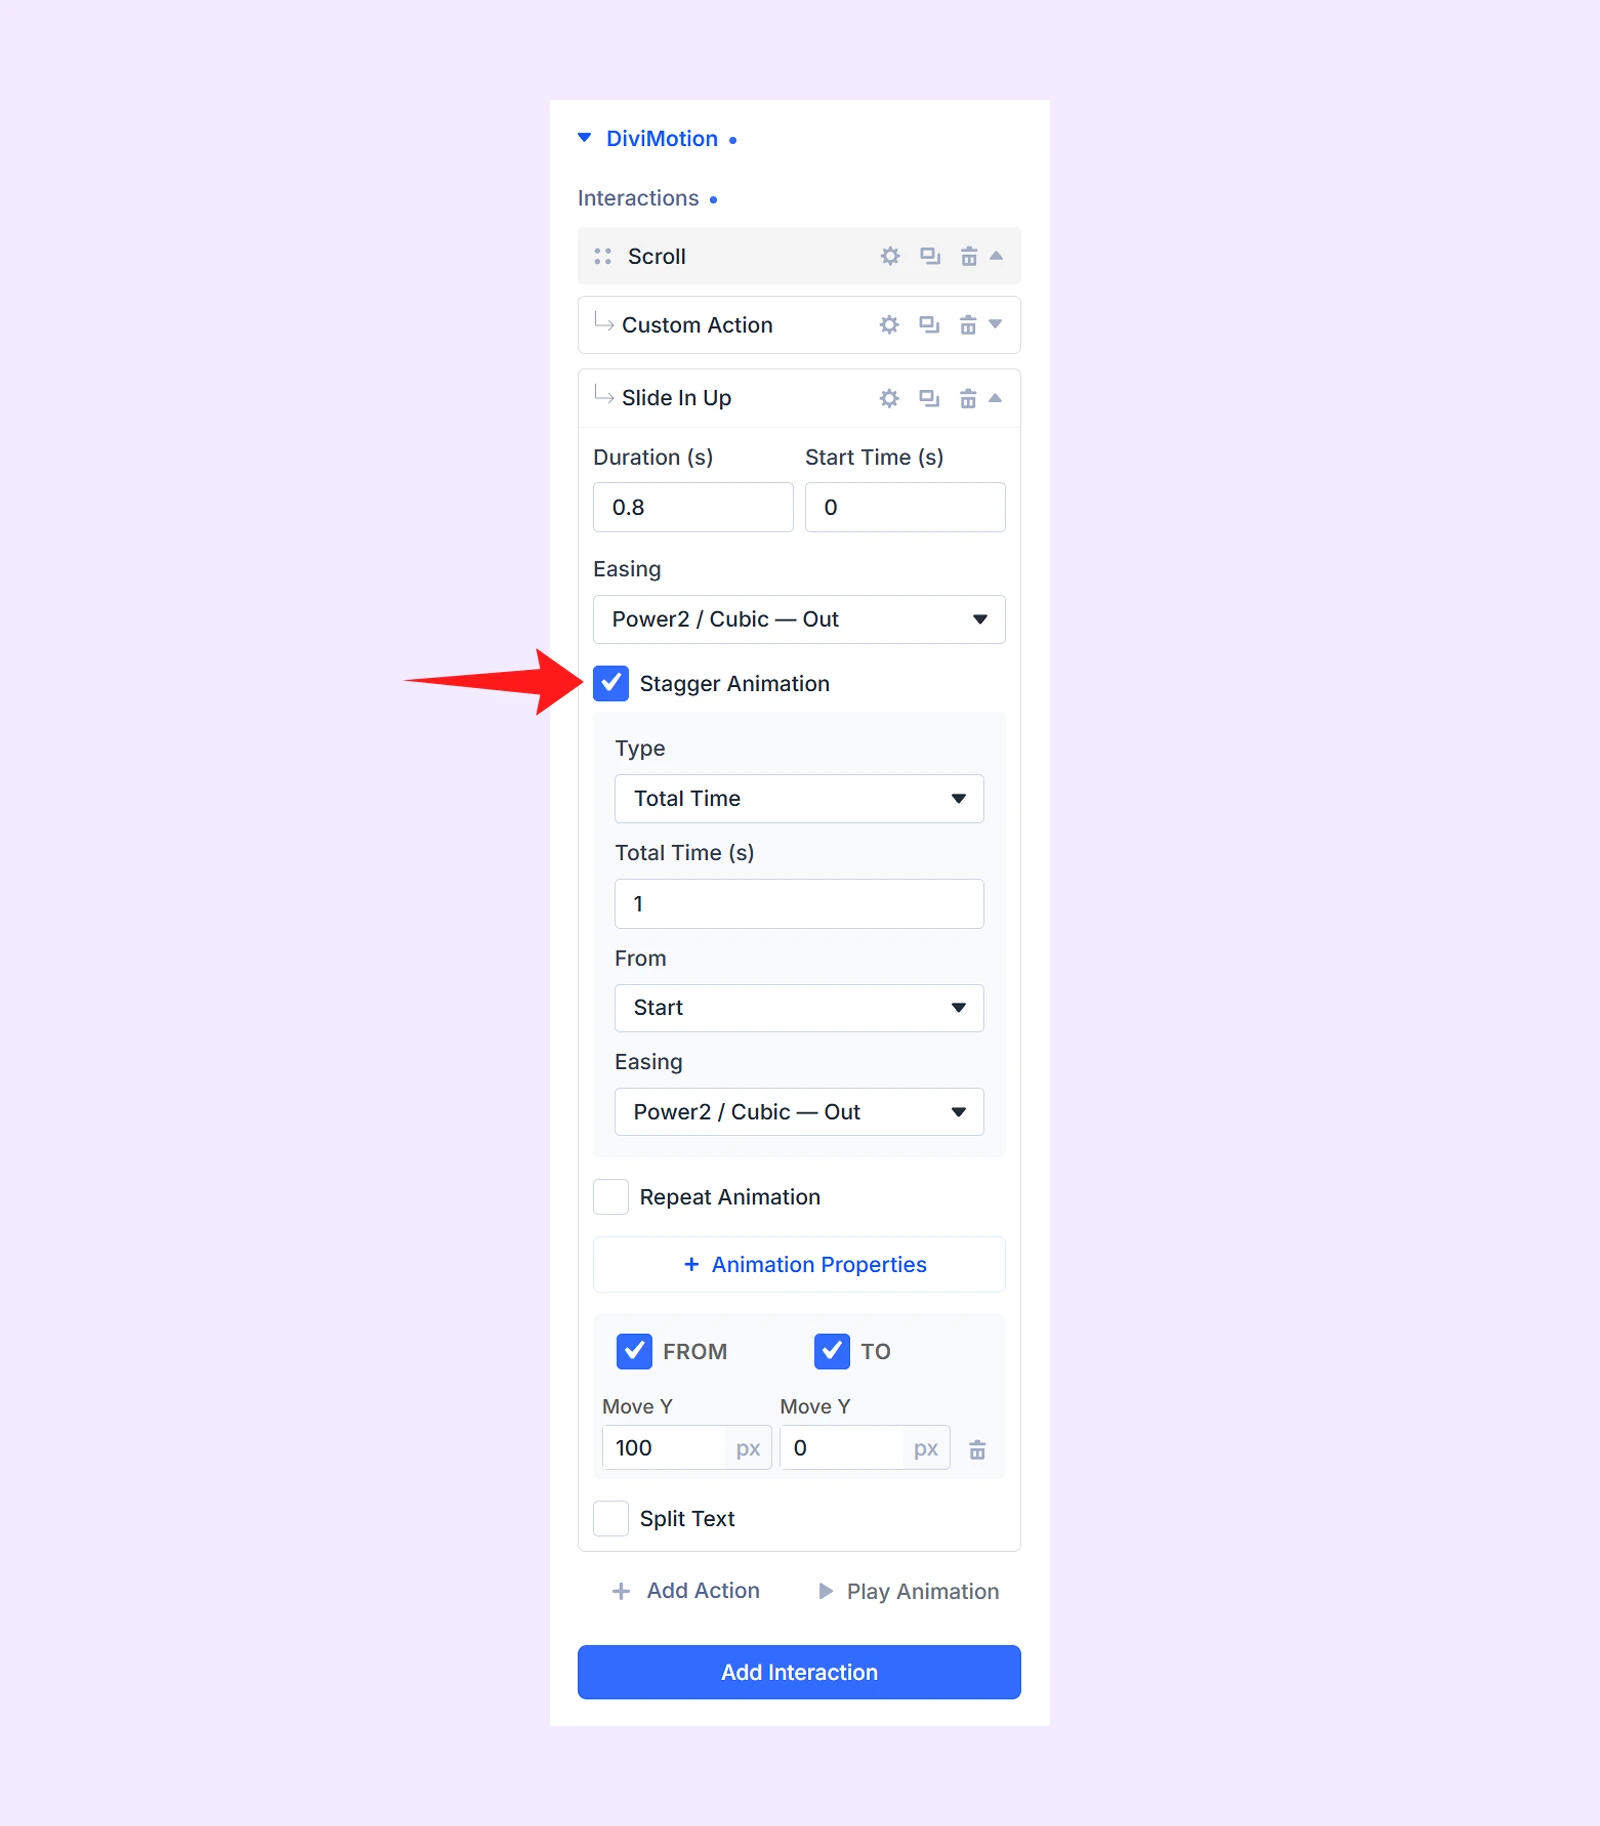
This will make the Blurb modules slide upward one after another while the section background changes color. Something like:
5.3: Use Set Properties
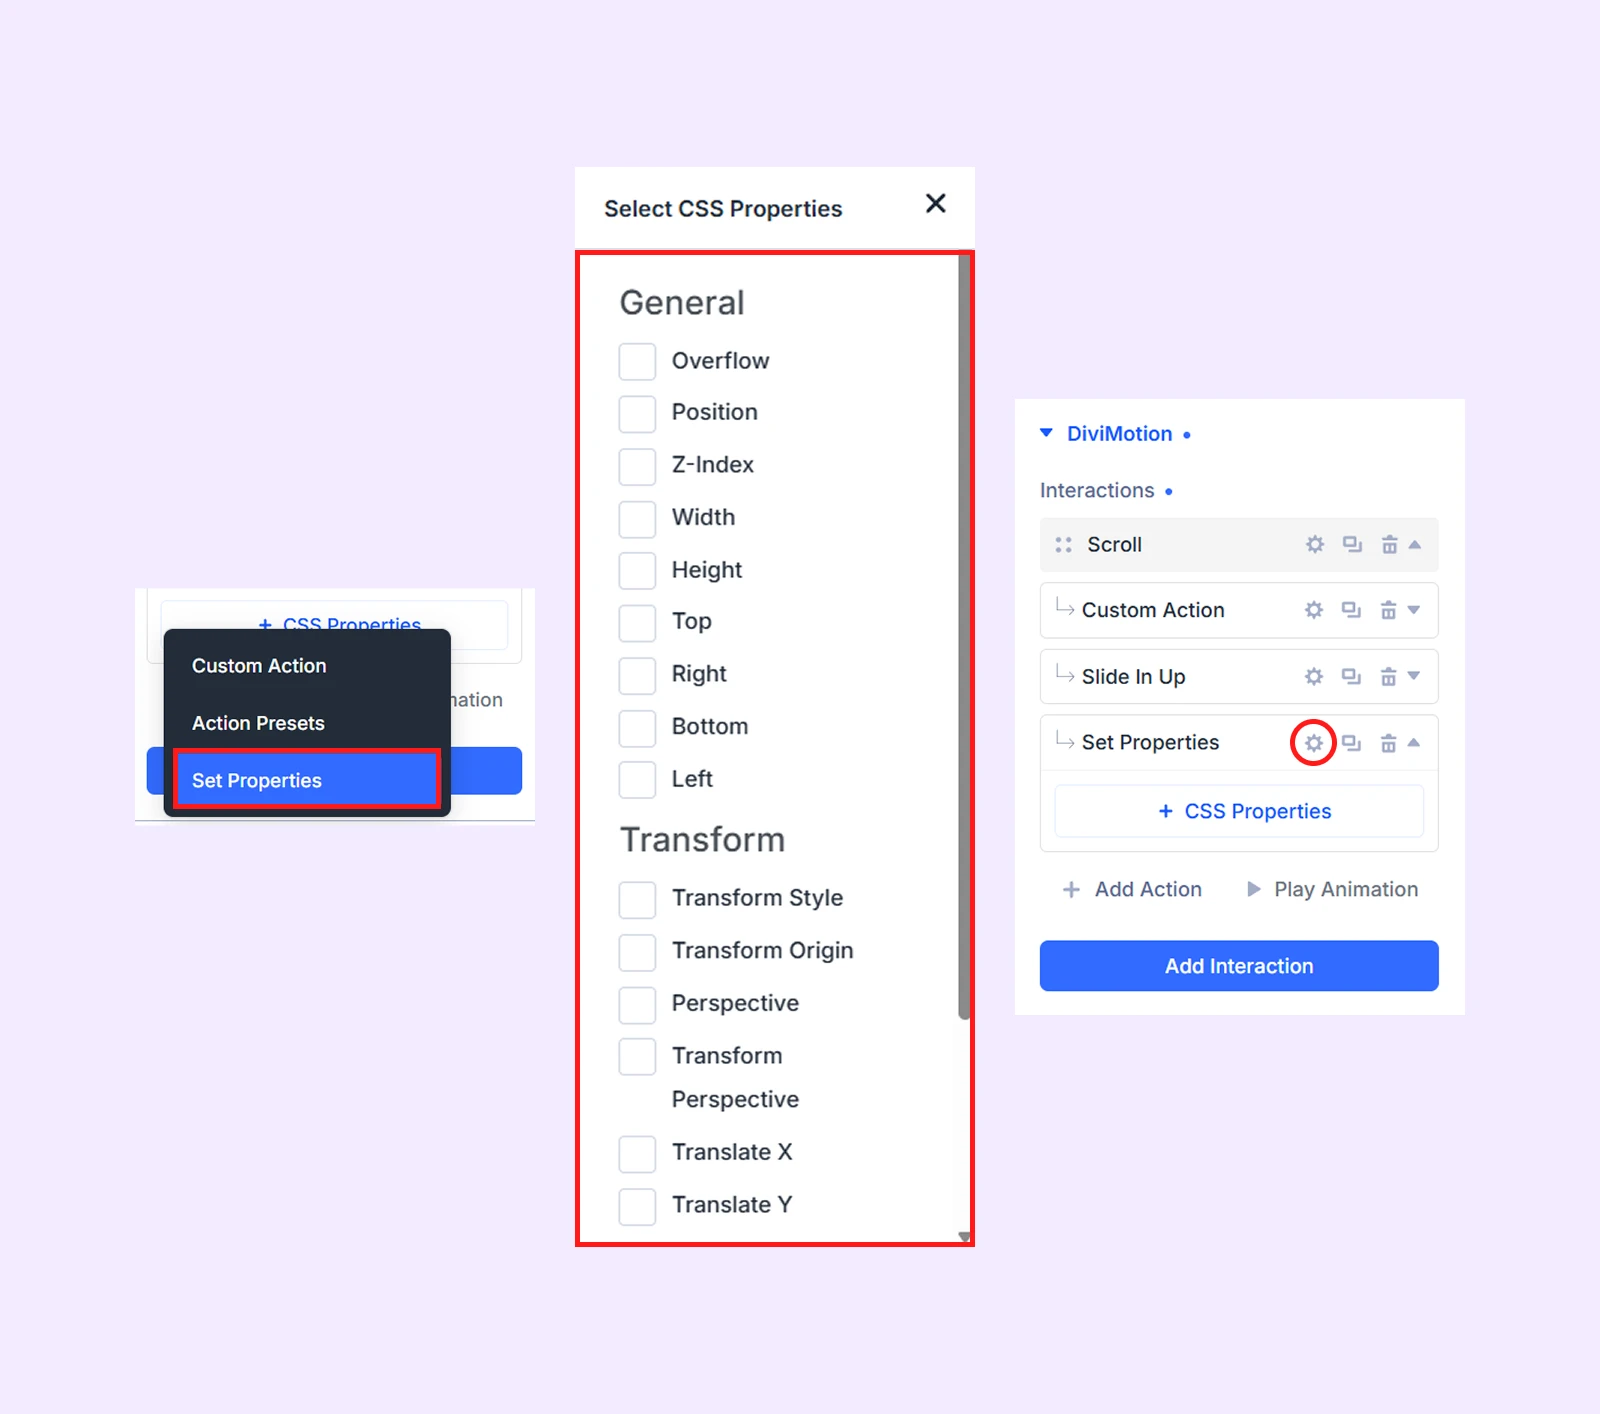
Choose Set Properties when you want to apply a value instantly without an animated transition. You can use it to:
- Set an element’s starting position
- Change its opacity or size
- Control overflow or layout
- Add or remove a CSS class
- Prepare an element for another action
Set Properties applies the selected values instantly when the action is reached. And it does not use duration or easing.
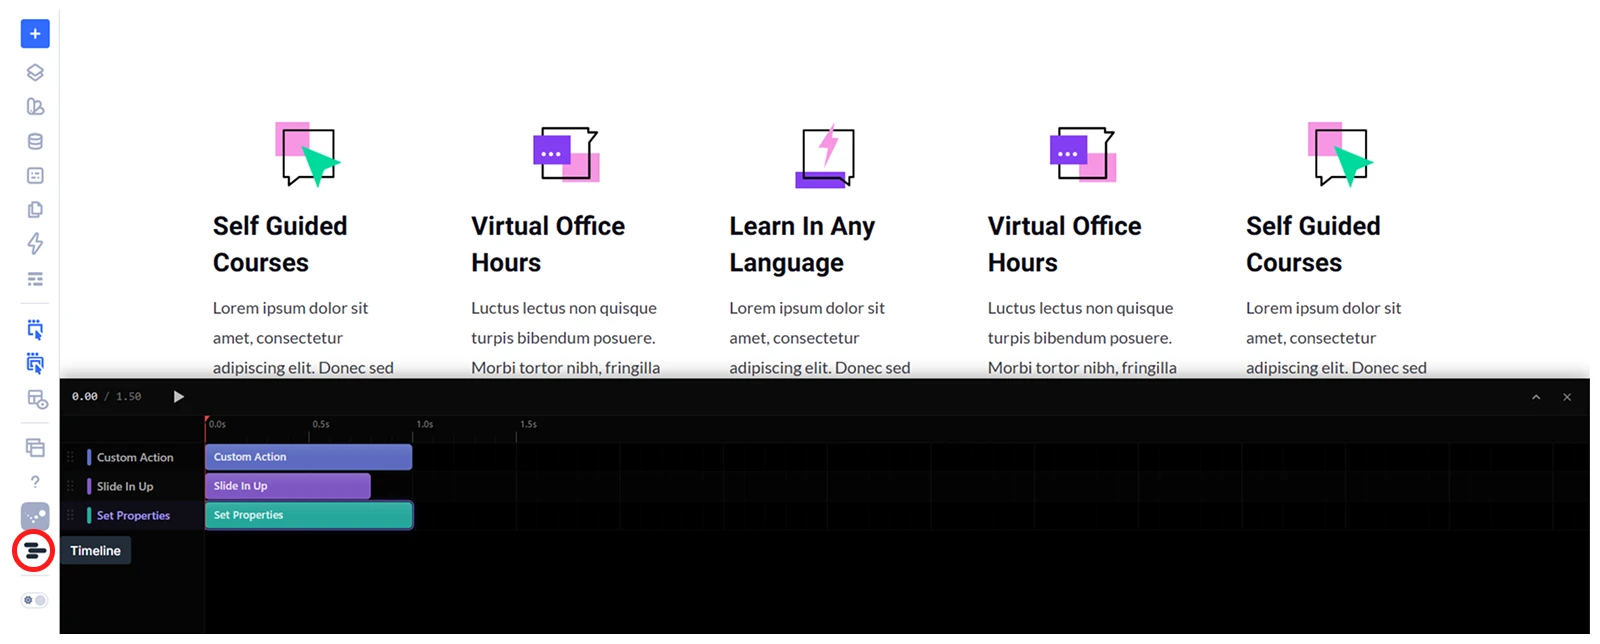
5.4: Arrange the Actions on the Timeline
Use the timeline to control how multiple actions work together. You can adjust their start time, duration, and order to make them play together, overlap, or run one after another.
To access it, click the Timeline icon in the left sidebar. Each action appears as a separate bar that you can move or resize to control when it starts, how long it runs, and how it works with the other actions.
Step 6: Save and Preview the Animation
Once everything is ready, save the interaction and update the page. Preview the effect inside the Visual Builder, then exit the builder and test it on the live page.
We used a simple background color transition and staggered Blurb animation to demonstrate how DiviMotion works.
For an even faster way to build advanced scroll effects, you can also use DiviMotion extensions such as:
- Horizontal Scroll: Moves content sideways as visitors scroll vertically.
- Card Deck: Reveals cards one after another with a layered effect.
- Card Stack: Stacks and reveals cards as visitors scroll through the section.
DiviMotion is ideal when you want to create GSAP animations visually without loading scripts or writing custom code. However, you can also add GSAP manually using a CDN, which we will cover in the next method.
Method 2: Add GSAP Animation to Divi Manually with CDN
You can also add GSAP to Divi manually using the CDN option in GSAP’s Install Helper. This method gives you complete control, but you will need to load the required scripts and write the animation code yourself.
Here is how to set it up.
Step 1: Get the GSAP Installation Code
First, open the official GSAP installation page and find the Install Helper. Then:
- Select CDN as the installation method.
- Select any GSAP plugin you want. For example we selected ScrollTrigger.
- Copy the generated script tags for GSAP Core and ScrollTrigger.
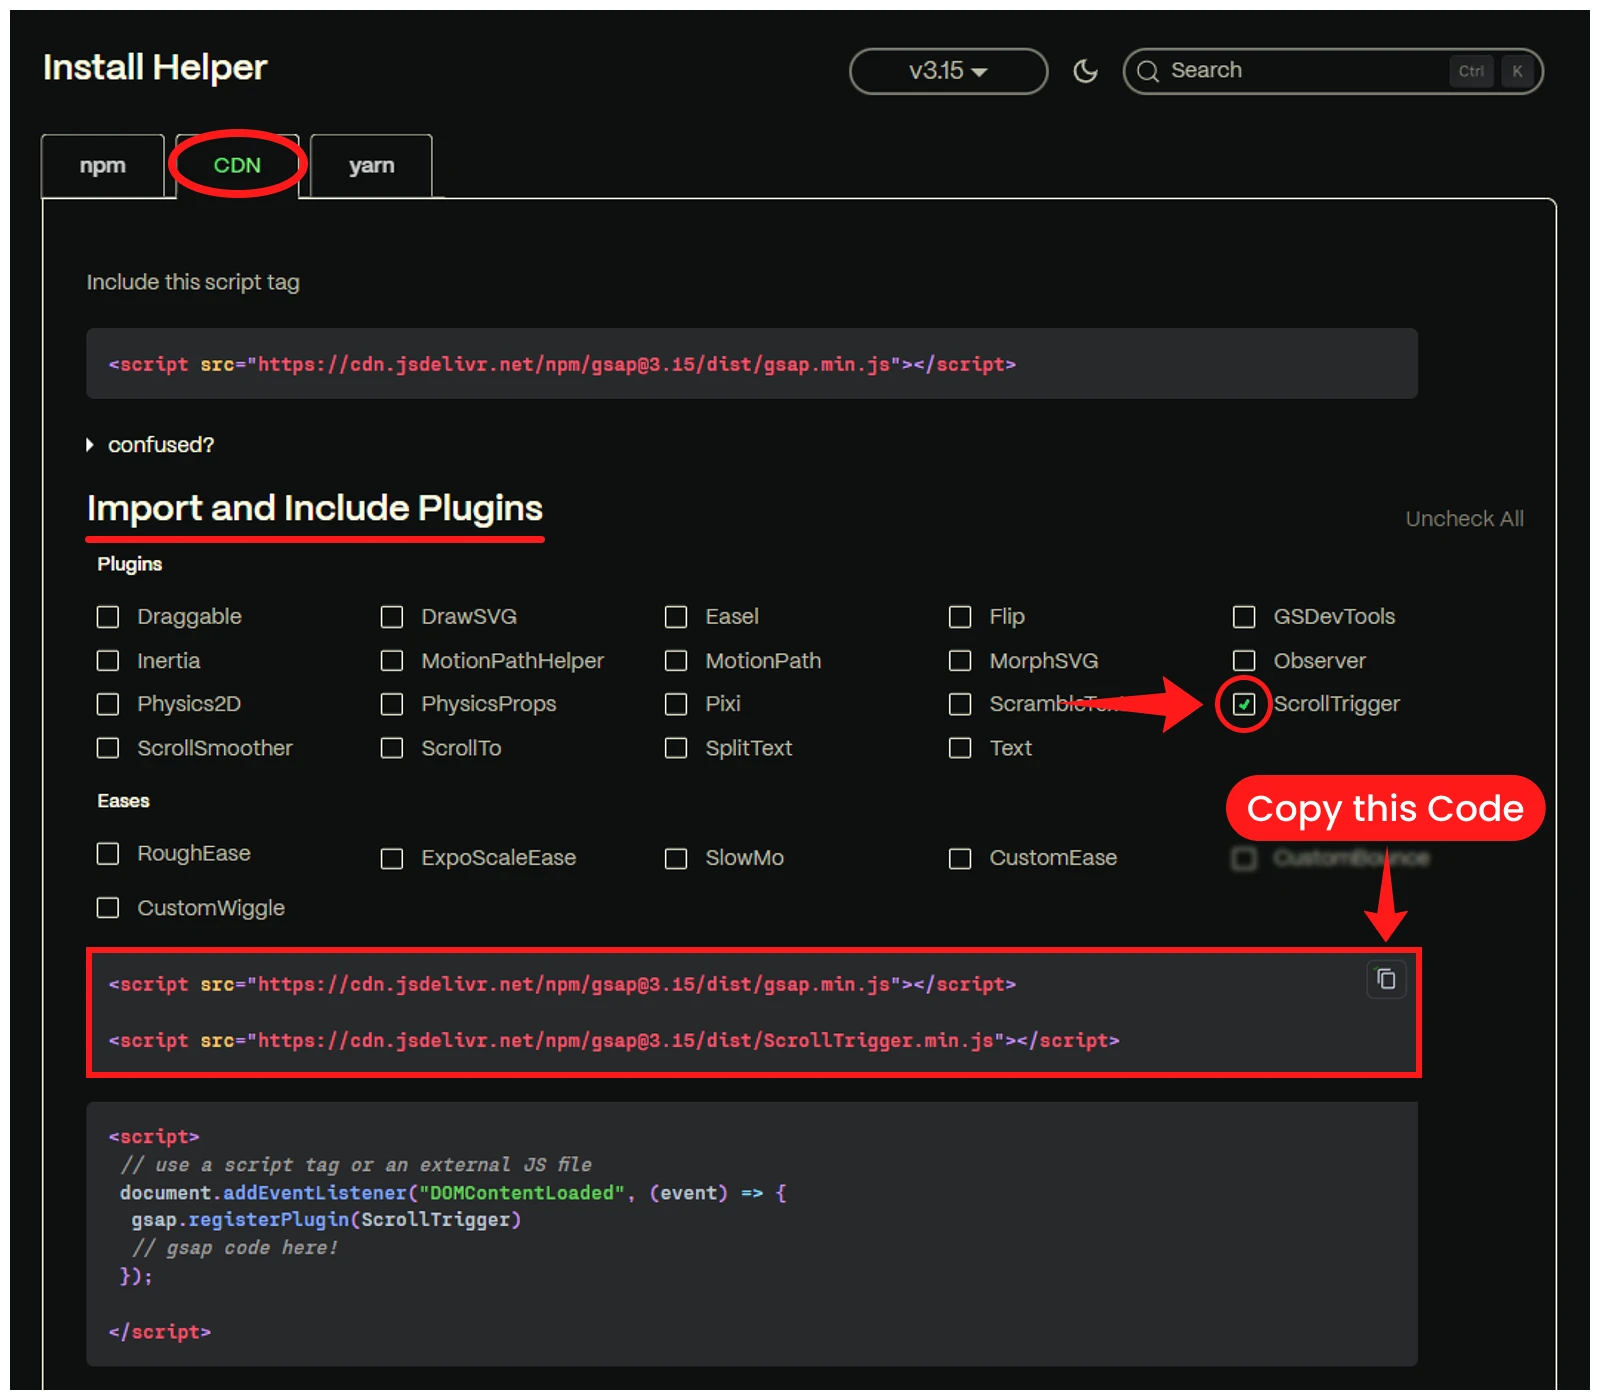
The copied code should look similar to this:
<script src="https://cdn.jsdelivr.net/npm/[email protected]/dist/gsap.min.js"></script>

<script src="https://cdn.jsdelivr.net/npm/[email protected]/dist/ScrollTrigger.min.js"></script>
Keep these scripts in a text or code editor. We will add them to Divi after preparing the animation code.
Step 2: Create the Animation Code
Next, create the custom JavaScript that tells GSAP what to animate and when the animation should begin. Your code should define:
- The CSS class of the Divi element you want to animate
- The type of effect, such as movement, fading, scaling, or rotation
- The animation duration and easing
- The scroll position that triggers the animation
For this example, we will use scroll-animation as the target class. Now add the your code below the scripts you copied in Step 1:
The code should look something like:
<!-- Load GSAP Core -->
<script src="https://cdn.jsdelivr.net/npm/[email protected]/dist/gsap.min.js"></script>

<!-- Load the ScrollTrigger plugin -->
<script src="https://cdn.jsdelivr.net/npm/[email protected]/dist/ScrollTrigger.min.js"></script>

<!-- Code block to create scroll-triggered animation -->
<script>
document.addEventListener("DOMContentLoaded", function () {

    // Register ScrollTrigger with GSAP
    gsap.registerPlugin(ScrollTrigger);

    // Animate every element with the scroll-animation class
    gsap.utils.toArray(".scroll-animation").forEach(function (element) {

        gsap.from(element, {
            y: 100,
            autoAlpha: 0,
            duration: 1.5,
            ease: "power2.out",

            scrollTrigger: {
                trigger: element,
                start: "top 55%",
                once: true
            }
        });

    });

});
</script>
<!-- Code block to create scroll-triggered animation -->
This code makes every Divi element with the scroll-animation class move upward and fade into view when its top reaches 55% of the viewport. The animation plays only once.
Your complete code should now appear in this order:
- GSAP Core script
- ScrollTrigger script
- Custom animation script
Step 3: Add GSAP and the Animation Code to Divi
Now add the complete code to Divi. And to do that, go to: Divi > Theme Options > Integration and then:
- Find Add code to the <head> of your blog.
- Paste the complete code prepared in the previous steps.
- Make sure the GSAP Core and ScrollTrigger scripts appear before the custom animation script.
- Click Save Changes.
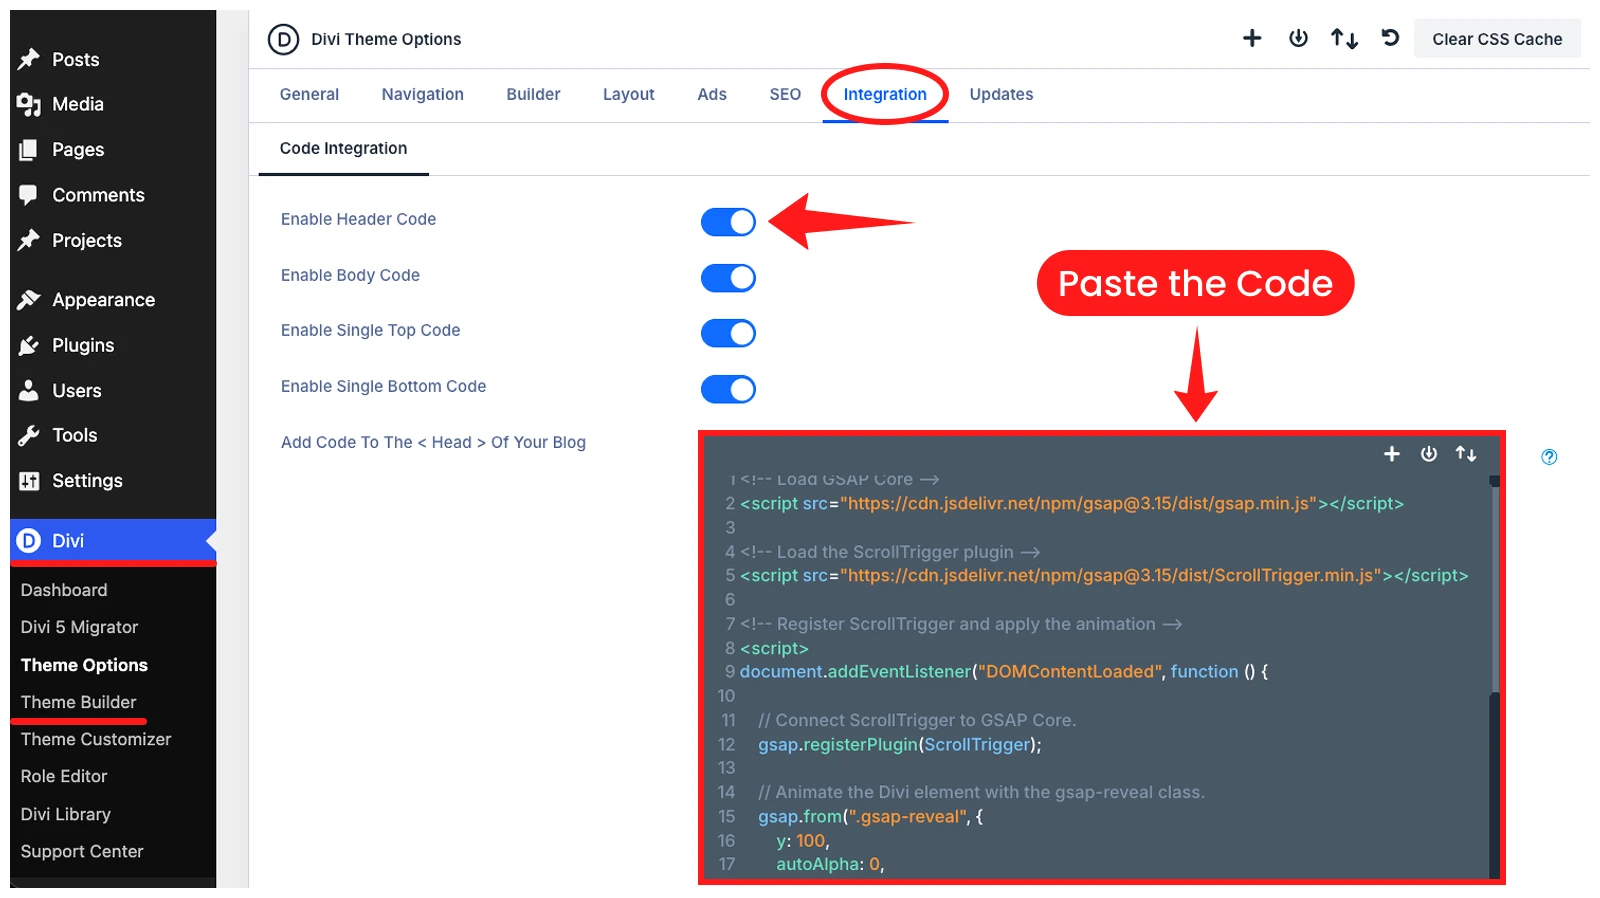
GSAP and ScrollTrigger are now available on your website, and the custom animation is ready to target Divi elements.
Step 4: Add the Animation Class to a Divi Element
Open the page with the Divi Visual Builder and select the section, row, column, or module you want to animate. Then:
- Go to Advanced > Attributes > Add Attribute > Class
- Enter “scroll-animation” (or your selected class) in the Attribute Value field.
- Save the module settings and update or publish the page.
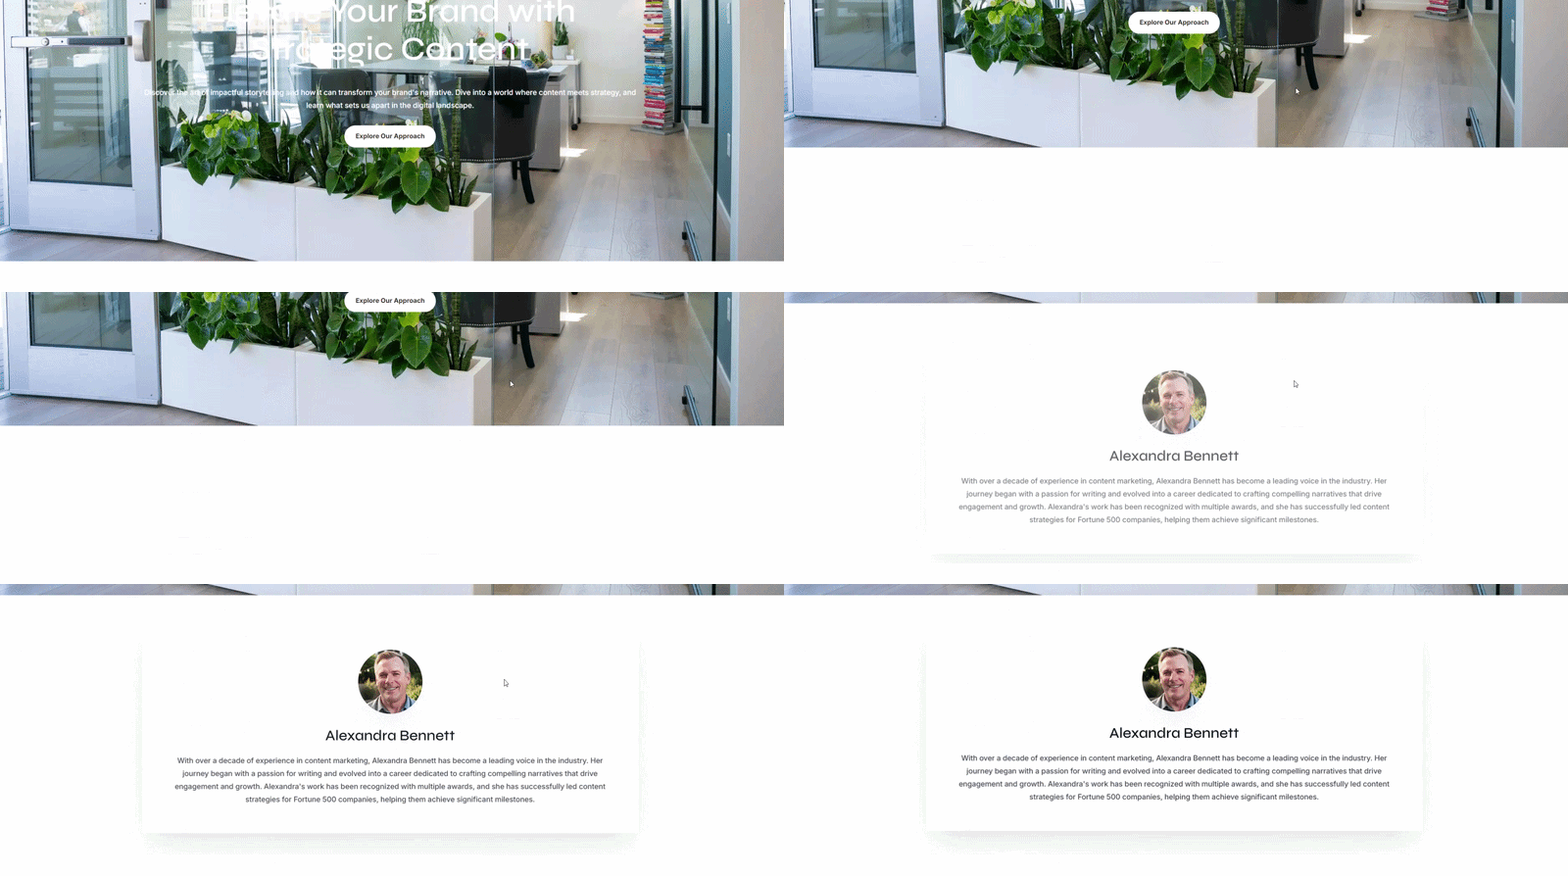
Exit the Visual Builder and test the live page. The selected element should move upward and fade into view when it reaches the trigger point defined in the code.
We added the scroll-animation class to the section below the hero, so it moves upward and fades into view as visitors scroll down the page.
Step 5: Create More GSAP Animations
You can create additional effects by adding new GSAP animation code with a different class. To do this:
- Go to Divi > Theme Options > Integration.
- Find your custom animation <script> block.
- Add the new animation below the previous one.
- Use a unique class for the new effect.
- Add the same class to the Divi element.
- Save and test the page.
This keeps your existing animations working while applying each new effect only to the elements using its matching class.
Note: You can explore some of the best GSAP websites example for inspiration and recreate similar effects in Divi using your own classes and animation settings.
Final Thoughts
Now you know how to add GSAP animation to a Divi website. In this guide, we covered both plugin-based and manual methods that anyone can follow, apply, and use to create engaging animations in Divi.
And obviously, using a plugin like DiviMotion is the easiest way to create advanced GSAP animations. This animation plugin for Divi lets you build scroll, hover, click, and page-load animations visually inside the Divi Builder.
But if you are comfortable with custom JavaScript and need complete control over your animations, adding GSAP manually through a CDN is also a good option.


0 Comments