

Do you want to use ACF (Advanced Custom Field) in the Divi module?
Technically custom fields store post metadata in WordPress.
But, why do people use it?
Because with the help of WordPress default functionality, you can enrich posts and pages with metadata like the author’s name, titles, and description.
But, there are more than that where users need additional content fields to the post or page. And, here comes the need for custom fields.
The good side is that WordPress facilitates custom fields functionality.
The downside is that it’s not a popular method among most users.
Actually, using a plugin is the most recommended way for doing this action. It even goes the same with a theme and page builder like Divi.
This article is also dedicated to Divi users only.
Here, we have come out with the most straightforward tutorial on “How to use ACF in the Divi module?”
Before that, we will show you how to add ACF (Advanced Custom Field) to your website with a plugin. And, then using it with the Divi module.
In the end, we will also teach our beloved DiviFlash users how to use ACF in the DiviFlash module.
So, let’s get started.
How to Add ACF Plugin in WordPress or Divi Website?
Thankfully, the ACF plugin is a great time saver while adding custom fields. Instead of balky customizations, the process is down to only a few clicks. The publisher, WP Engine ensures a smooth user experience.
Here’s how to use the freemium version of the ACF plugin on your WordPress website.
Step 1: Start with installing and activating the ACF plugin. We are using the free version of this plugin. Get it from the WordPress free repository or follow this file path: WordPress Dashboard, > Plugin > Add New. Then, browse for ACF via the search box on the top right side.

You will find a plugin that looks similar to the image above. Simply install and activate it.
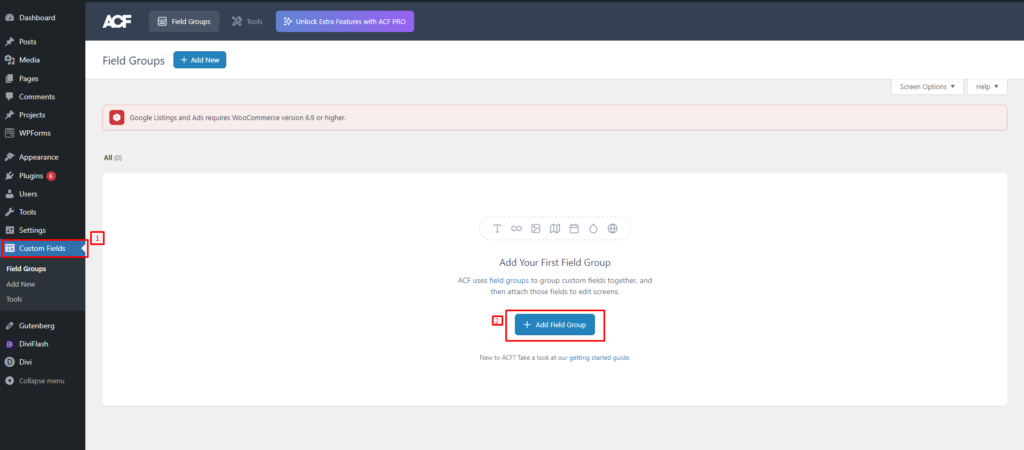
Step 2: Upon activation, you need to go to the newly added “Custom Fields” menu in the sidebar of the WordPress admin area. Click the “+Add New” button for a new field group.
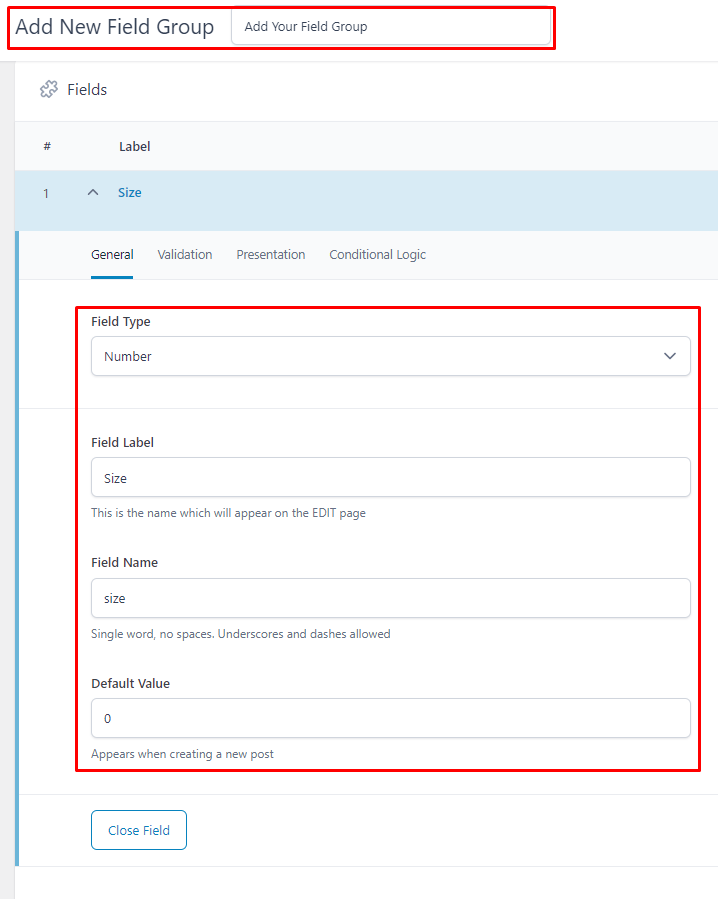
Step 3: On the next screen, there will be a field form with many boxes. Give a title to your field group at the very top of the page.
Next, you just add a field. Here, you don’t need to fill in all the options. But, Field Type, Field Label, and Field Name are the least requirement for each field setup. So, submit your custom fields instruction as needed.
For our tutorial:
- Field Type: Number
- Field Label: Size
- Field Name: size (NB: It will be automatically filed as Field Label)
- Default Value: 0
If you need another custom field, hit the “+Add New” button again.

Step 4: After the field completing part, scroll down to “Location Rules” of the setting box. From here, you can assign where to show the field group. There will be three boxes with dropdown options.
The middle box shows two choices: “is equal to” and “is not equal to”. These will determine on which Custom Post Type your custom fields will be displayed or not.
Our location rules: Post Type (is equal to) Project
Next, look at the “and” & “Add rule group” options. With the first one, you can create a new rule and the second one for setting down a new rule group.

Step 5: Visit the “Presentation” option of the “Setting” box. There are multiple options for choosing the look of custom fields in the post editor. Like, Style, Position, Label Placement, Order No. etc. Set them as you like.
Once you are finished with all the settings. Hit the “Save Changes” button at the top right of the ACF dashboard.
Now, you have successfully registered your advanced custom fields.
How to Use ACF in Divi Default Module?
The good thing is that with a builder like Divi, you don’t need to insert a shortcode in the frontend for displaying a custom field. But, the default WordPress functionality requires it every time you go for a custom field.
Now before starting, keep in mind that your registered advanced custom fields will be available at the assigned location. So, on your Divi builder dashboard take a page, post, layout, or project according to the location box setting.
Keep reading to see how this works with a Divi module.

Step 1: As we have already set the location rules to projects, add a new project or go to an existing project and insert a Divi dynamic module like you regularly do. We have chosen the Divi Blurb module for our tutorial.

Step 2: Navigate to the content tab of the Blurb module. Here, hover over the input box and click the dynamic content icon.

Step 3: A pop-up will appear with the available dynamic content list. Down below, you will see advanced custom fields enrolled with the ACF plugin. Select your preferred custom fields.

Step 4: On the next popup add your post or page metadata by filling out the Before and After text box. Then, finish all the editing of the page or post you are working on. Lastly, save and exit the visual builder for a live preview.
That’s how you can use ACF in the Divi module.
How to Enable Advanced Custom Fields to DiviFlash Module?
Now, if you are a DiviFlash user, this is for you. If not, check our all-in-one Divi plugin. It provides powerful modules, extensions, and layouts to enhance your Divi experience.
Love to see you using the DiviFlash plugin.
Let’s see how to enable ACF with DiviFlash modules. By default, Divi is integrated with the ACF plugin.
But, to make it available with the DiviFlash module, you just need to do a little click work as below:

- From your WordPress admin area, go to the DiviFlash plugin dashboard: DiviFlash > Dashboard.
- In the extension box, you will see the “ACF Support” option.
- Enable it and hit the “Save Changes” button at the bottom of the page.
How to Use Advanced Custom Fields to DiviFlash Module?
To most of the DiviFlash modules, adding custom fields is the same as the default Divi module. However, some of the modules like CPT Carousel, Post Carousel, Filterable CPT, and CPT Grid are available with ACF fields as child items. Even, you can customize the content fields along with before and after text.
Let’s begin the DiviFlash part:
Start by creating a new page or go to an existing page and insert a DiviFlash module mentioned above. For example, we have added a Filterable CPT module.

Step 1: Open the module setting. Then, add a child element from the content tab.

Step 2: Next, from the element type dropdown, select ACF fields. On the next screen, there will be the ACF setting. From the “Post Type” dropdown, you will find your registered field label with the ACF plugin.

Step 3: According to our assigned location rules, we select “Projects”. And, “Select Acf Field” option is available now. And, it shows the registered “Size” field label.

Step 4: Now, go to the design tab. You will see various customizing options. Using features like alignment, text styling, spacing, sizing, border, box shadow, filters and many more you can bring an embellishing look to the content fields.
Like the image below, we have customized our content fields.

Conclusion
Now, you have the solution of how to use ACF (Advanced Custom Fields) in the Divi module. We have also gone over how to use ACF in the DiviFlash module.
You can start with yourself. And, if you run into any problem doing this let us know in the comment box for an easy fix.


0 Comments