

If you have ever tried creating a custom blog feed or product grid in Divi, you know the struggle. The older Blog Module of Divi 4 offered only fixed layouts: grid or full-width with limited styling options.
Where simple elements reorder or display custom fields data wasn’t possible without applying custom CSS or relying on third-party plugins.
Divi 5 addresses these limitations with a major step forward by introducing the Loop Builder. It redefines how dynamic content is built and customized directly inside the Visual Builder.
With the Divi Loop Builder, you can display posts, WooCommerce products, and custom post types using fully customizable layouts. It also allows you to pull dynamic data from Advanced Custom Fields (ACF) and other supported sources.
In this guide, we’ll explore what’s new in the Divi 5 Loop Builder and how to use it effectively to create flexible, dynamic loops for your website.
Divi Blog Module vs Divi 5’s Loop Builder
| Feature | Divi Blog Module | Divi 5 Loop Builder |
| Purpose | Display standard blog posts with preset layouts. | Display any dynamic content with full design freedom. |
| Design Flexibility | Fixed layout (grid or full width) with limited control over element order and structure. | Fully customizable layout using any Divi elements. |
| Supported Content | Default posts and simple custom post types. | Posts, WooCommerce products, custom post types, users, categories, and repeater fields. |
| Custom Fields | Not supported without external plugins or custom code. | Natively supports ACF and dynamic custom fields. |
| Query Options | Basic category, tags, and order filters. | Advanced filters, meta queries, post offsets and sorting controls. |
Best For | Advanced filters, meta queries, post offsets, and sorting controls. | Dynamic grids, product showcase, and custom data layouts. |
Introducing Divi 5 Loop Builder
In WordPress, a loop is the mechanism that displays repeating content such as posts, products, or categories from the database. Each item in the loop pulls dynamic data like the title, featured image, excerpt, or metadata, based on defined query settings.
For example, your main blog page or blog archive page is basically a loop that shows your latest post. This core concept has always existed in WordPress.

The Divi 5 Loop Builder brings this same concept into the Visual Builder. Instead of relying on preset layouts, you can design your own loop layout from scratch using Divi modules.
You create a layout template for a single item using elements such as post titles, images, buttons, or custom field data. Divi then automatically repeats that layout for every item that matches your query.
This approach is not limited to blog posts and works across many content types.
With the Divi 5 Loop Builder, you can:
- Create custom blog feeds, product lists, and portfolio grids.
- Display events, courses, or WooCommerce product data dynamically.
- Loop through authors, categories, or ACF repeater fields to build dynamic sections.
These are the same WordPress loops you’ve been using for years. Now available inside your Divi visual builder with control over every part visually.
How Divi 5 Loop Builder Works
Before creating your first loop, it is important to understand the core settings of the Divi 5 Loop Builder and how they work together create any loop. Let’s take a look at the Divi 5 Loop builder inside and out.
1. Query Type:
The Query Type defines what kind of content the loop will display. Divi 5 currently supports the following query types:
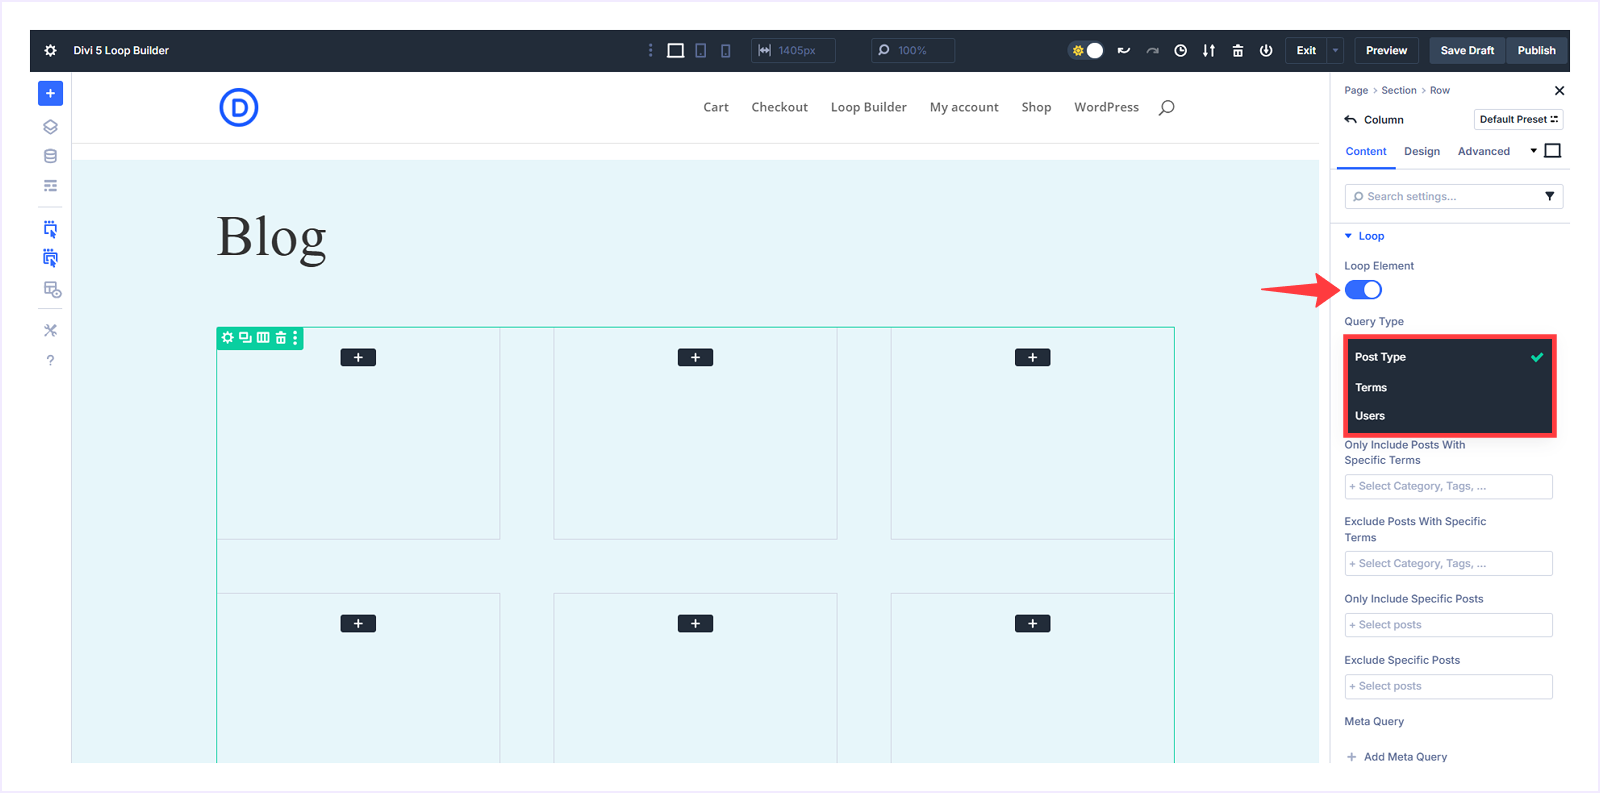
- Posts: Use this option to loop through posts, WooCommerce products, pages, or any registered custom post type. This includes content such as blog posts, products, projects, testimonials, recipes, or any other custom post type added to your site.
- Terms: The Terms query type allows you to loop through taxonomy items such as categories, tags, or custom taxonomies. This is useful when you want to display grouped content, like product categories or blog tags.
- Users: The users query type lets you loop through registered users on your website. You can use this to display authors, team members, contributors, customers, or any user role available in WordPress.
2. Configure Query Settings:
Once you select a Query Type, Divi displays additional settings that control which items appear in the loop. These options allow you to include or exclude content, apply filters, and define sorting rules.
“Post” Query Settings:
Use these settings when looping through posts, products, or custom post types.
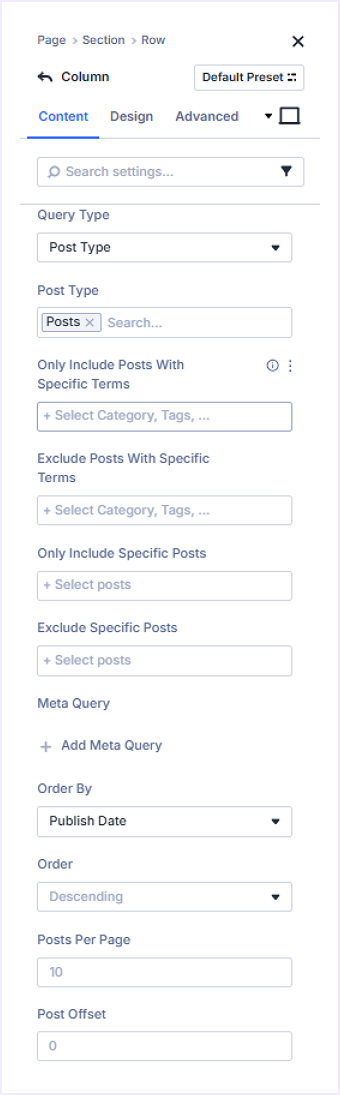
- Post Type: Select the content type to display, such as Posts, Products, Pages, Media, or any custom post type.
- Include or Excludes Terms: Filter posts by specific categories or tags, or exclude the ones you don’t want to show.
- Include / Exclude Specific Posts: Manually choose individual posts or products to show or hide.
- Add Meta Query: Filter content using custom field values by defining the Meta Key, Meta Value, comparison condition, and data type. For example, you can display products with a price greater than a specific value (e.g., 50) or show posts marked as “Featured”.
- Order By: Control the sorting logic using options like publish date, last modified date, author, or comment count.
- Order: Reorder loop items by choosing Ascending or Descending order. Ascending shows older items first, while Descending shows newer items first.
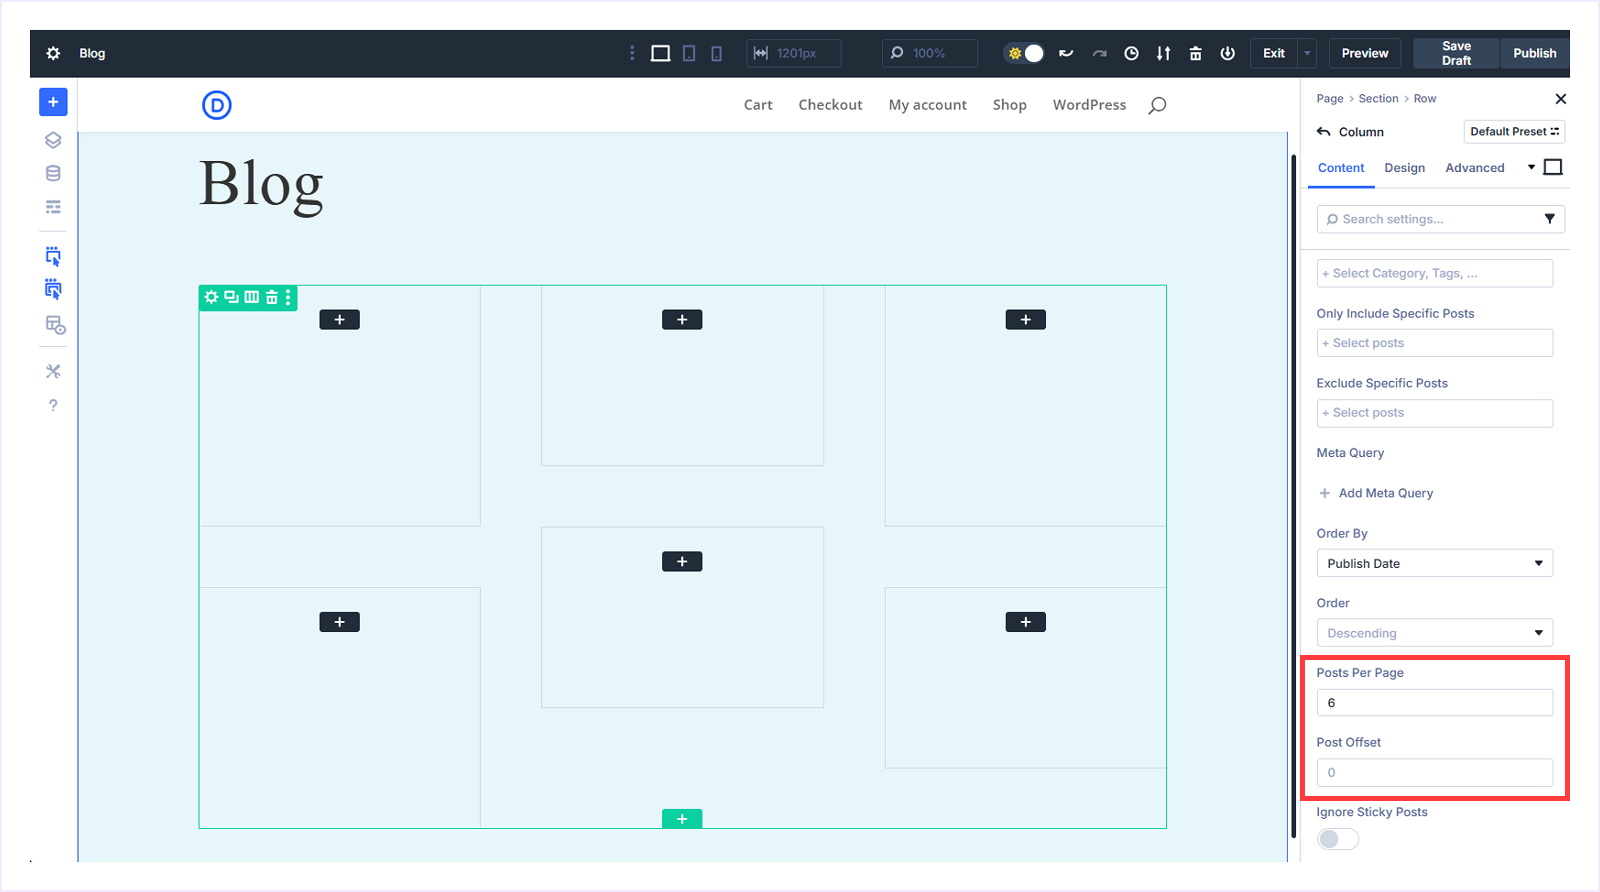
- Post Per Page: Set how many posts you want to display per page before pagination appears.
- Post Offset: Skip a certain number of posts from the start of your query results. This is useful when you want to display a featured post separately and start your loop from the next one.
- Ignore Sticky Posts: Prevent sticky posts from appearing at the top of your loop. When enabled, sticky posts will be treated like regular posts and sorted according to your ordering criteria.
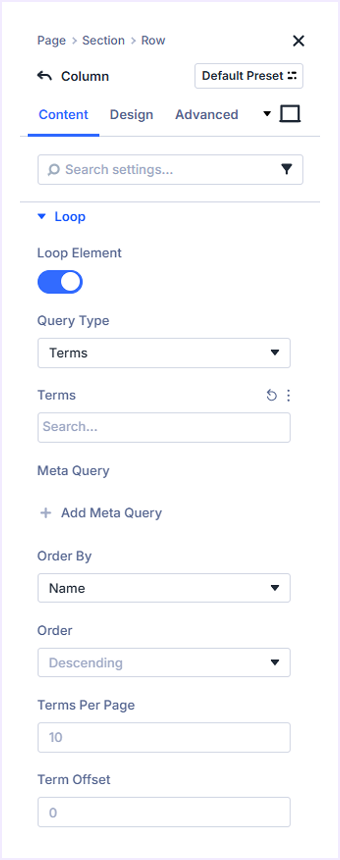
“Term” Query Settings:
When you select Terms as the Query Type, Divi lets you loop through taxonomy terms such as categories, tags, or any custom taxonomy from WordPress or installed plugins.
Supported taxonomies include:
- Default WordPress: Categories, Tags, and Formats, etc.
- Divi and Custom Plugins: Page Categories, Project Categories, or Media Categories, etc.
- WooCommerce: Product Categories, Product Tags, Brands, Product Visibility, and Shipping Classes, etc.
These options enable the design of dynamic layouts that display groups of content, such as a grid of product categories or a list of blog tags with featured images and titles.
- Meta Query: Filter taxonomy terms using custom metadata such as Meta Key, Meta Value, Compare Condition, and Type. For example, you can display only featured product categories or hide inactive terms.
Additional settings for term-based loops:
- Terms per Page: Control how many taxonomy items display before pagination appears.
- Term Offset: Skip a specific number of terms from the beginning of the loop, useful for separating featured and regular categories.
Use these options to create a WooCommerce category grid or a visual layout of blog categories that automatically updates when new categories are added.
“Users” Query Settings:
When using the Users query type, the Loop Builder displays user profiles dynamically based on defined rules. This is ideal for author listings, team directories, or member showcases by using their name, avatar, role, and custom data.
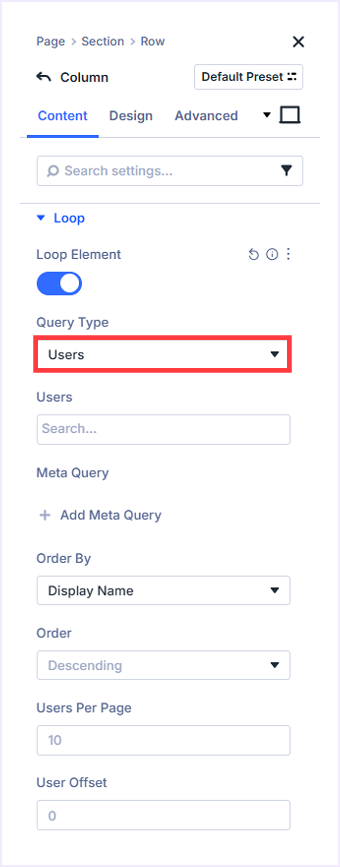
Available options include:
- Users: Display users by role, such as Administrator, Editor, Author, Contributor, Subscriber, or Customer.
- Meta Query: Display users based on custom user metadata, such as active membership status or published post count.
- Order By: Sort users by Display Name, Username, Registration Date, Email, Post Count, or ID.
- Order: Set the sorting direction. Use Descending to show the newest or highest values first, or Ascending to show the oldest or lowest first.
- User Pr Page: Control the number of profiles displayed before pagination appears.
- User Offset: Skip a specific number of users from the beginning of the list, useful when separating featured members or administrators from the general listing.
These settings allow you to create dynamic author grids, staff directories, or customer showcases that automatically update as new users are added to your site.
How to Create a Loop in Divi 5 (step-by-step)
Now that you understand how the Loop Builder works, let’s walk through a practical example to see it in action. In this section, we will create a masonry-style blog layout using Divi 5’s Loop Builder combined with Divi 5 CSS Grid.
It will help you understand how looping and grid controls work together to create flexible and dynamic post layouts.
Step 1: Configure The Layout
- Start by creating a new page from your WordPress dashboard and open it in the Divi Visual Builder.
- Add a new section to the page and set the background color to #E7F6FA.
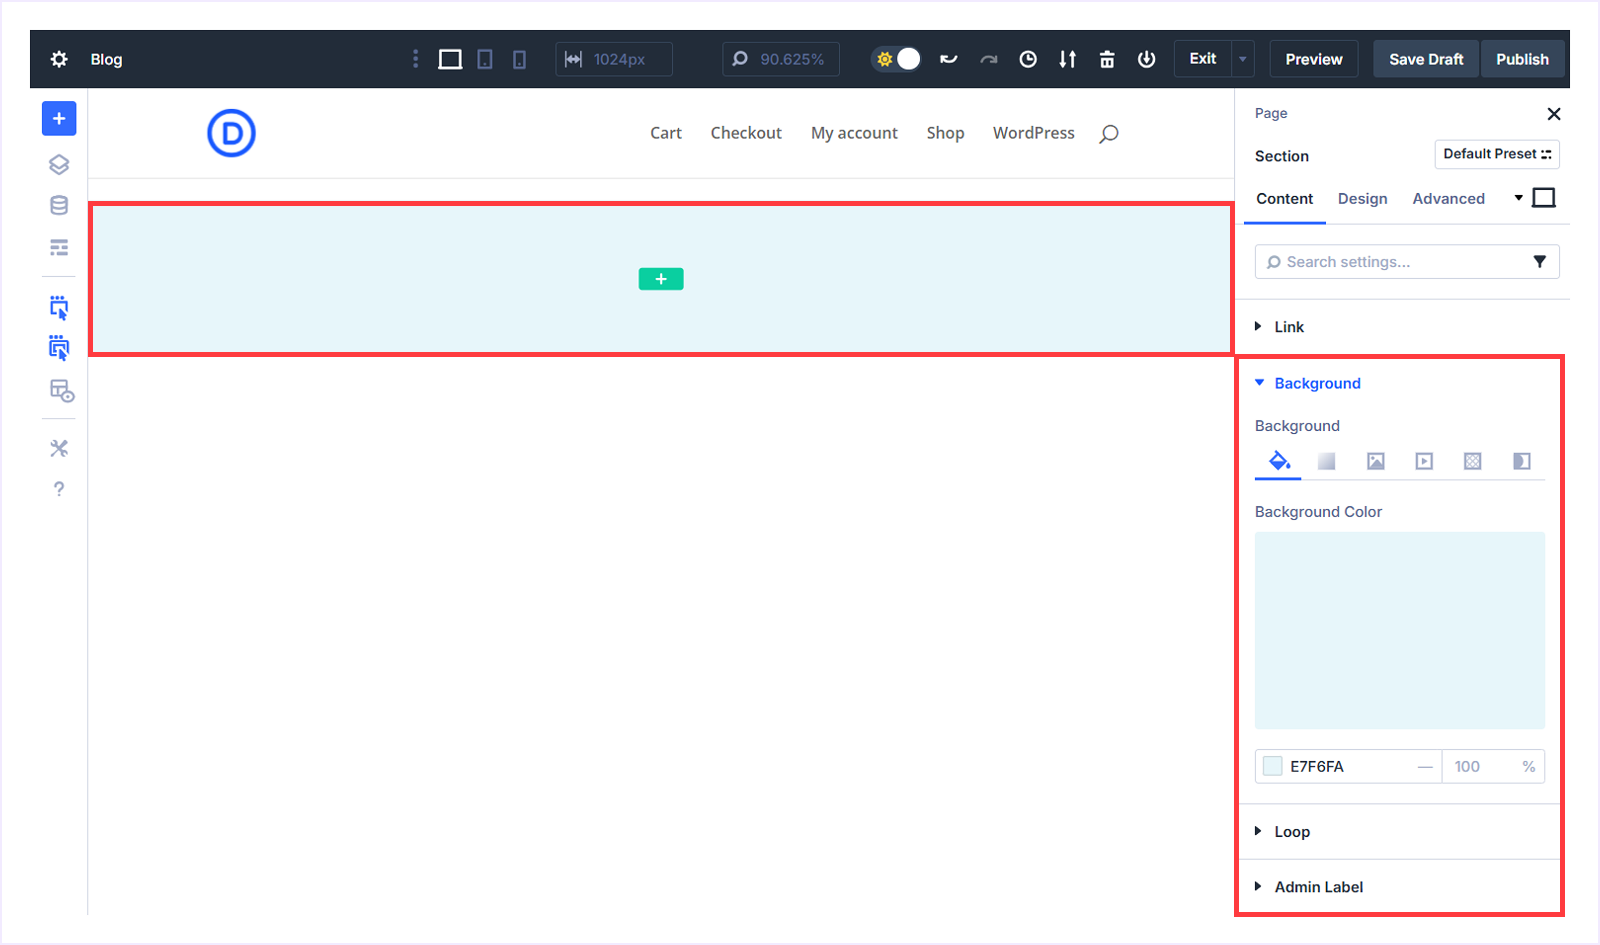
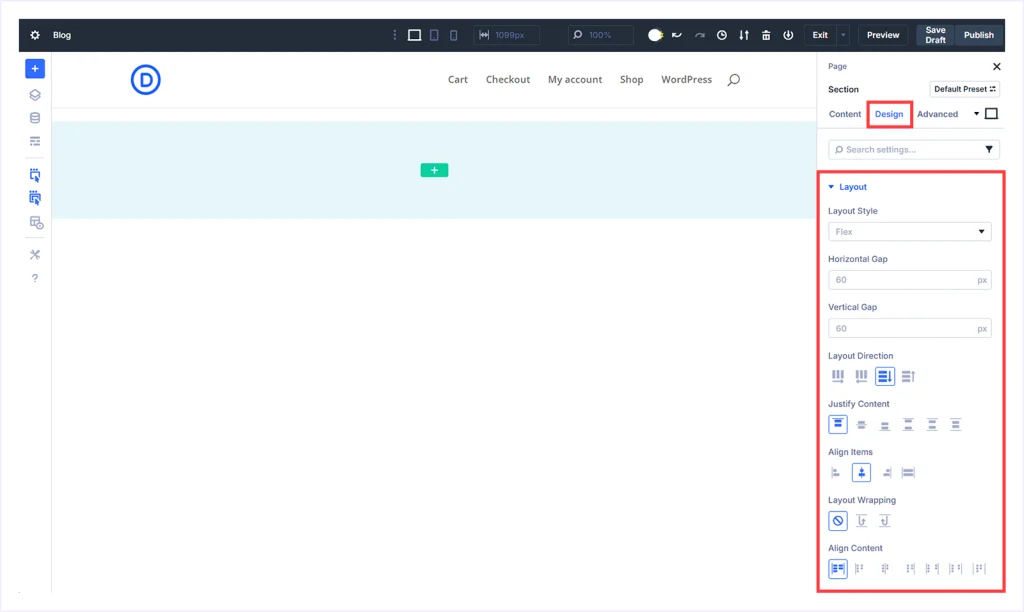
- Switch to the Design tab and expand the Layout settings. Set the Layout Style to Flex and apply a 60px Horizontal Gap and a 60px Vertical Gap. Keep all other settings at their default values.
- Inside this section, add a single-column row. Insert a Heading module and set the heading text to “Blog”.
- With the Heading Module selected, go to the Design tab and apply the following settings:
- Heading Tag: H1
- Heading Font: Times New Roman
- Heading Font Size: 64px
- Below the heading, add another single-column row. This row will be used to display the blog posts dynamically using the Loop Builder in the next steps.
Step 2: Enable and Configure CSS Grid
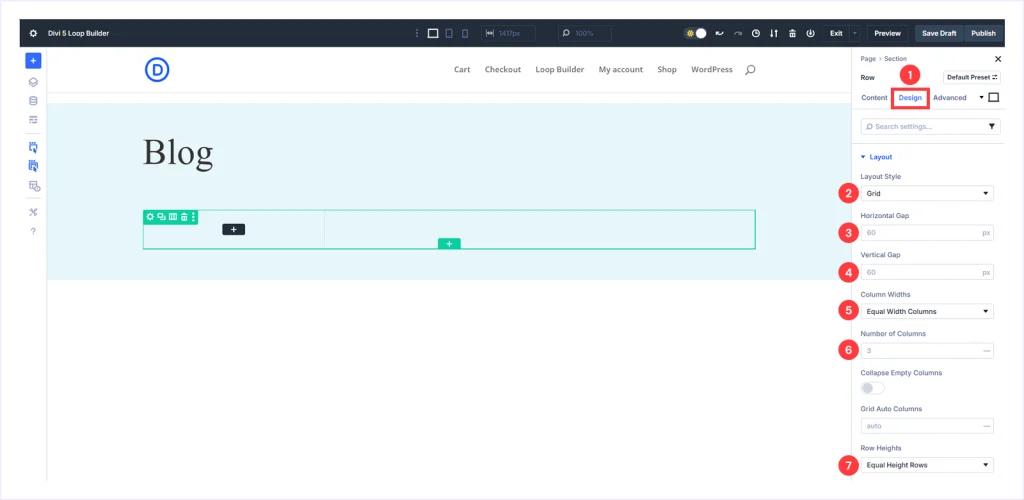
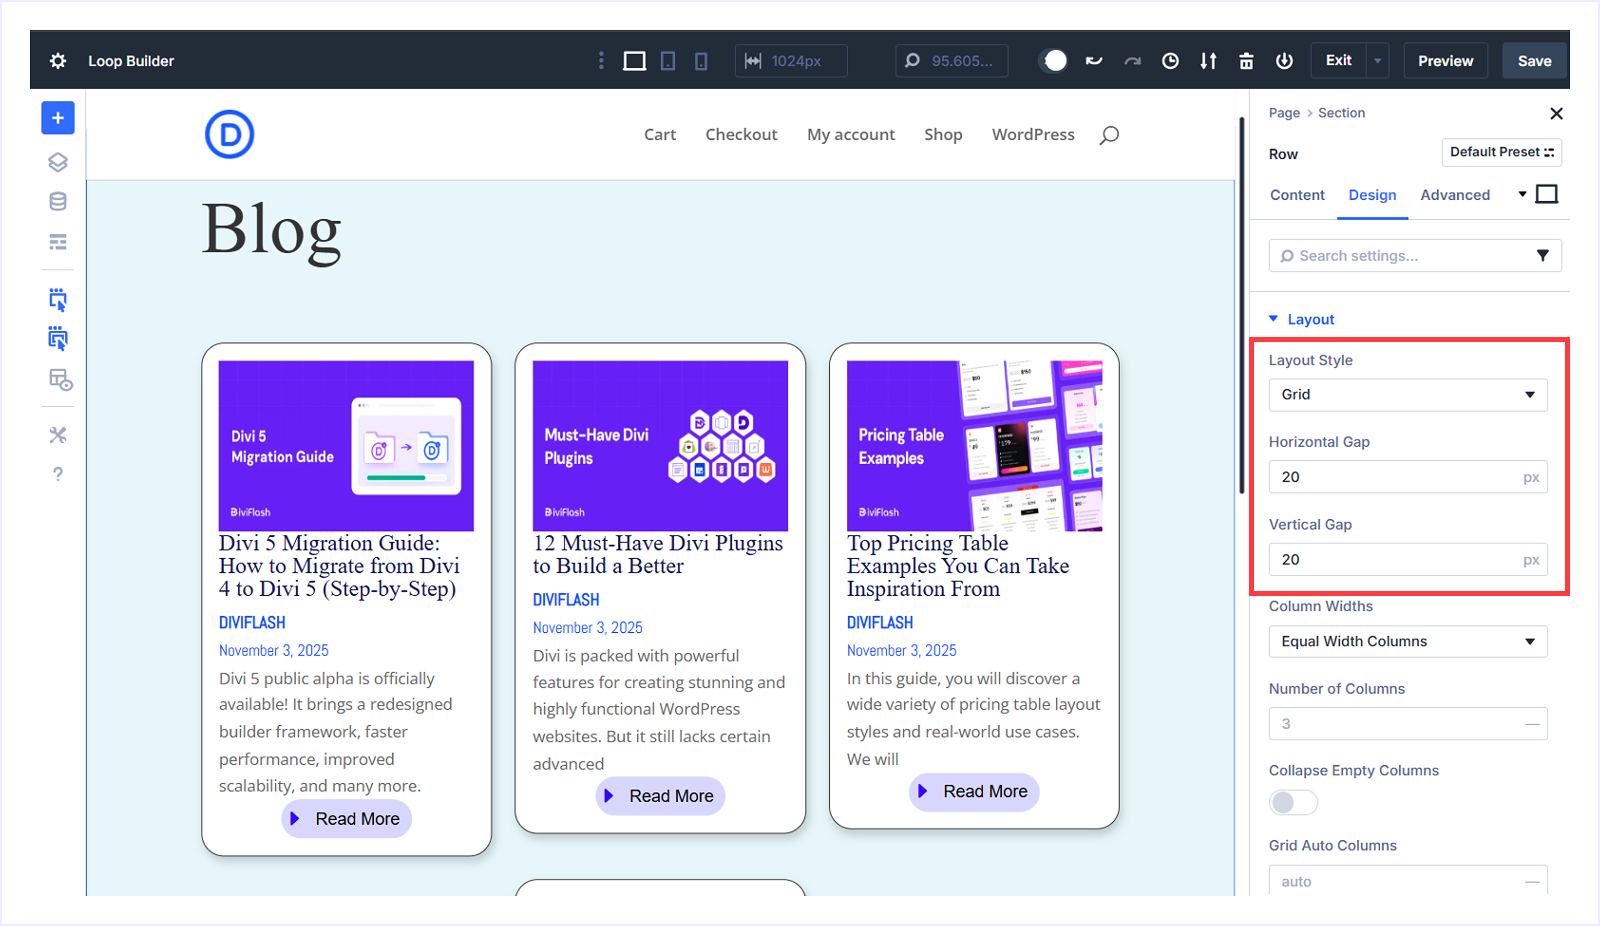
- Select the single-column row placed below the blog heading and switch to the Design tab.
- Expand the Layout settings and change the Layout Style to Grid. Apply the following values:
- Horizontal Gap: 60px
- Vertical Gap: 60px
- Column Width: Equal Width Columns
- Number of Columns: 3
- Row Heights: Auto Height Rows
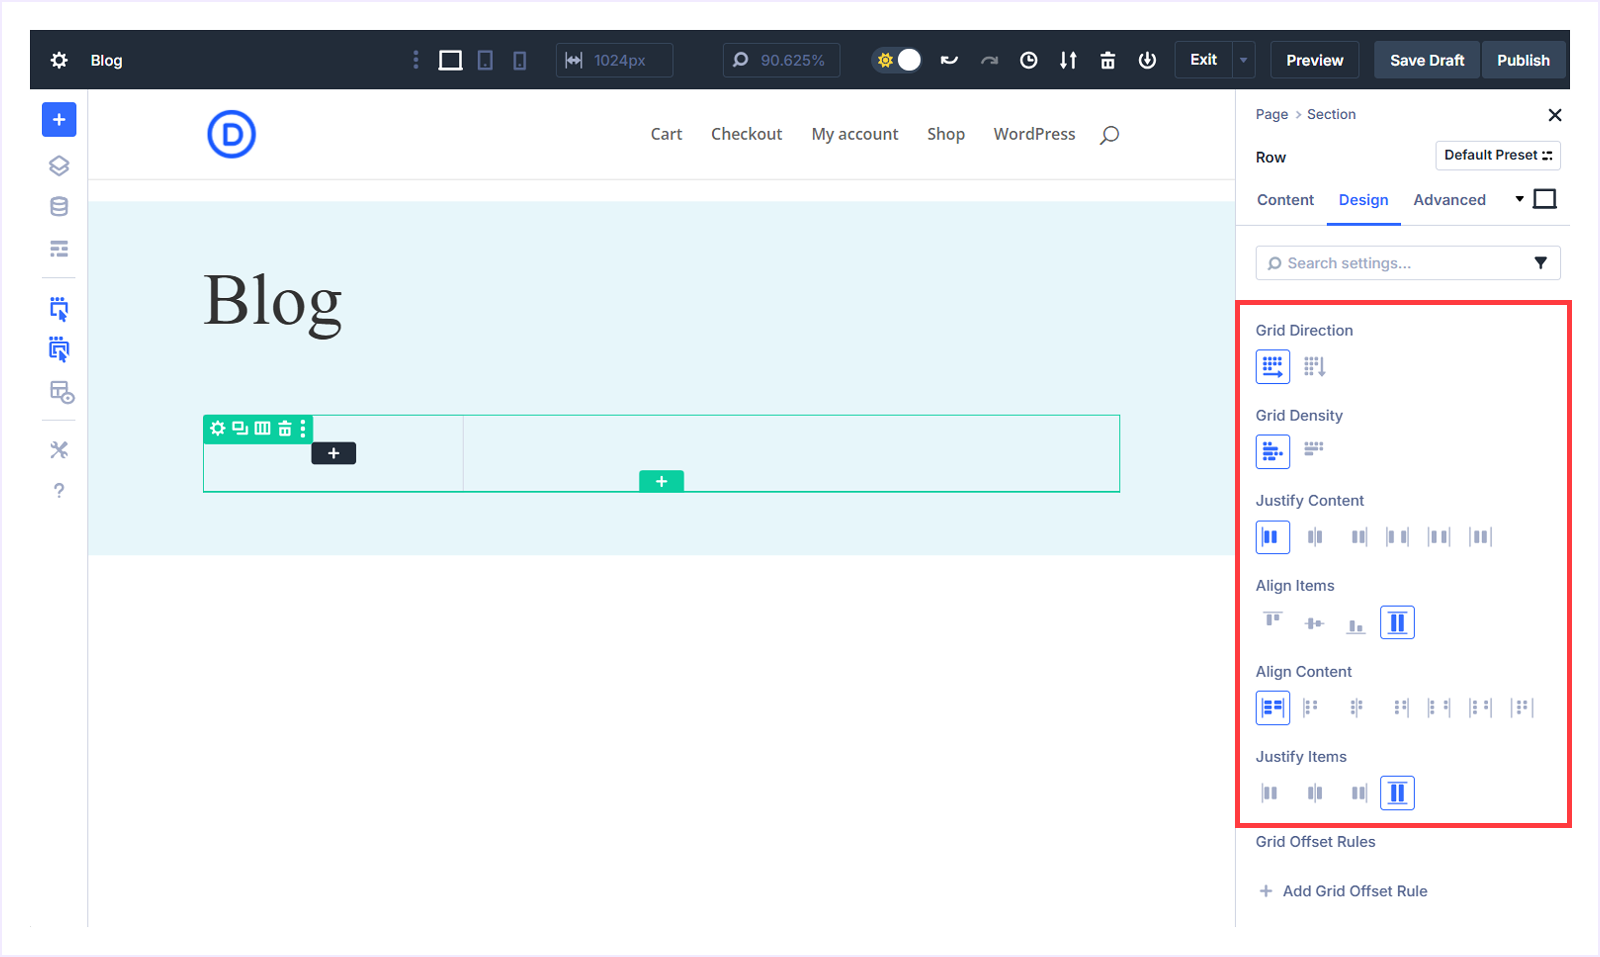
- Scroll down within the same section and configure these grid options:
- Grid Direction: Row
- Grid Density: Dense
- Justify Content: Start
- And keep Align Items, Align Content, and Justify Items set to their default value of Stretch.
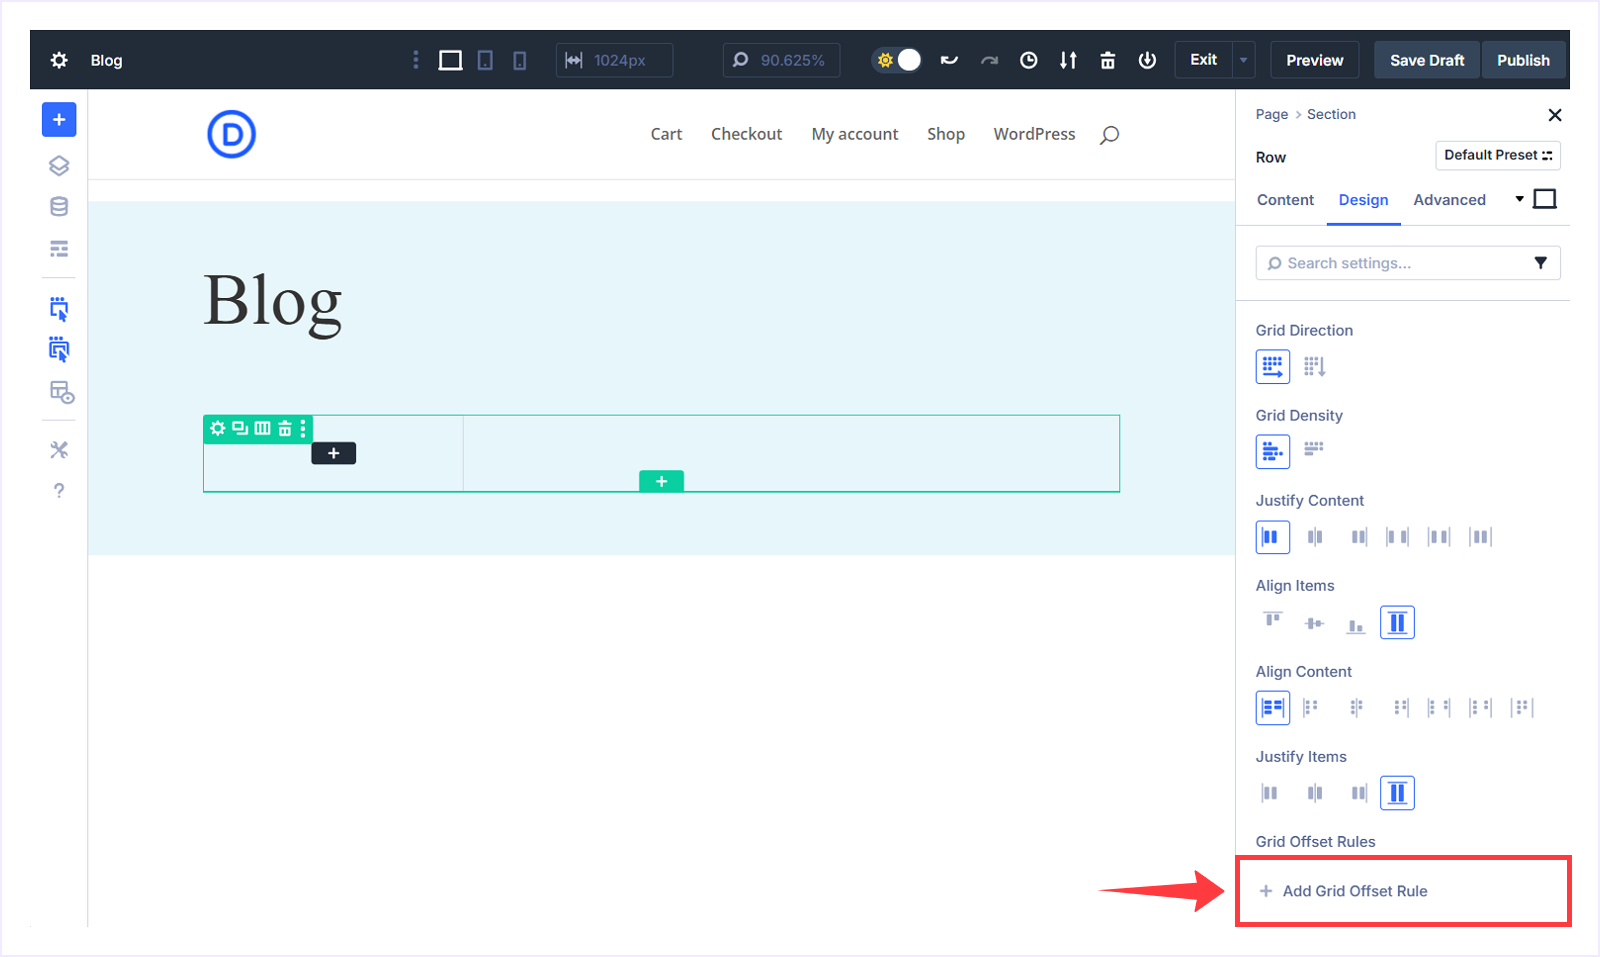
Create Grid Offset Rules
Next, you will create Grid Offset Rules. These rules allow you to control how specific items behave inside the grid, such as adjusting height or position, without using custom CSS. This is what creates the masonry-style layout effect.
- Click + Add Grid Offset Rule to create a new rule.
First Grid Offset Rule: Use the following settings to create your Rule.

- Target Offset: Custom nth-child Rule
- Custom nth-child Rule: n
- Offset Rule: Row Span
- Offset Value: 5
This rule targets every grid item and makes each one span five rows vertically. As a result, posts gain additional height, allowing the grid to stack items more naturally.
Second Grid Offset Rule: Use the following settings to create your Rule.
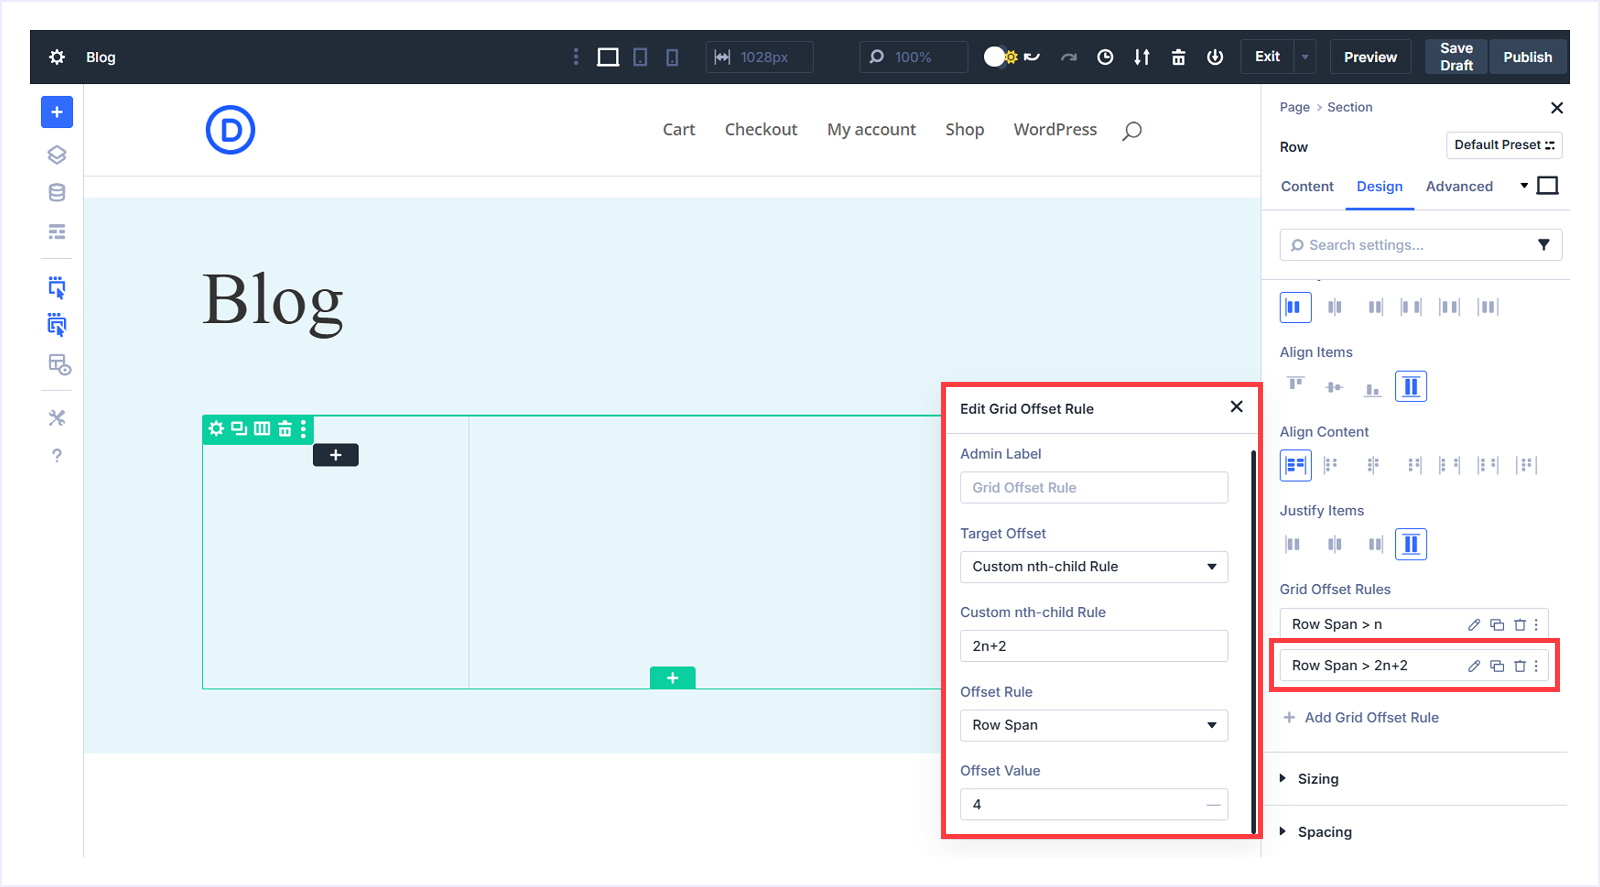
- Target Offset: Custom nth-child Rule
- Custom nth-child Rule: 2n+2
- Offset Rule: Row Span
- Offset Value: 4
This rule targets every second item in the grid, starting from the second post, and makes it span four rows vertically. The alternating row spans create visual variation and produce a balanced masonry-style layout.
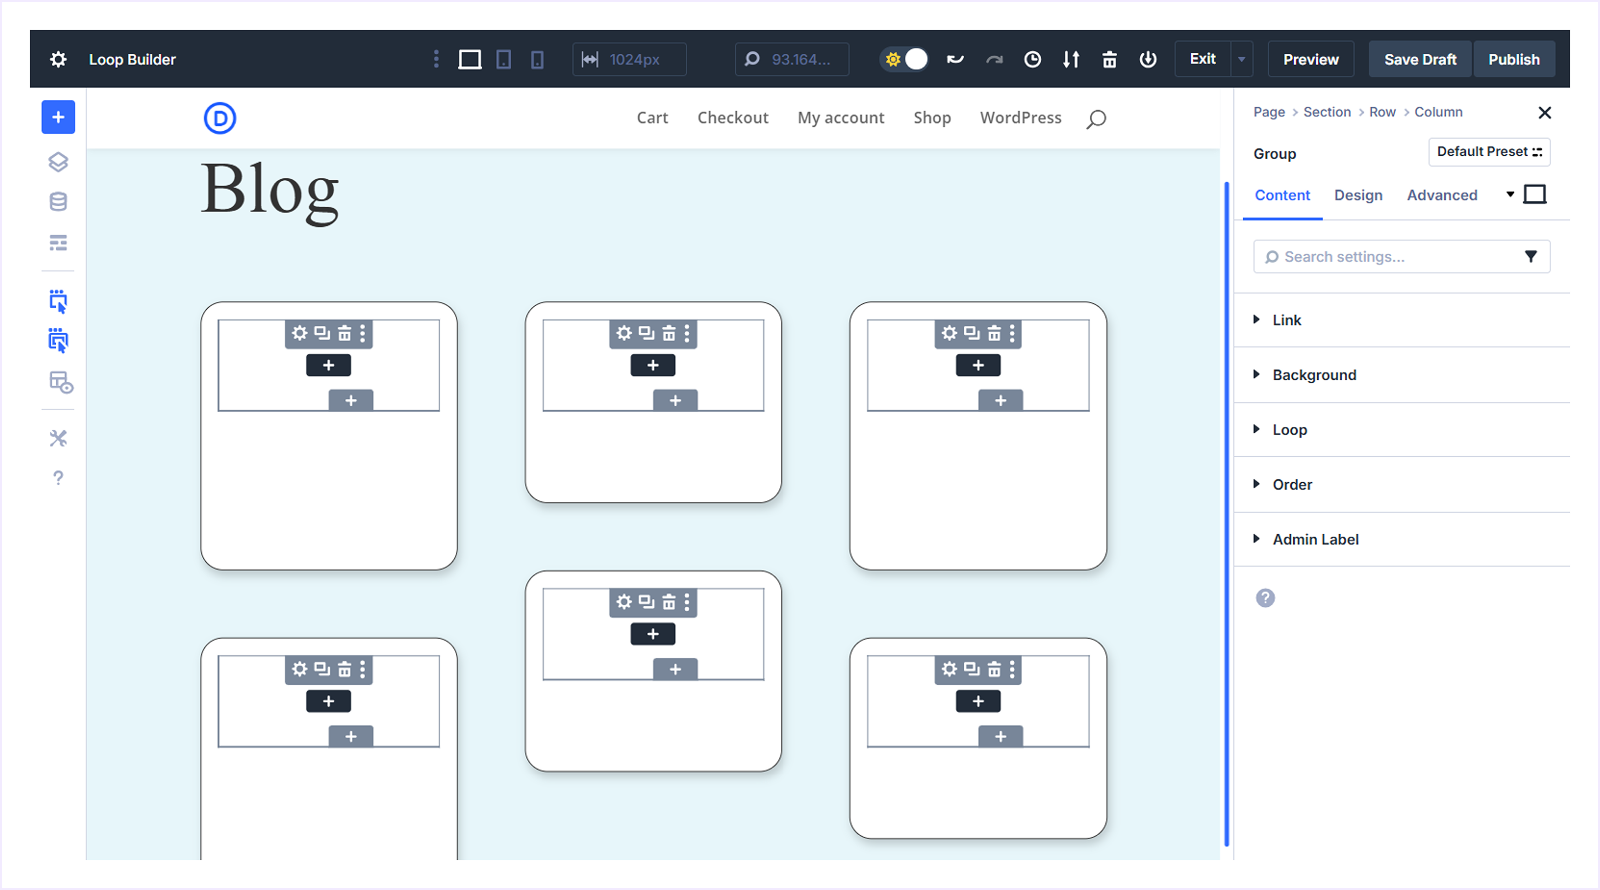
Step 3: Configure the Loop Builder for Dynamic Blog Posts
Now our grid is ready. Let’s connect it to dynamic blog content using the Divi 5 Loop Builder. Follow these simple steps to do this:
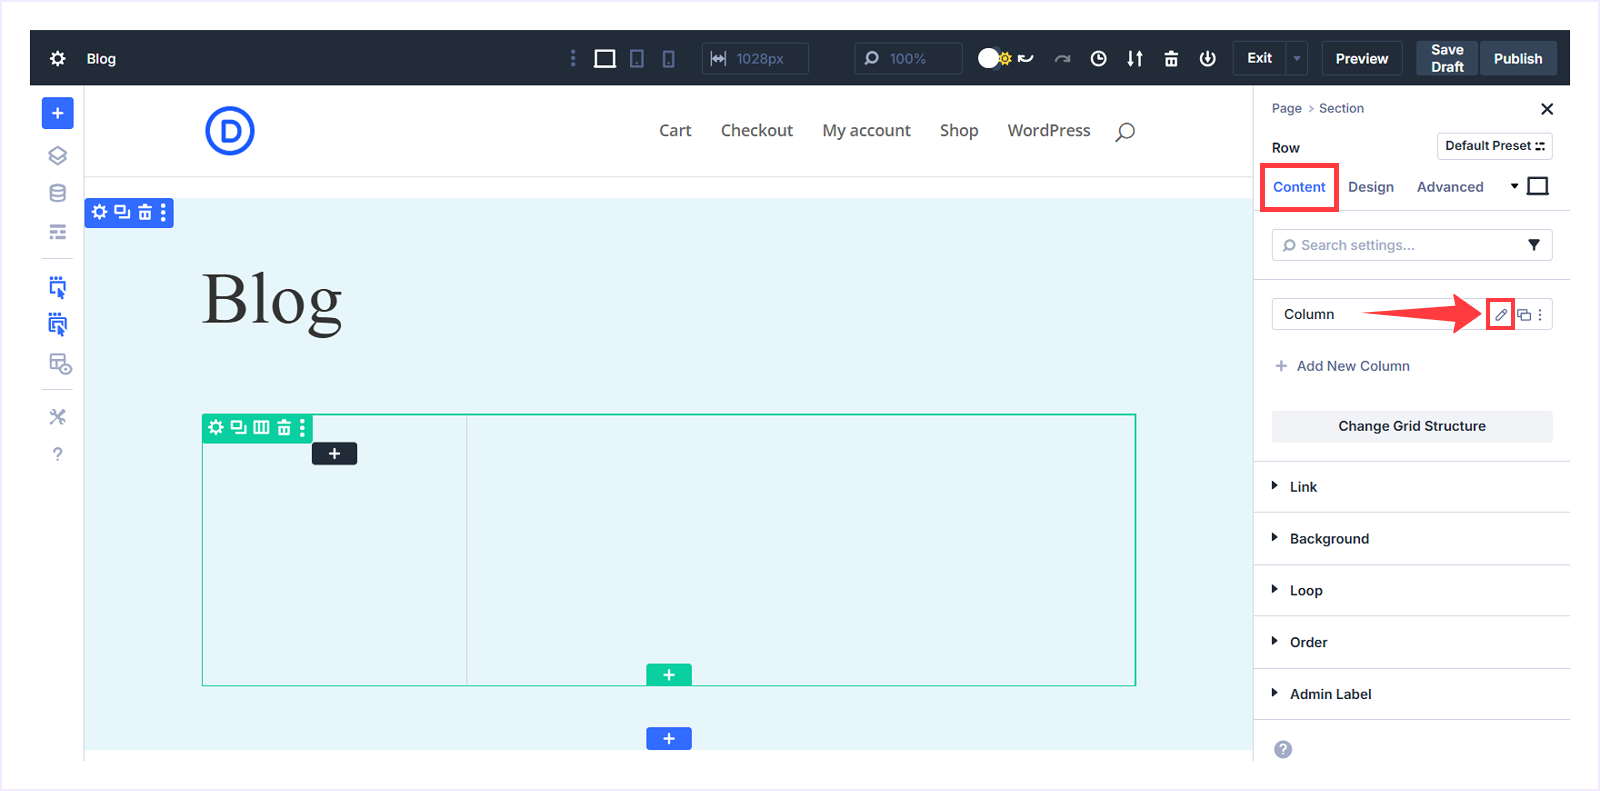
- Select the row and go to the Content tab, then click the column settings (pencil icon) to open its options.
- Expand the Loop section below and toggle Loop Element On.
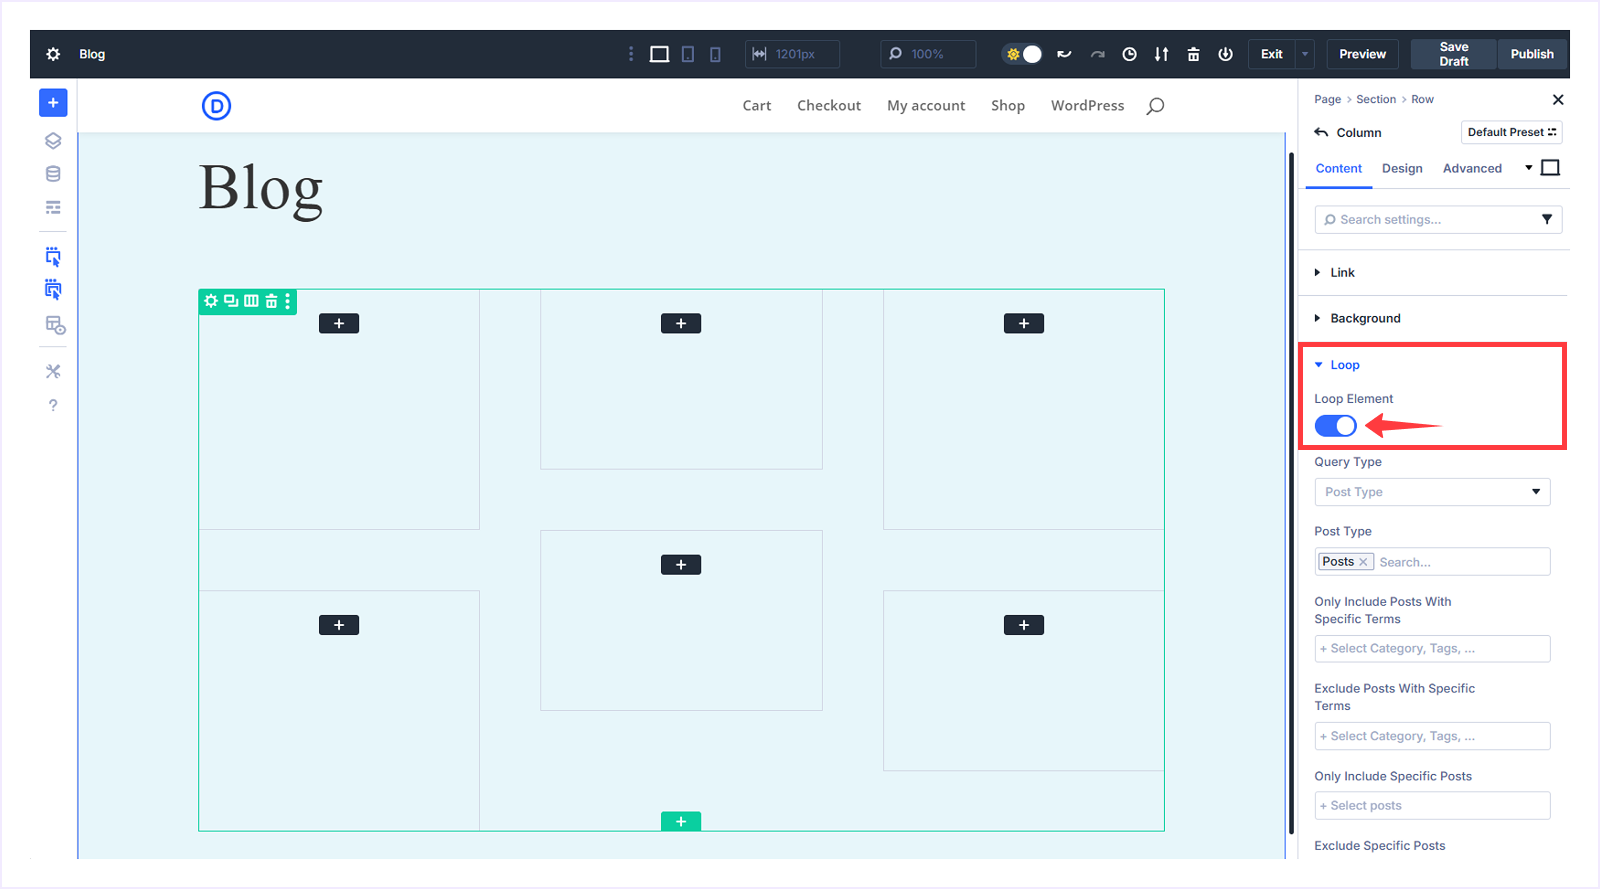
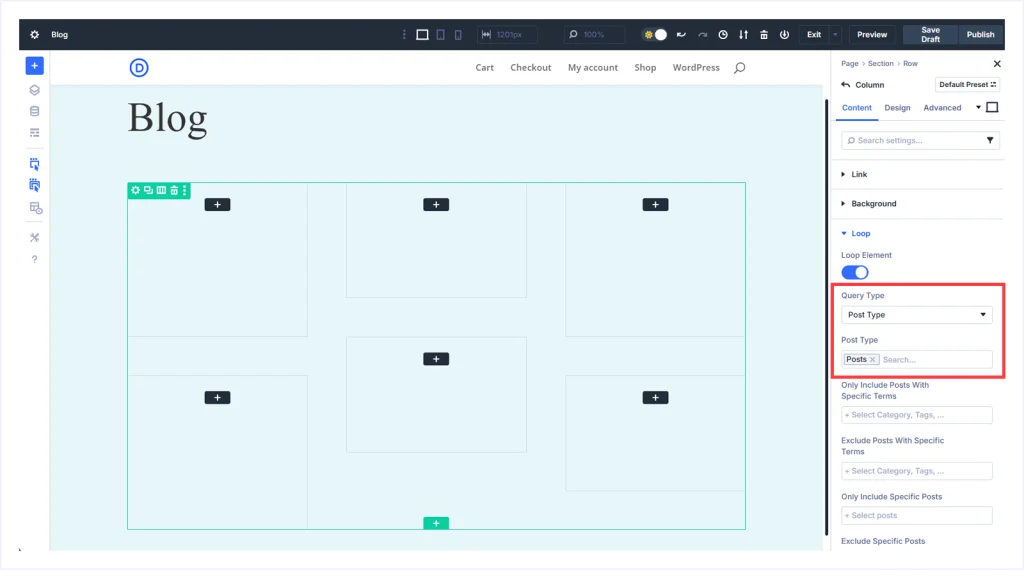
- Set Query Type to Post Type, and Post Type to Posts. This enables the Loop Builder to display blog posts inside your grid.
- Scroll to the Posts Per Page field and set it to 6. This defines how many posts will appear in your grid before pagination appears.
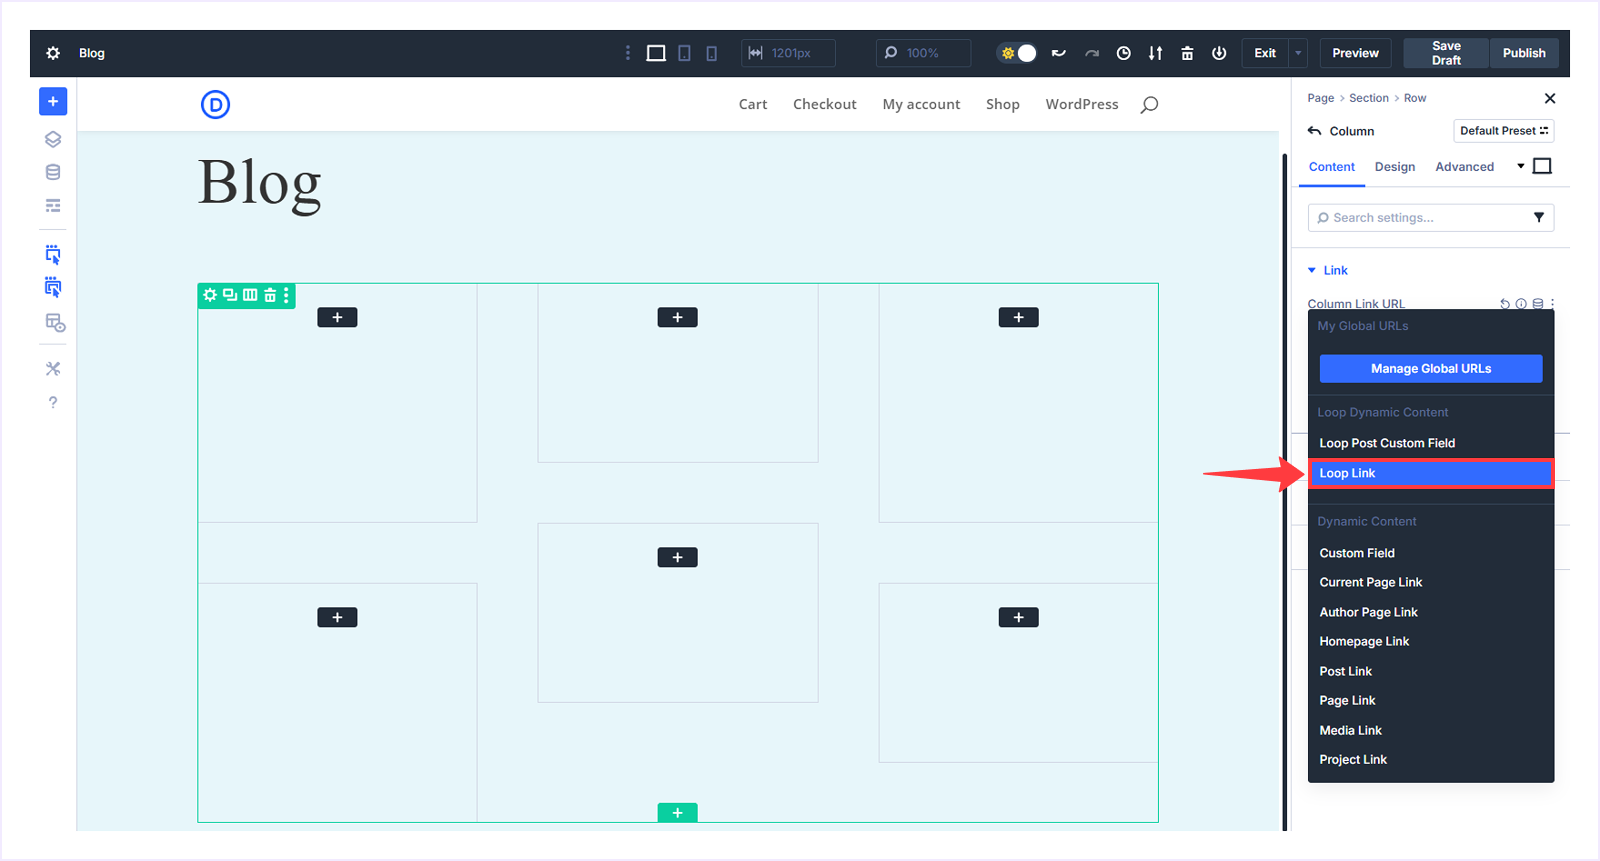
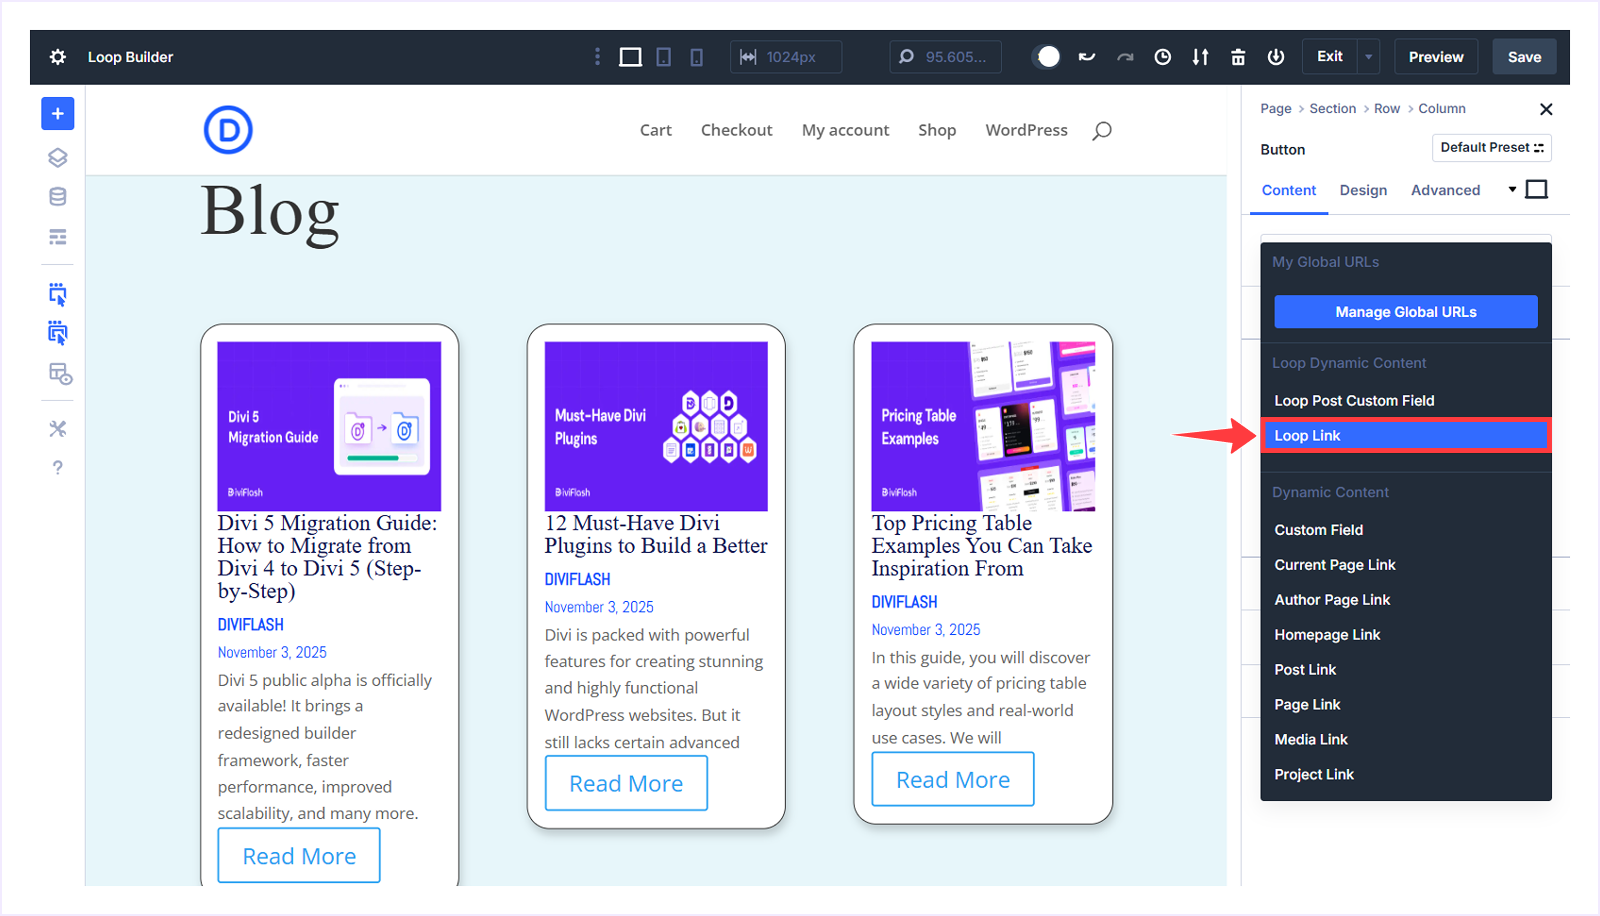
- Expand the Link section and click the Insert Dynamic Content icon beside the Column Link URL field.
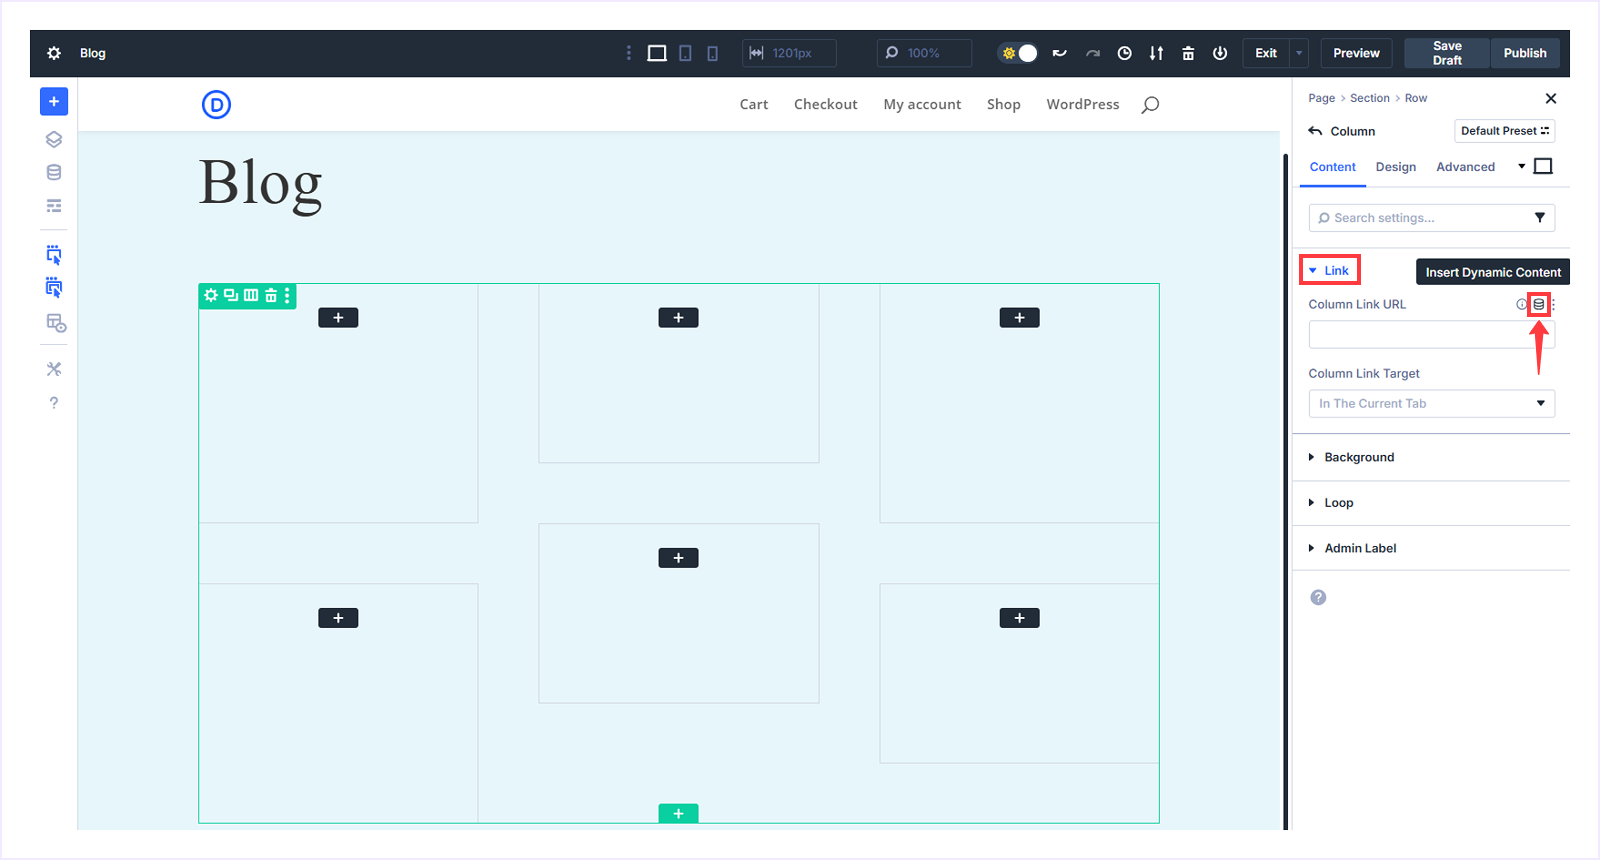
- From the dropdown menu, select Loop Link.
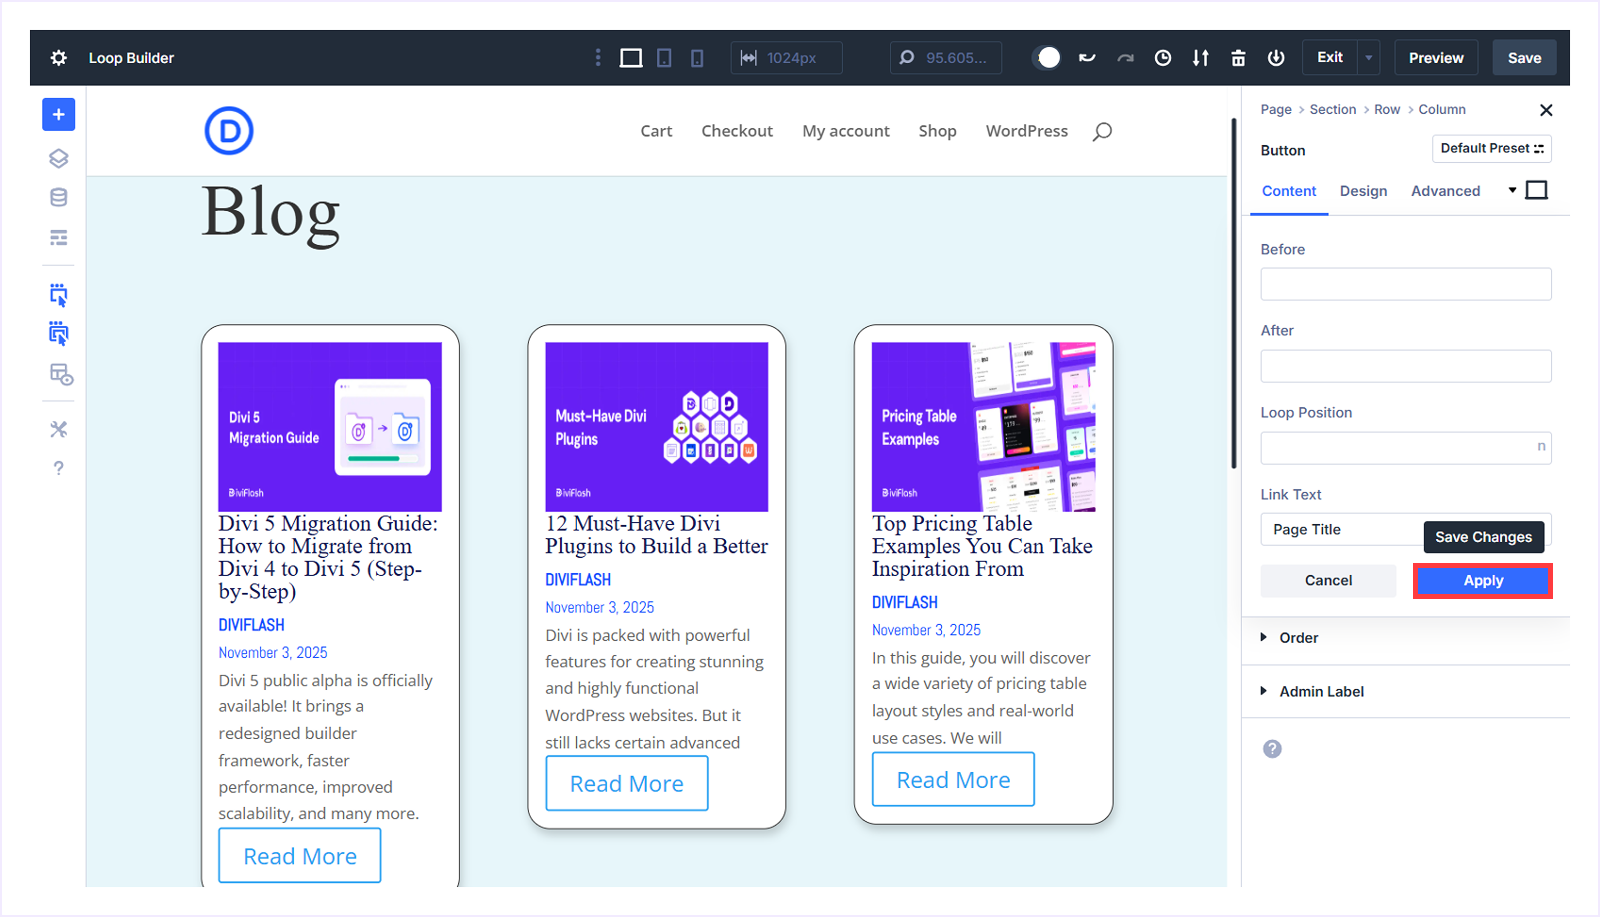
- Keep all other settings as the default and click Apply to save changes.
Step 4: Design The Looped Item
It’s time to design each loop item. Follow these few steps to do this:
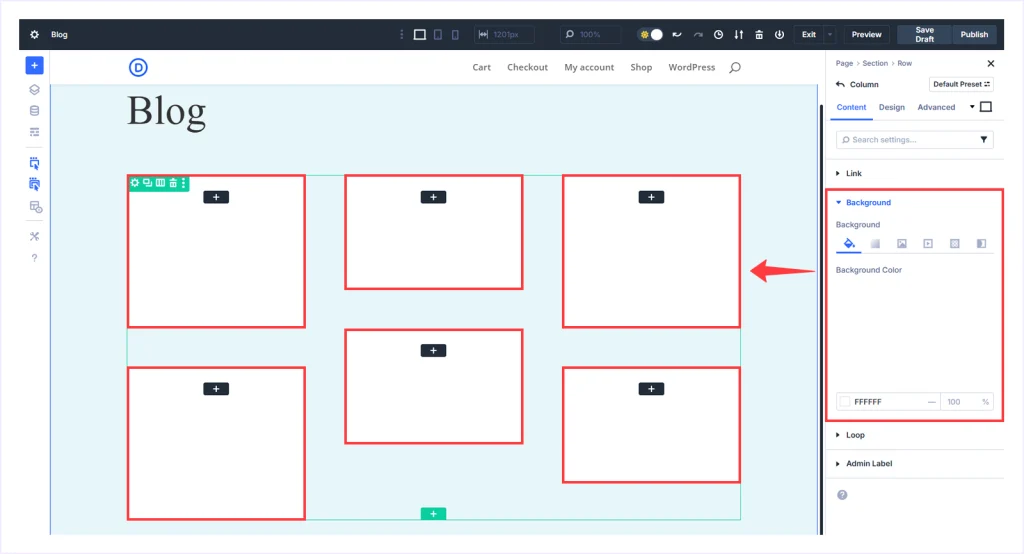
- Within the Column Settings, expand Background and choose white as the background color (#FFFFFF).
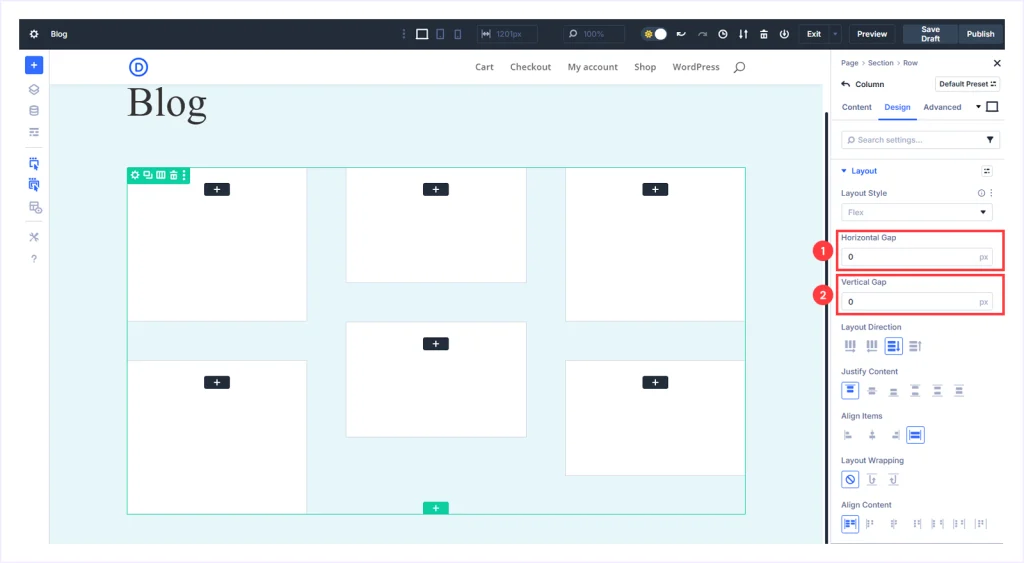
- Switch to the Design tab and set both Horizontal and Vertical Gap to 0 under Layout settings within the Flex style layout. And keep the res as the default.
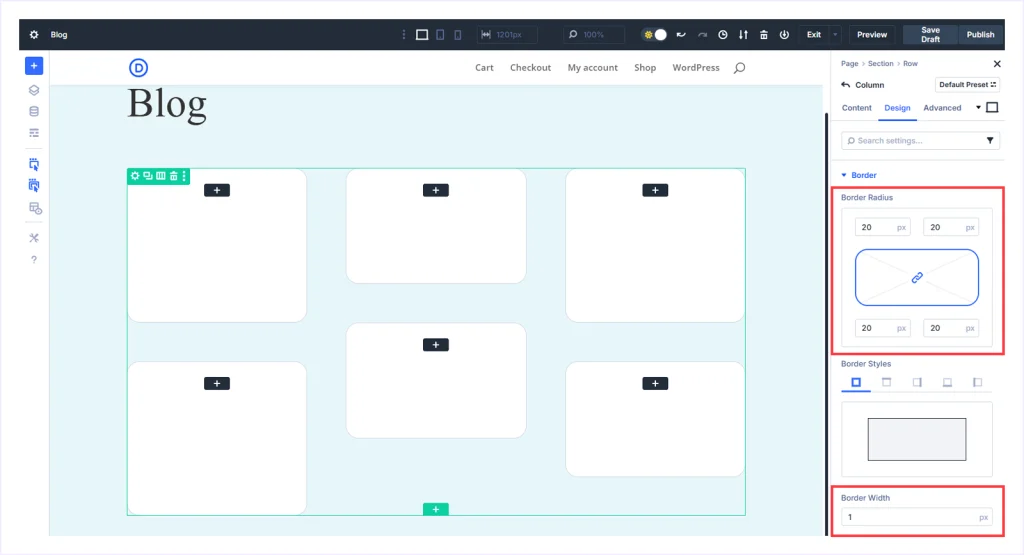
- Now, within the same column settings, scroll down to locate Border and expand it.

- Set the Border Radius to 20px to create rounded corners. Choose a 1px border width and keep the other settings at their defaults.
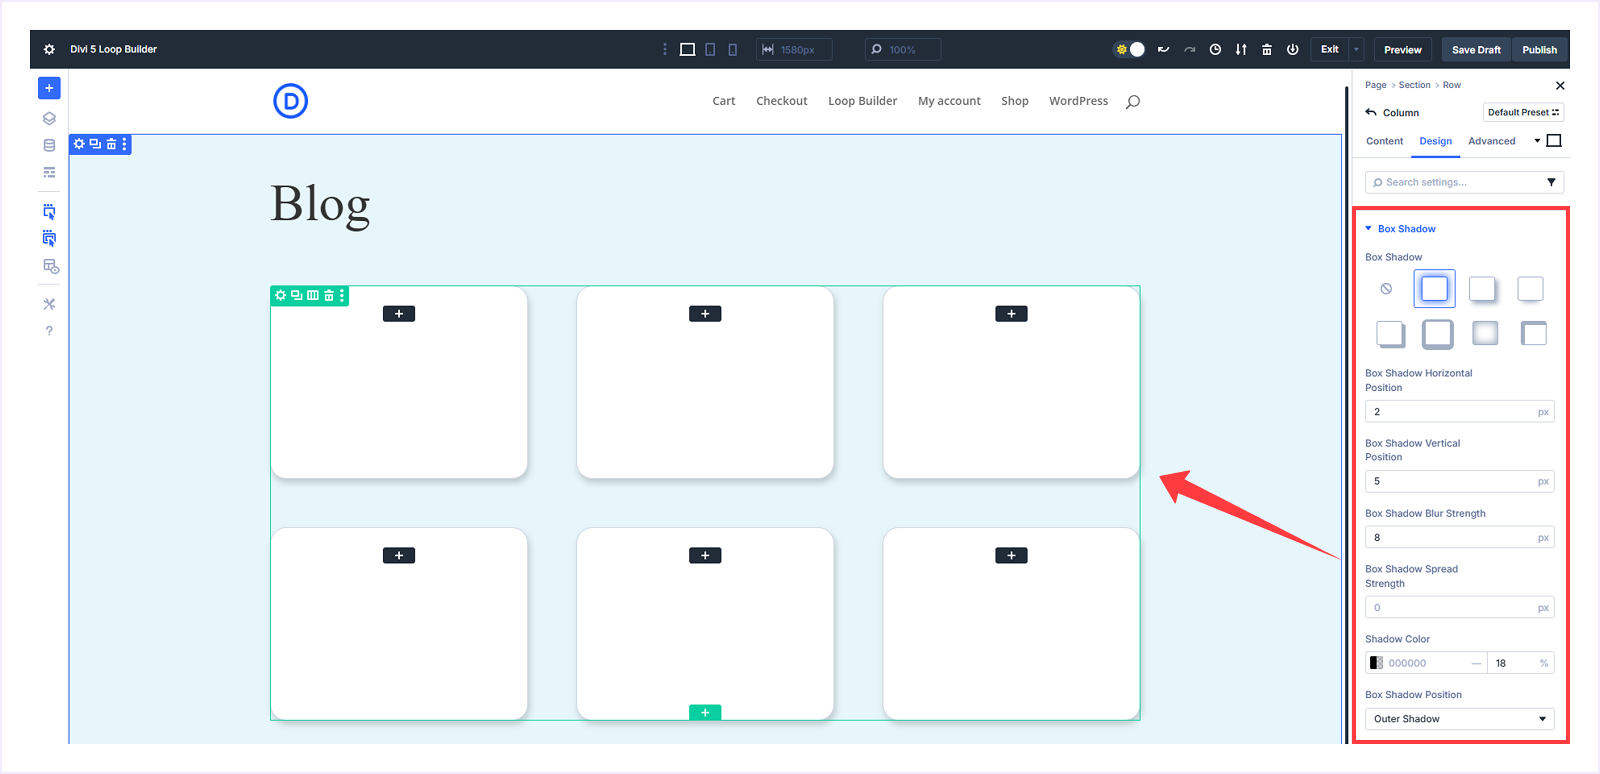
- Now expand the Box Shadow under the Border settings.
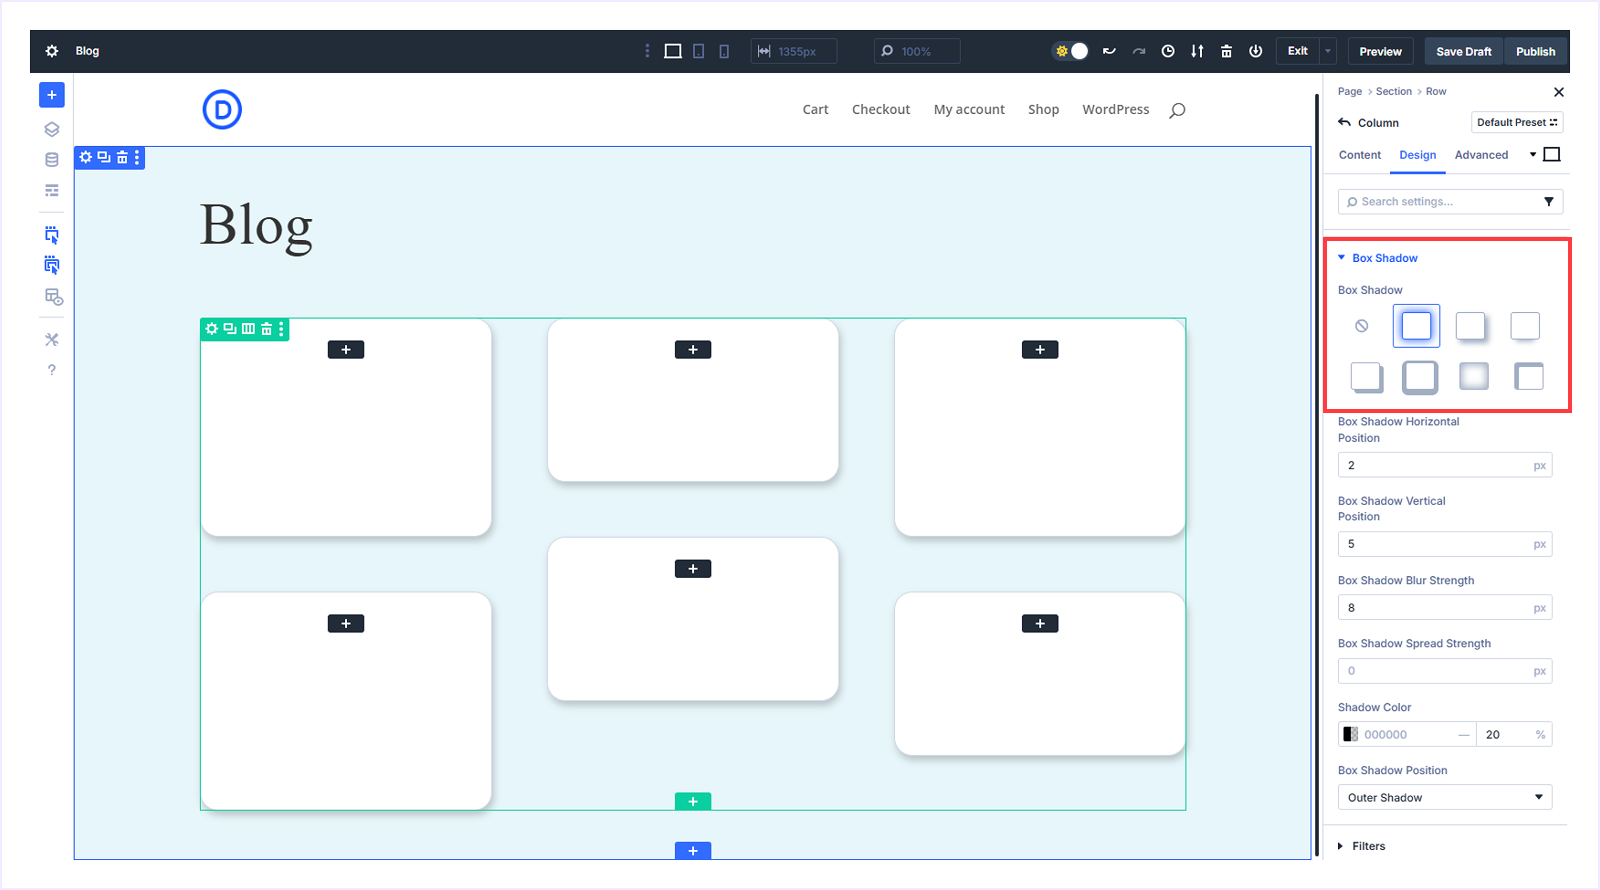
- Select the 2nd preset and set Horizontal Position to 2px, Vertical Position to 5px, Blur Strength to 8px, Spread Strength to 0px, keep the shadow color at #000000 with 18% opacity, and choose Outer Shadow to add visual depth.
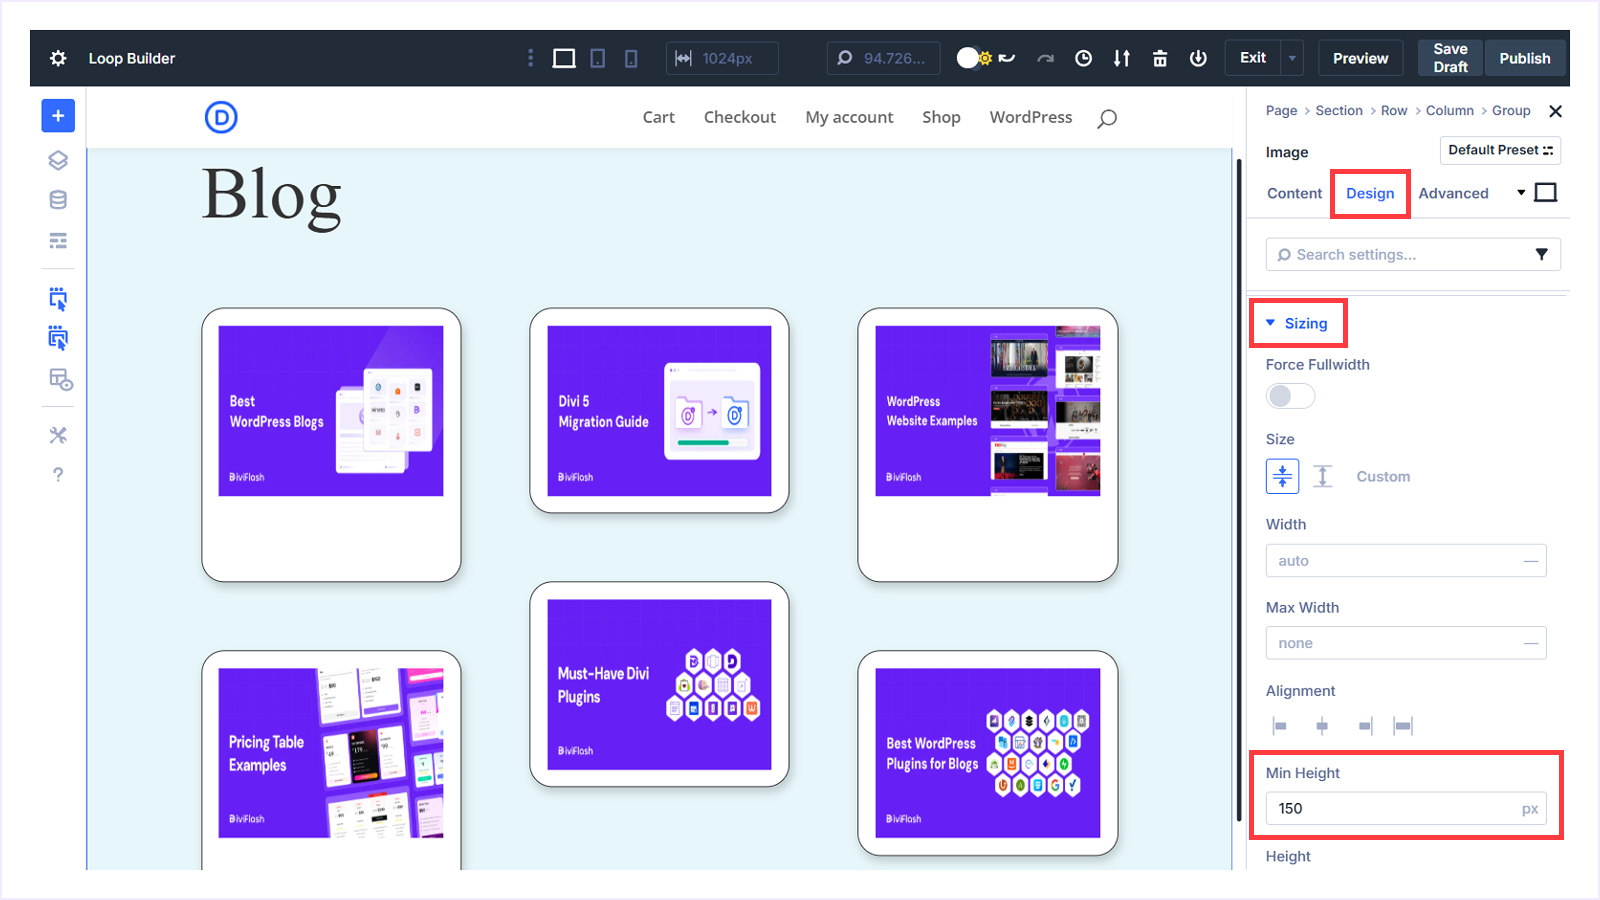
Step 5: Display Blog Feature Images:
Now it’s time to show the blog featured images on these cards. Follow these steps:
- Click the blank “+ icon” from the first group item.
- Choose the Group module from the module list.
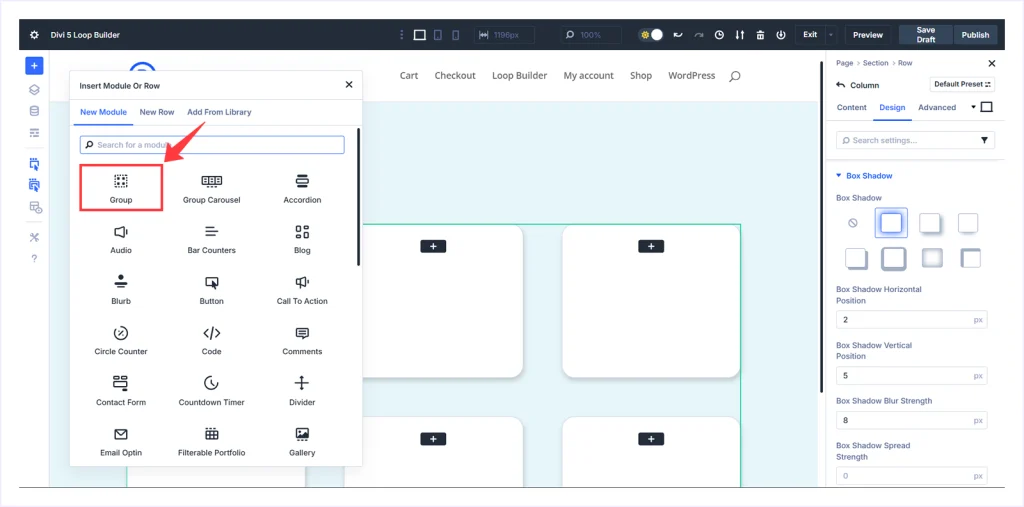
- The Group module is now added to every loop item.
- Click any + icon inside any Group module and select the Image module.
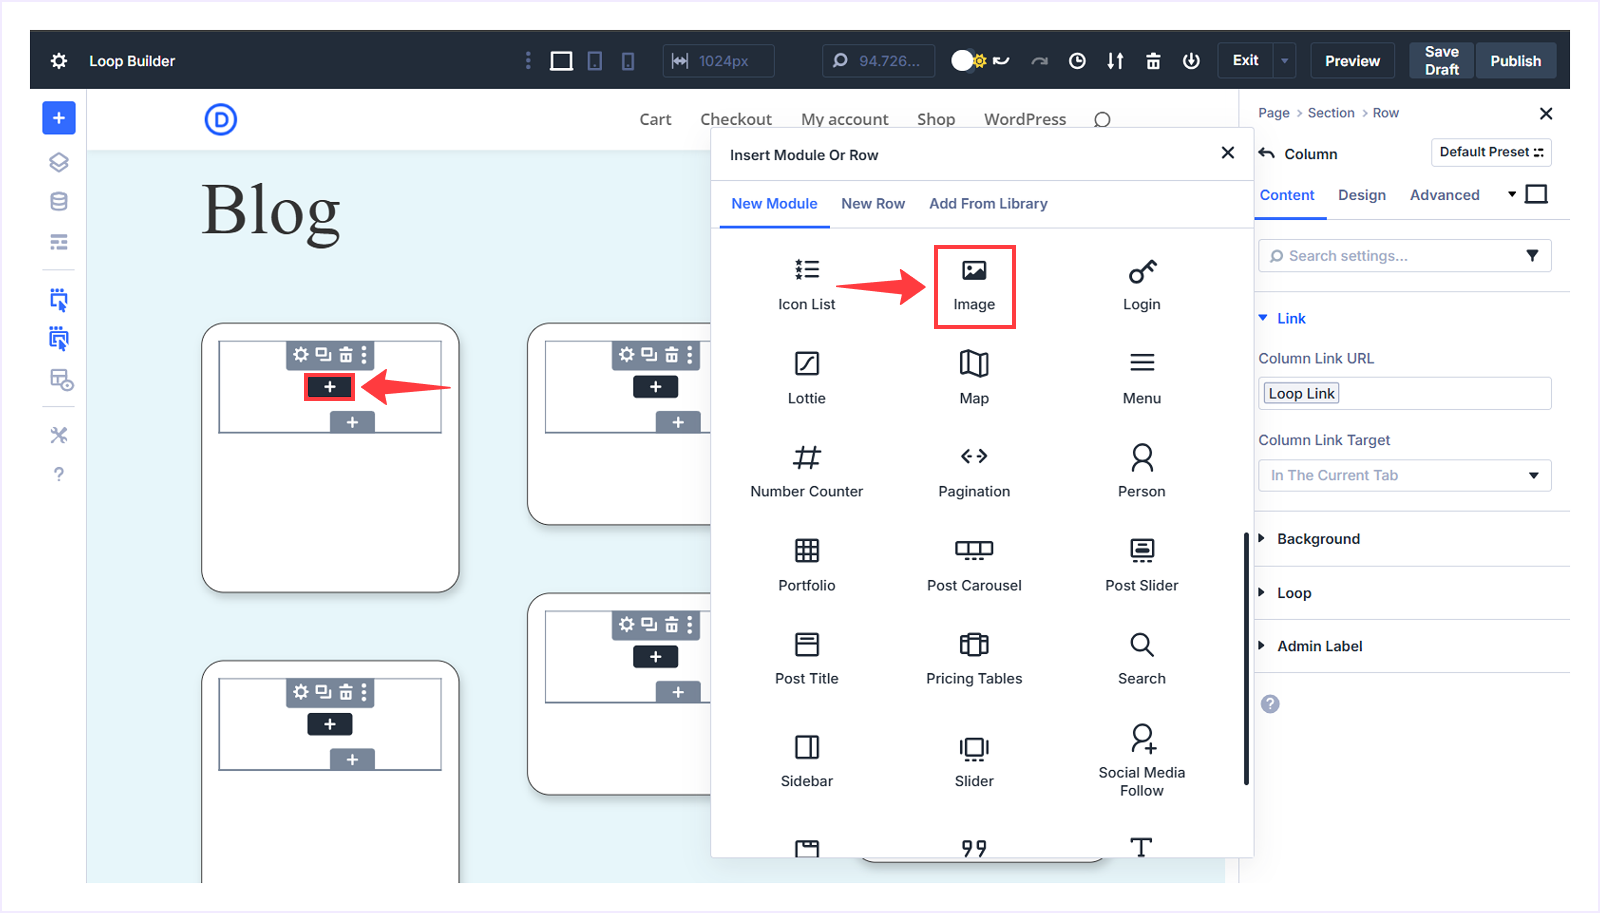
- The Image module will be automatically inserted into every Group module.
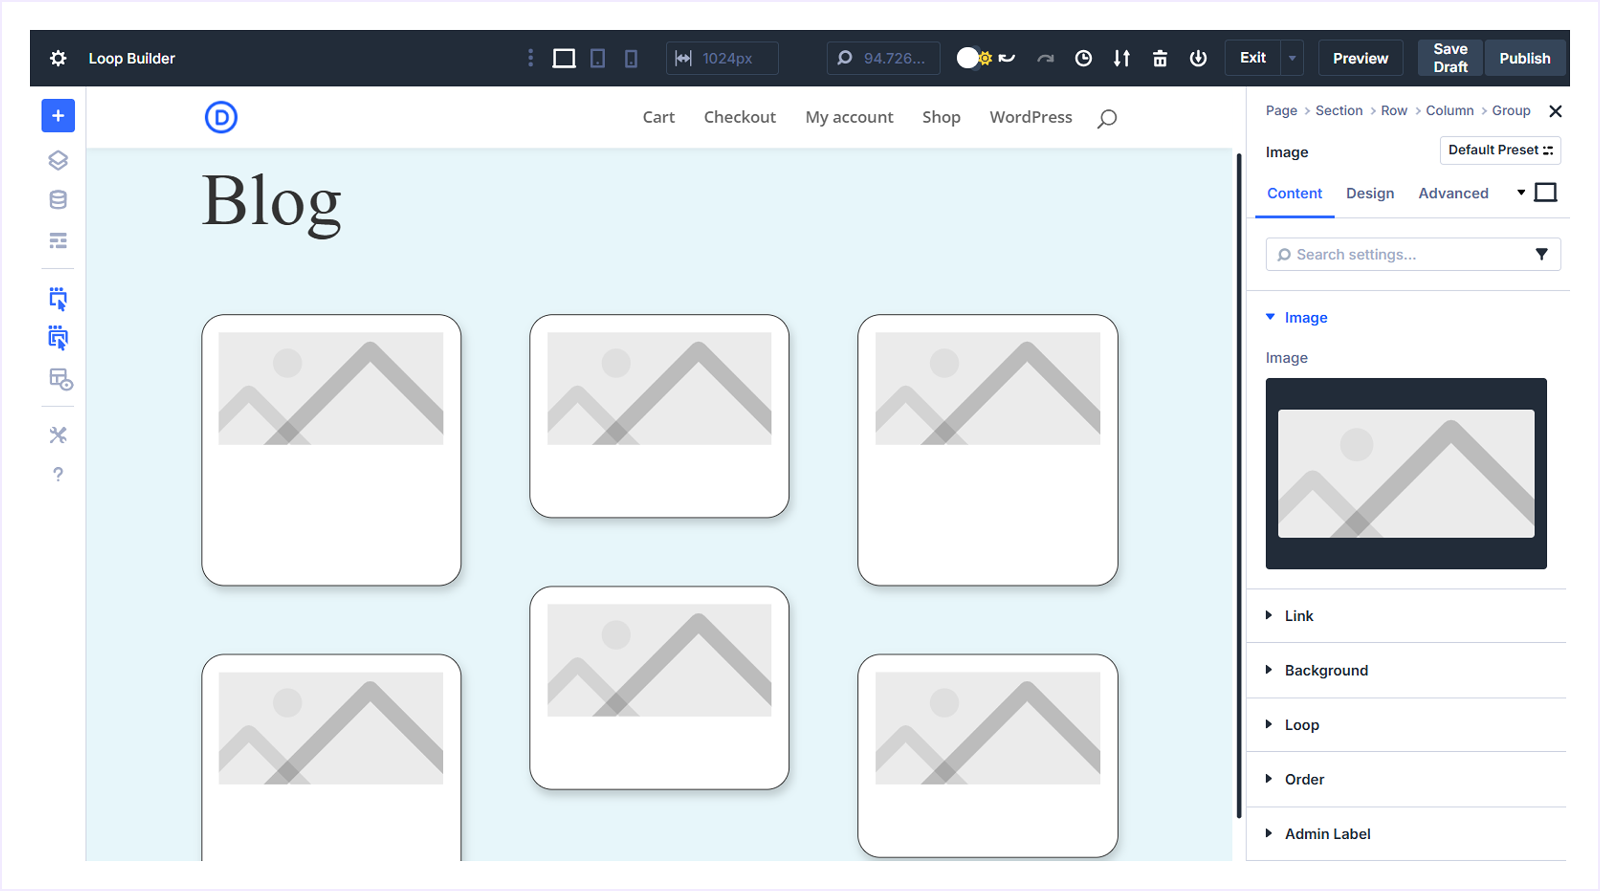
- Hover over the image field, click the Insert Dynamic Content icon, select Loop Featured Image, and click Apply.
- With the image selected, switch to the Design tab, expand Sizing, and set Min Height to 150px.
Step 5: Display Blog Headings:
Now we are going to display the blog heading under the featured image. Follow these steps:
- Click the + icon under the Image module to add a new module.
- Select the Group module from the list.
- Within the Group module, click the + icon and choose Heading.
- With the Heading module selected, go to the Content tab, hover over the Heading field, and click Insert Dynamic Content.
- Choose Loop Post Title from the context menu.
Customize Blog Heading:
- Switch to the Design tab within the Heading Module selected and apply the following:
- Heading Font: Times New Roman
- Heading Font Color: #151B54
- Heading Font Size: 20px
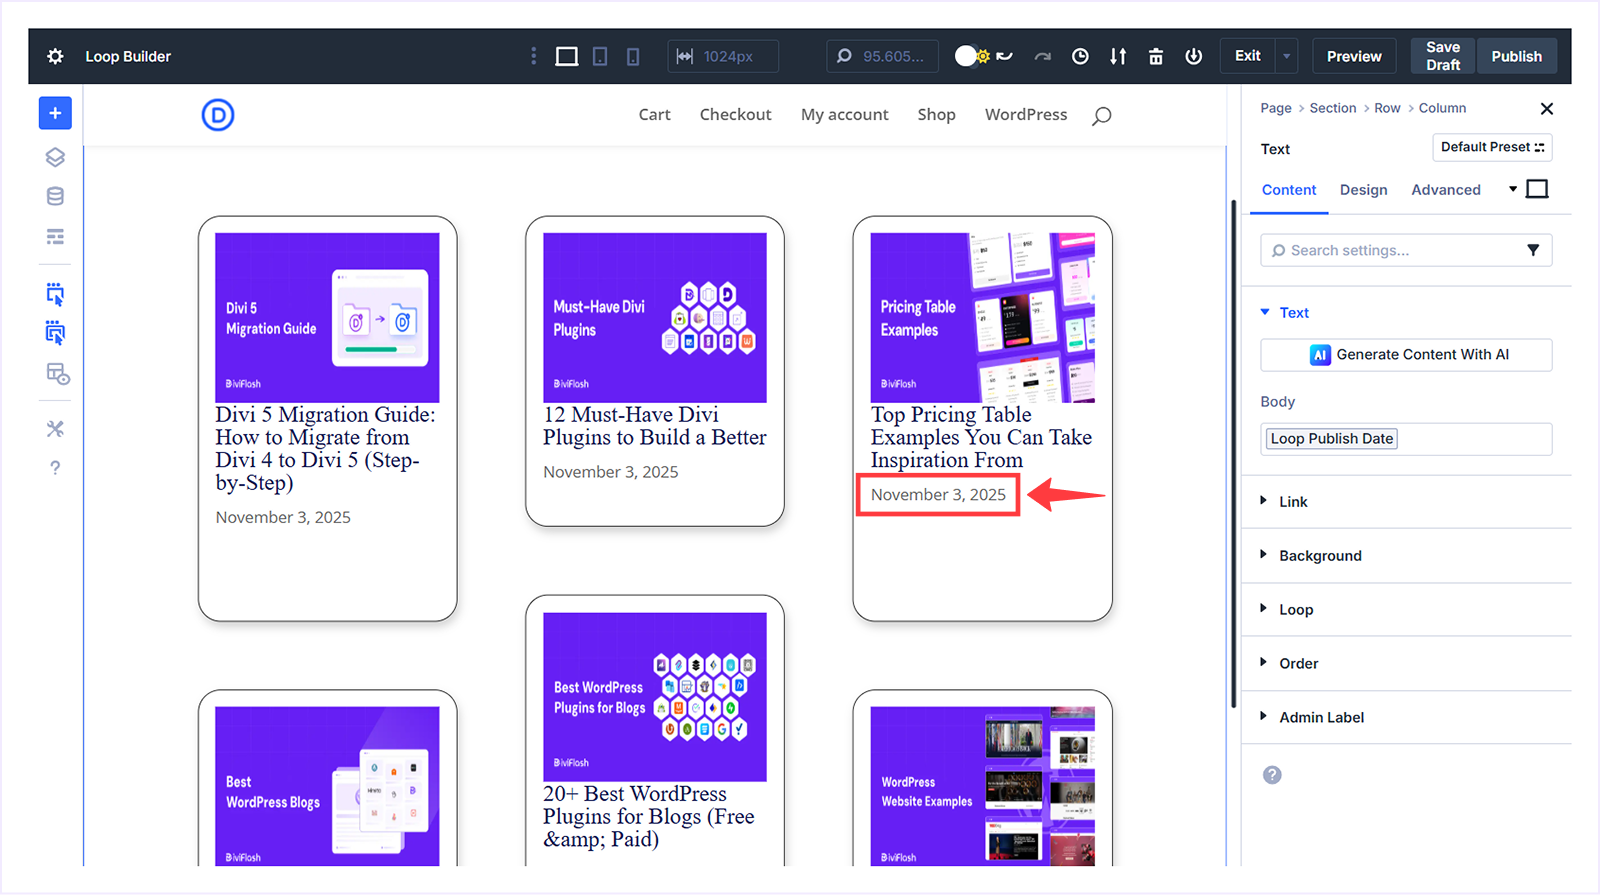
Step 5: Display Post Meta Data:
Now we are going to show post metadata such as the post excerpt, author information, and publication date on these cards. Follow these steps:
Display Post Published Date:
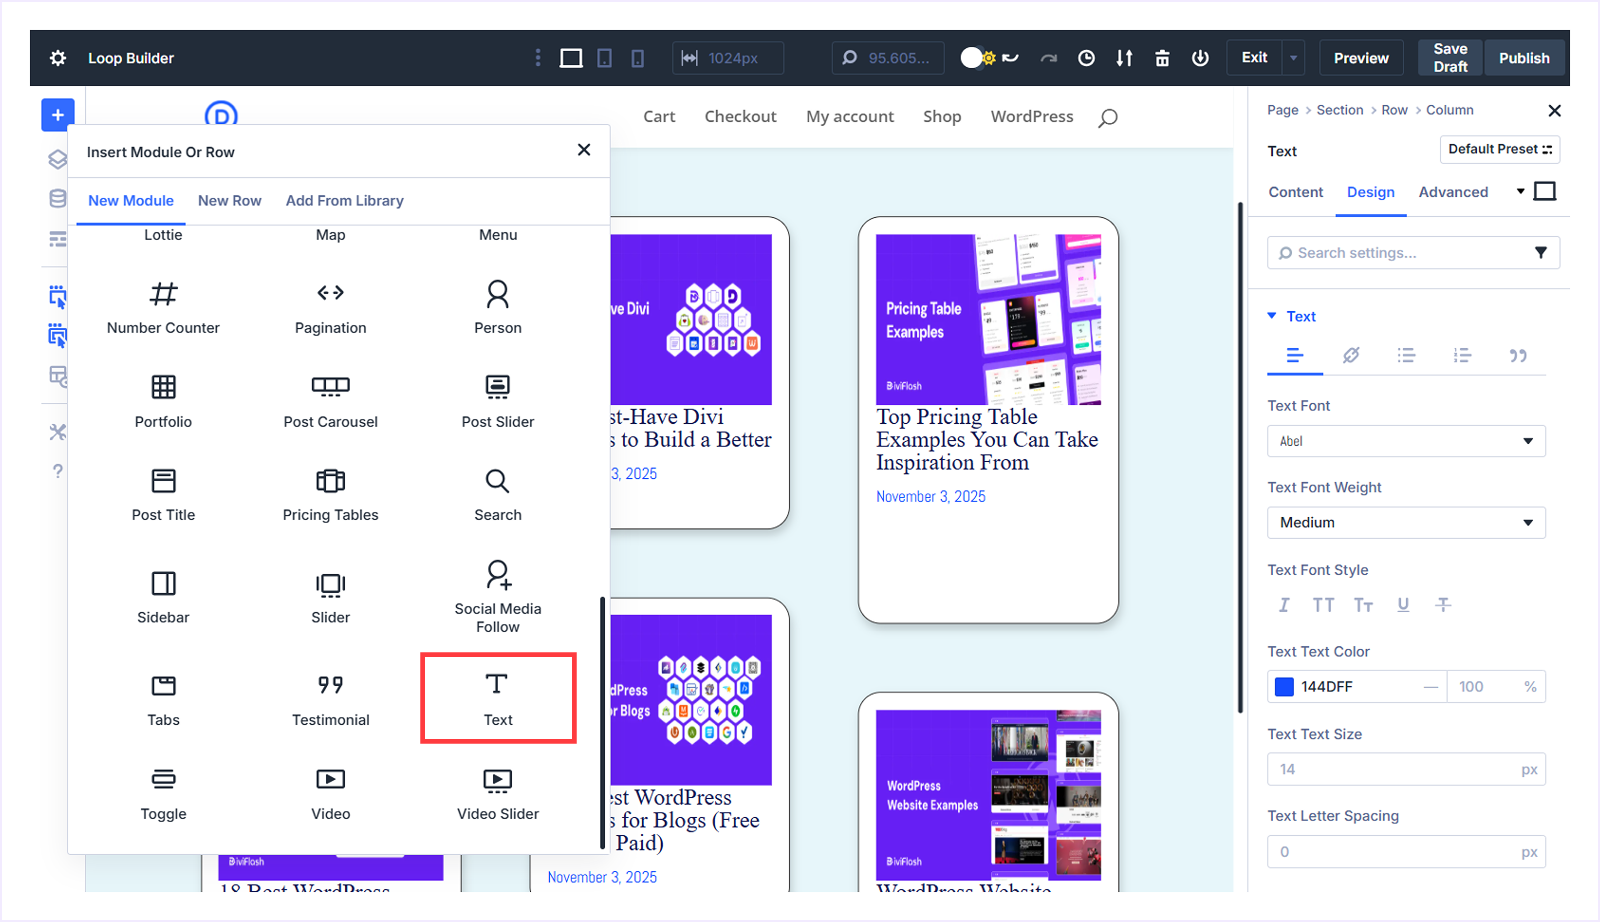
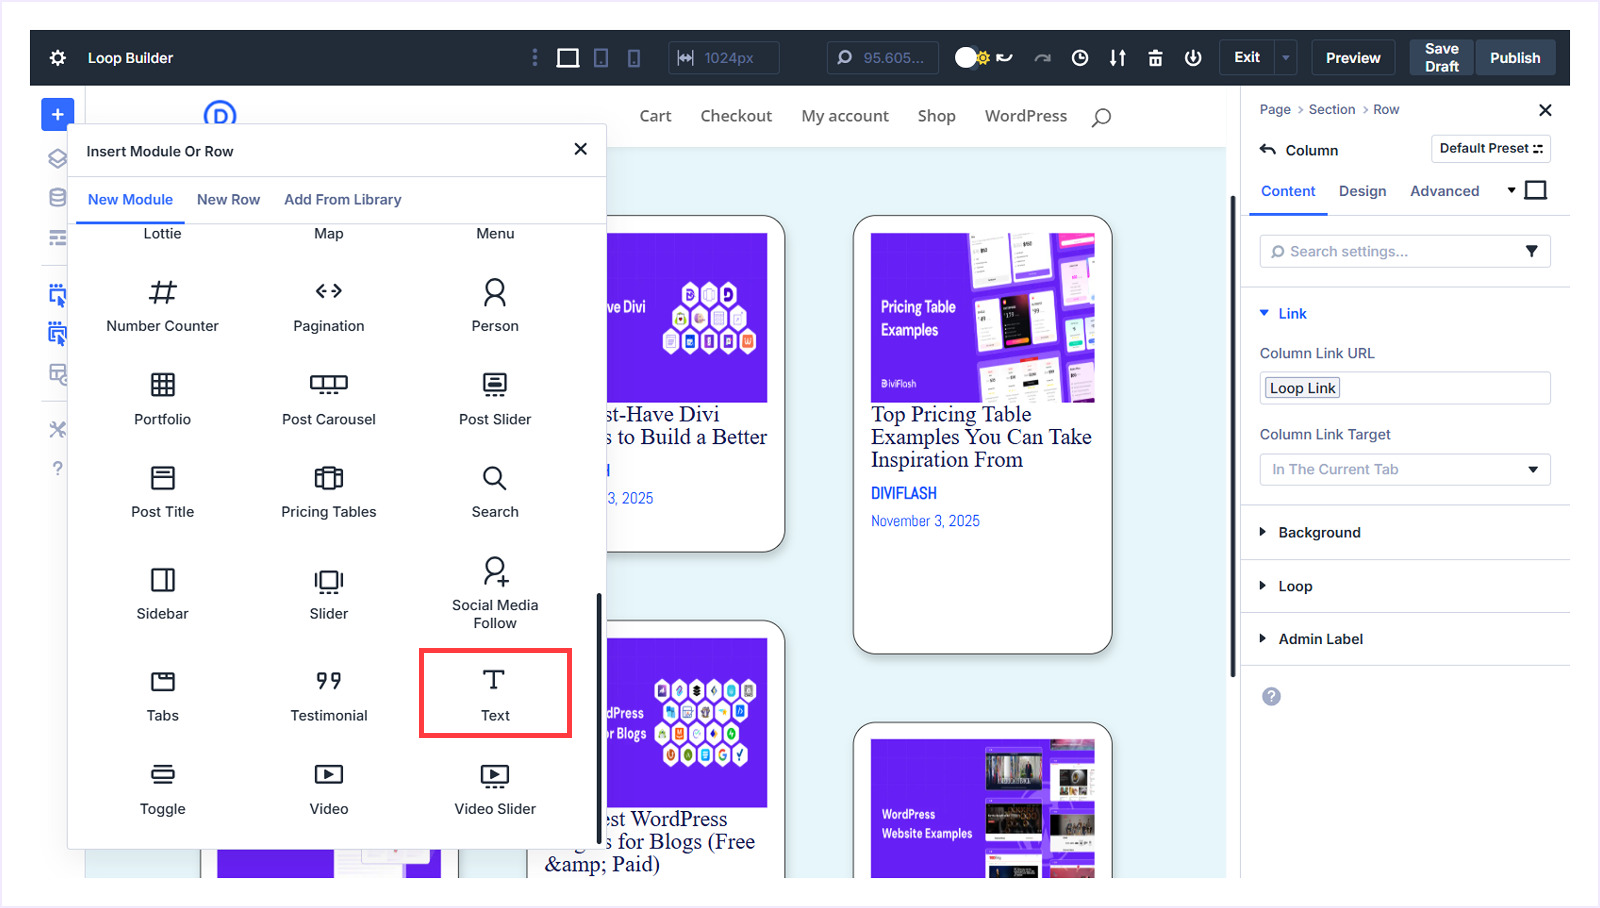
- Click the + icon after the blog heading.
- Choose the Text module from the list.
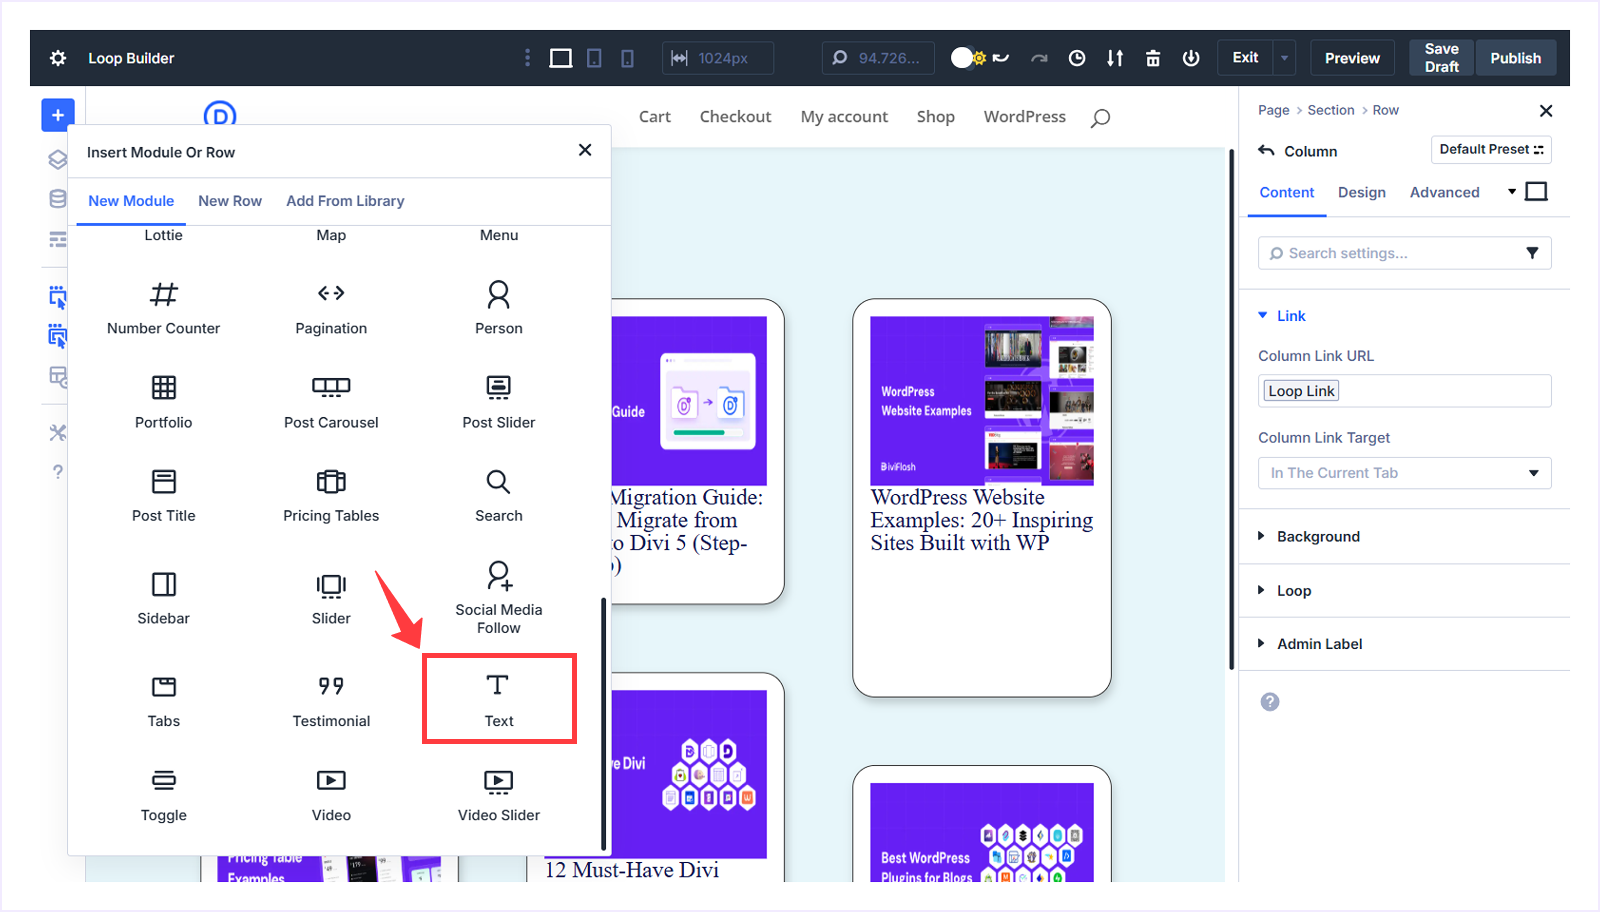
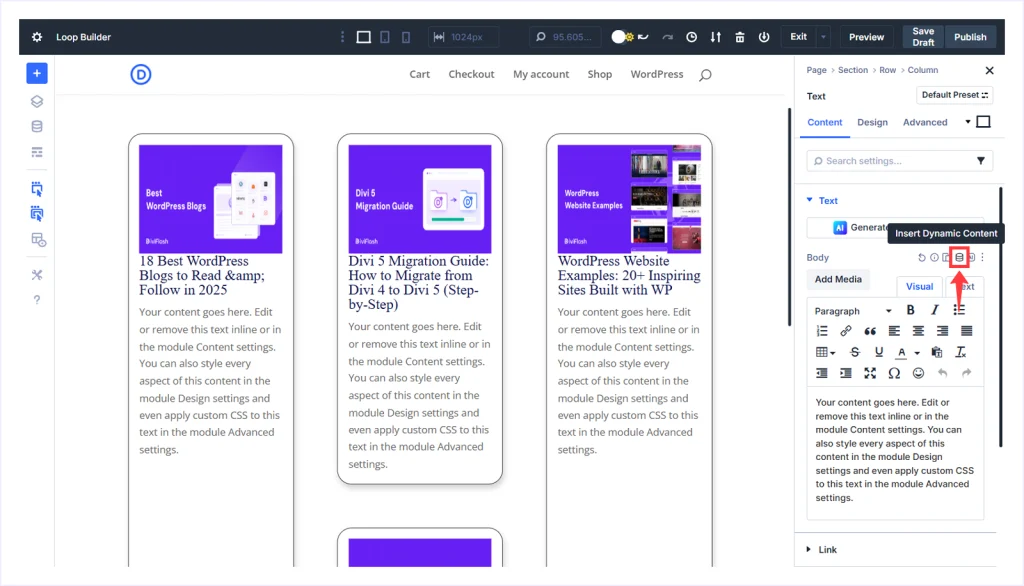
- A Text module will be added with placeholder text.
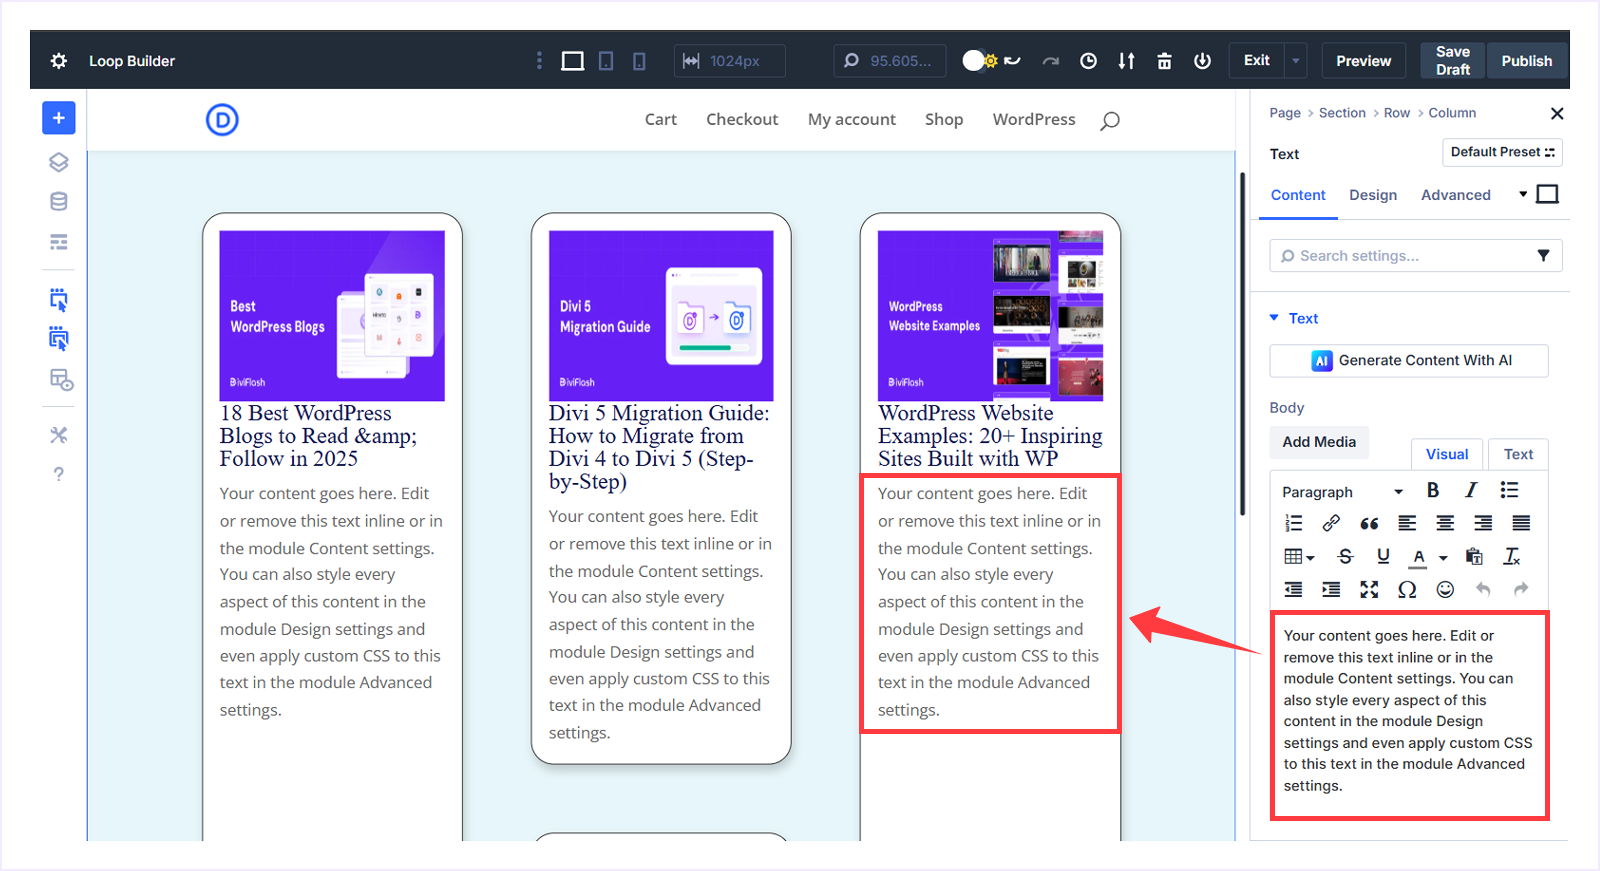
- With the Text module selected, go to the Content tab, hover beside the Body field, and click Insert Dynamic Content.
- Choose Loop Published Date from the context menu.
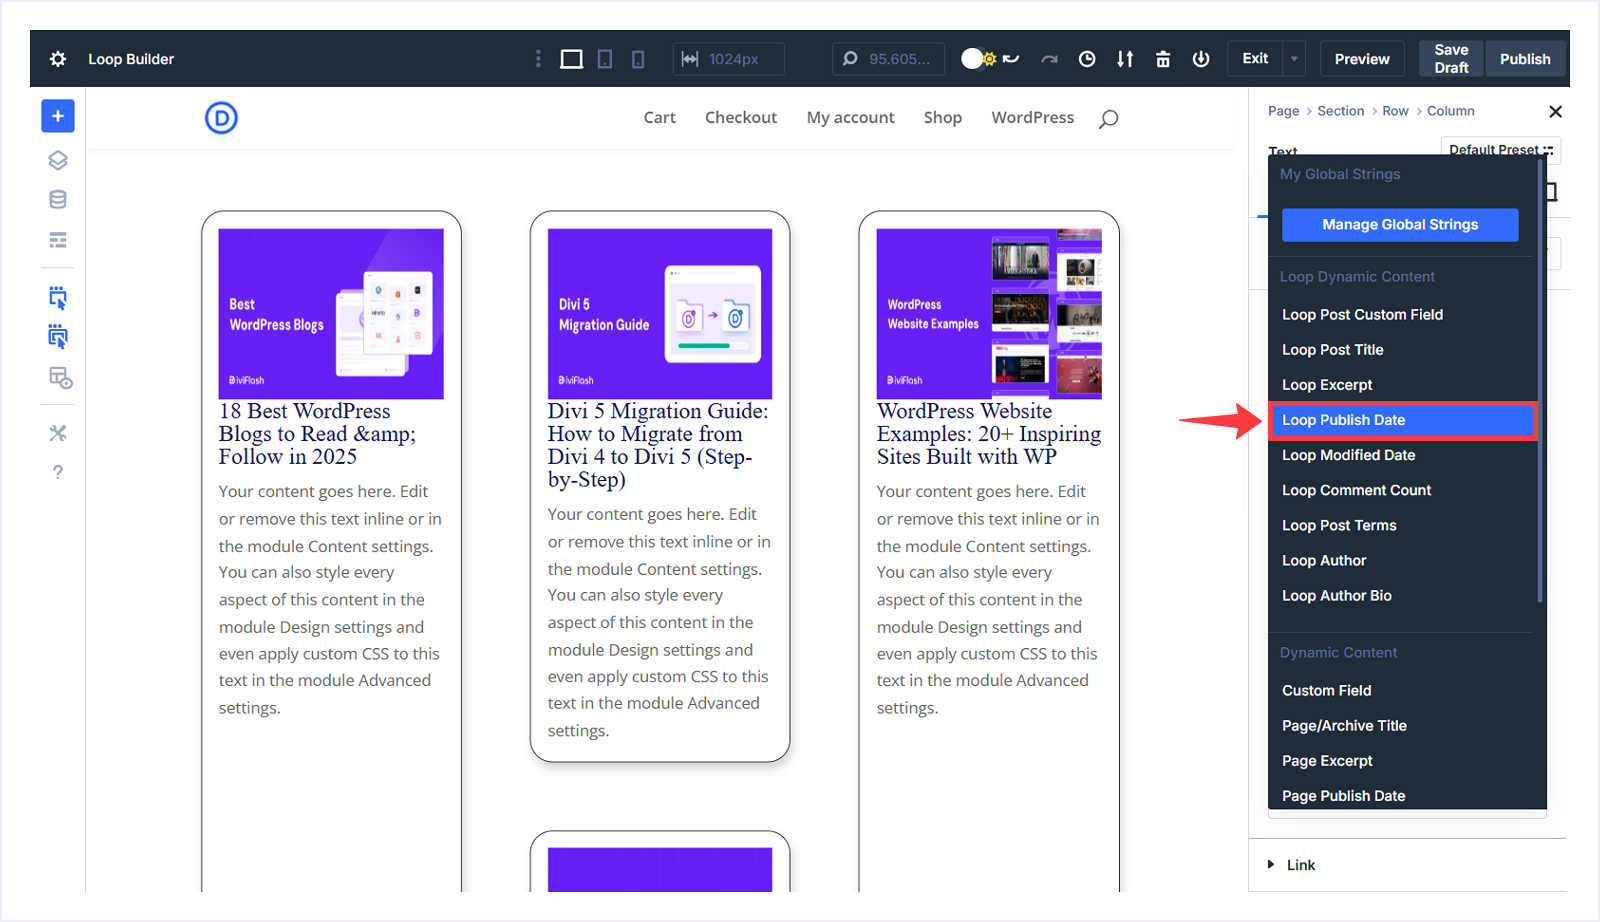
- The placeholder text is now replaced with the blog’s published date.
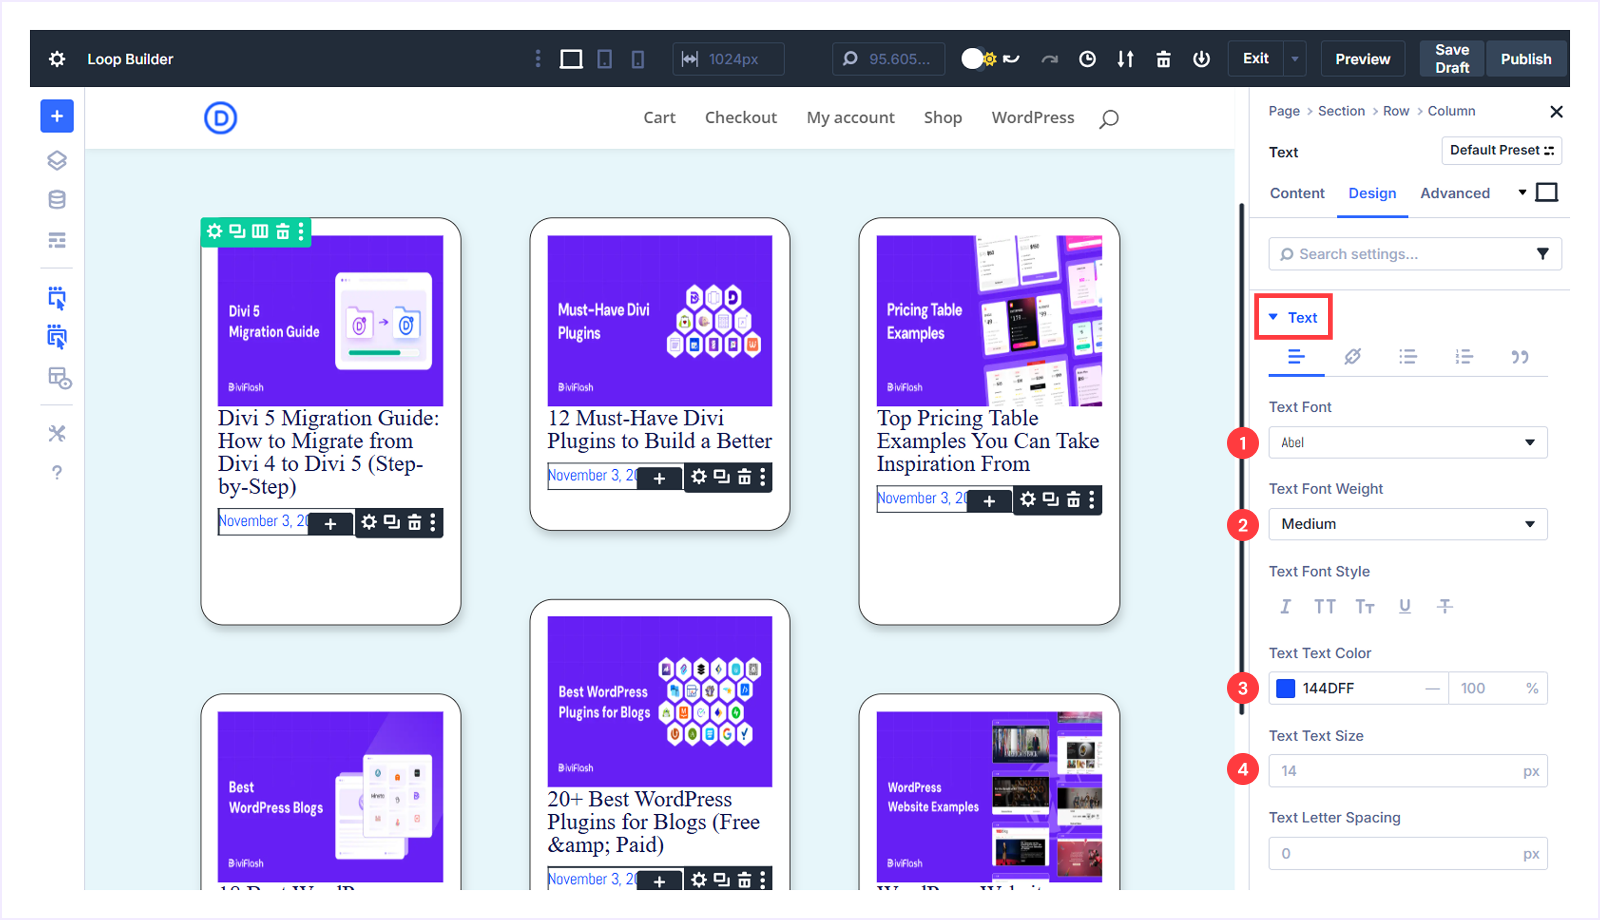
Customize Post Published Date:
- Go to the Design tab with the published date Text module selected.
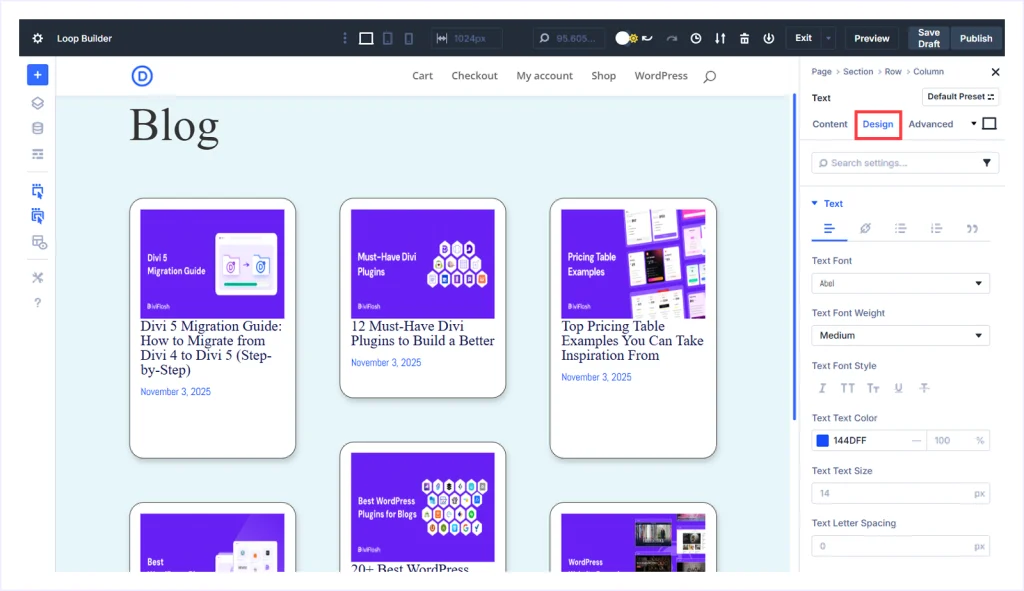
- Expand Text and apply the following:
- Text Font: Abel
- Text Font Weight: Medium
- Text Font Color: #144DFF
- Text Font Size: 14px
Display Post Author:
Follow these steps to display the post author:
- Click the + icon above the published date text element.
- Choose the Text Module from the available module list.
- With the Text module selected, go to the Content tab, hover beside the Body field, and click Insert Dynamic Content.
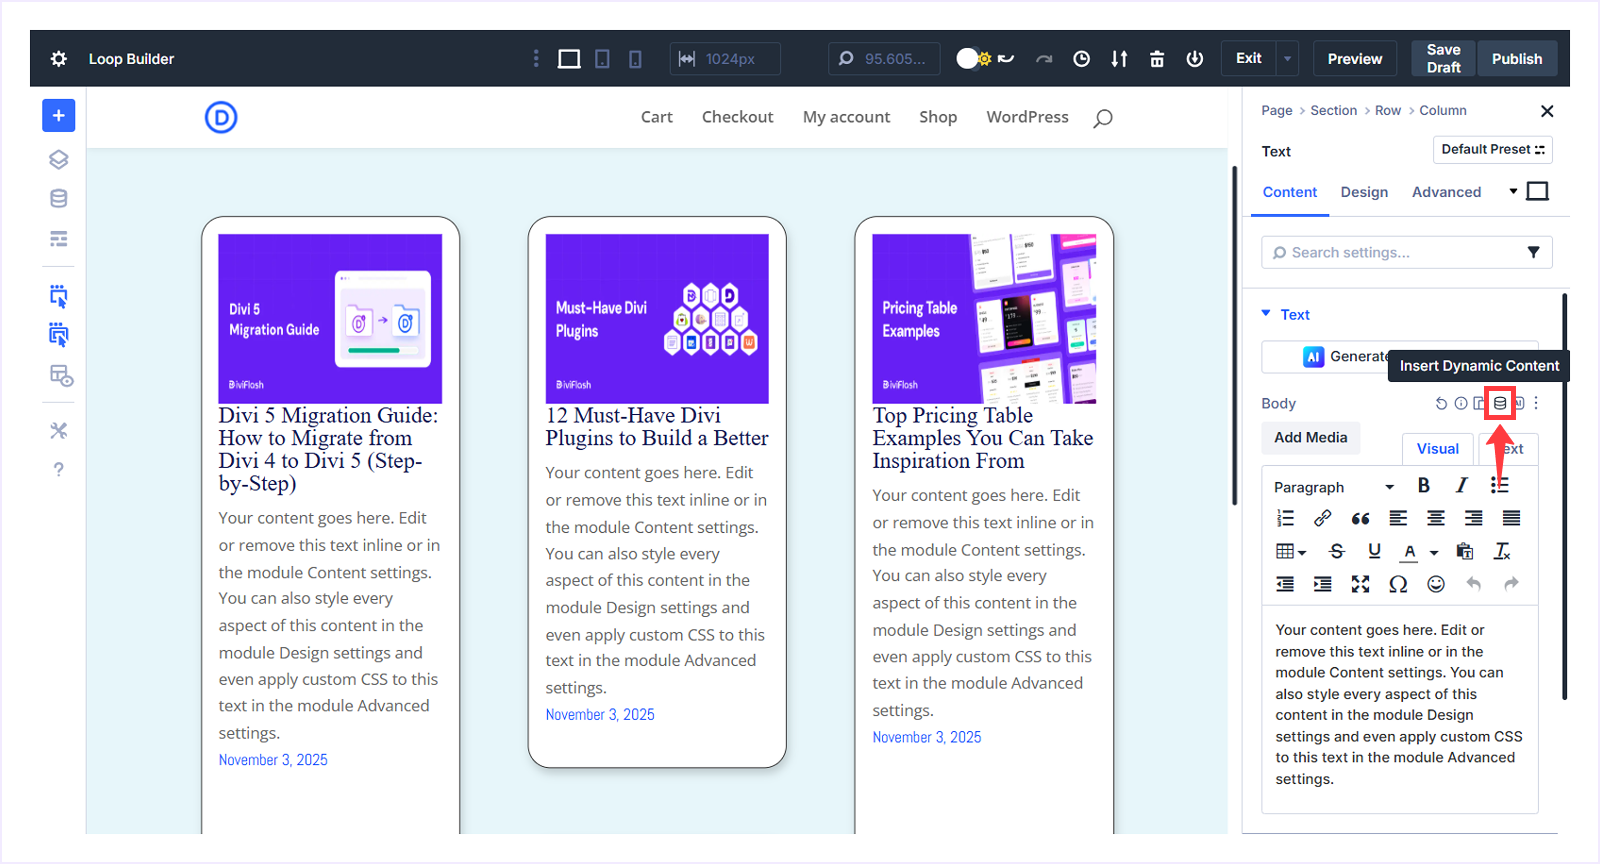
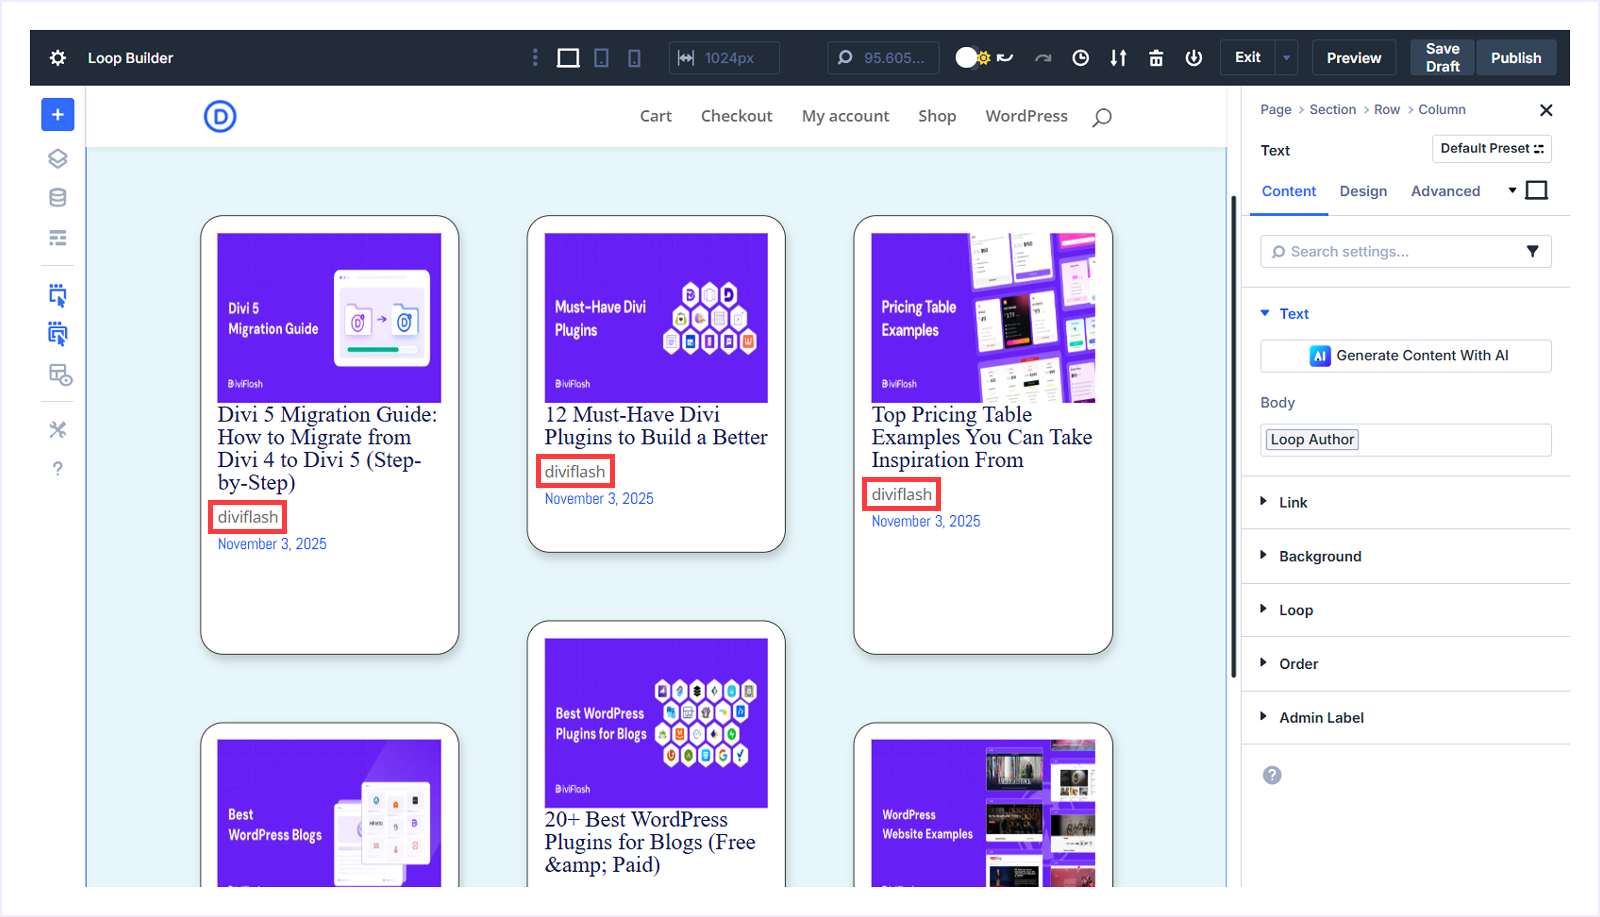
- Choose Loop Author from the menu.
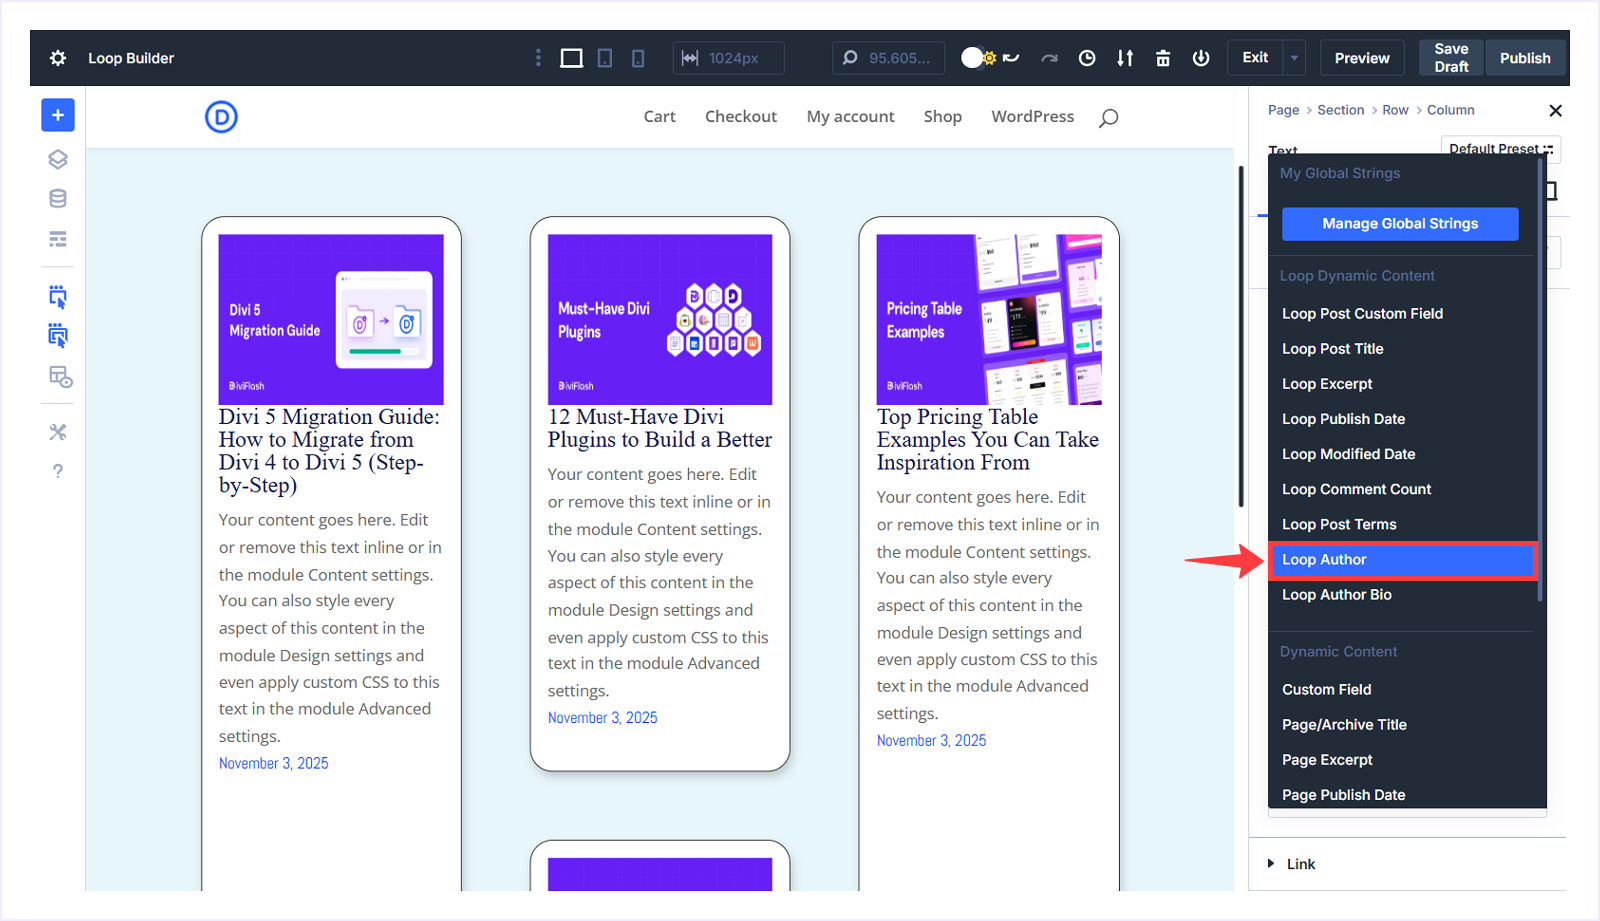
- The post author now appears before the published date.
Customize Post Author:
Now we will customize the author’s appearance following these steps:
- Switch to the Design tab with the author Text module selected.
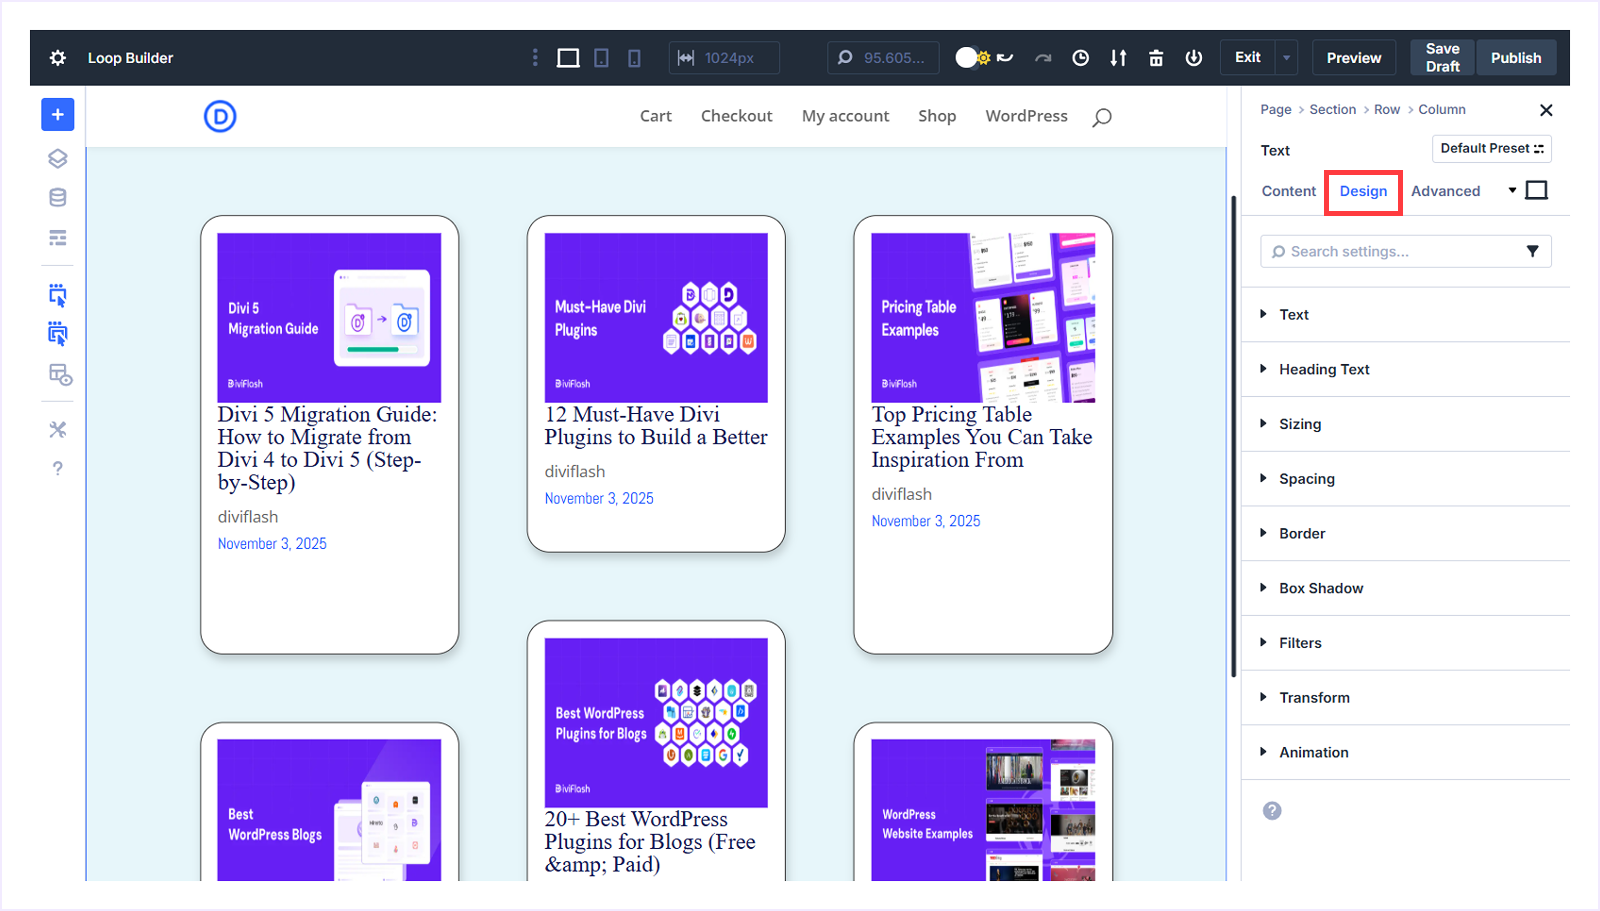
- Expand the text settings and apply the following changes:
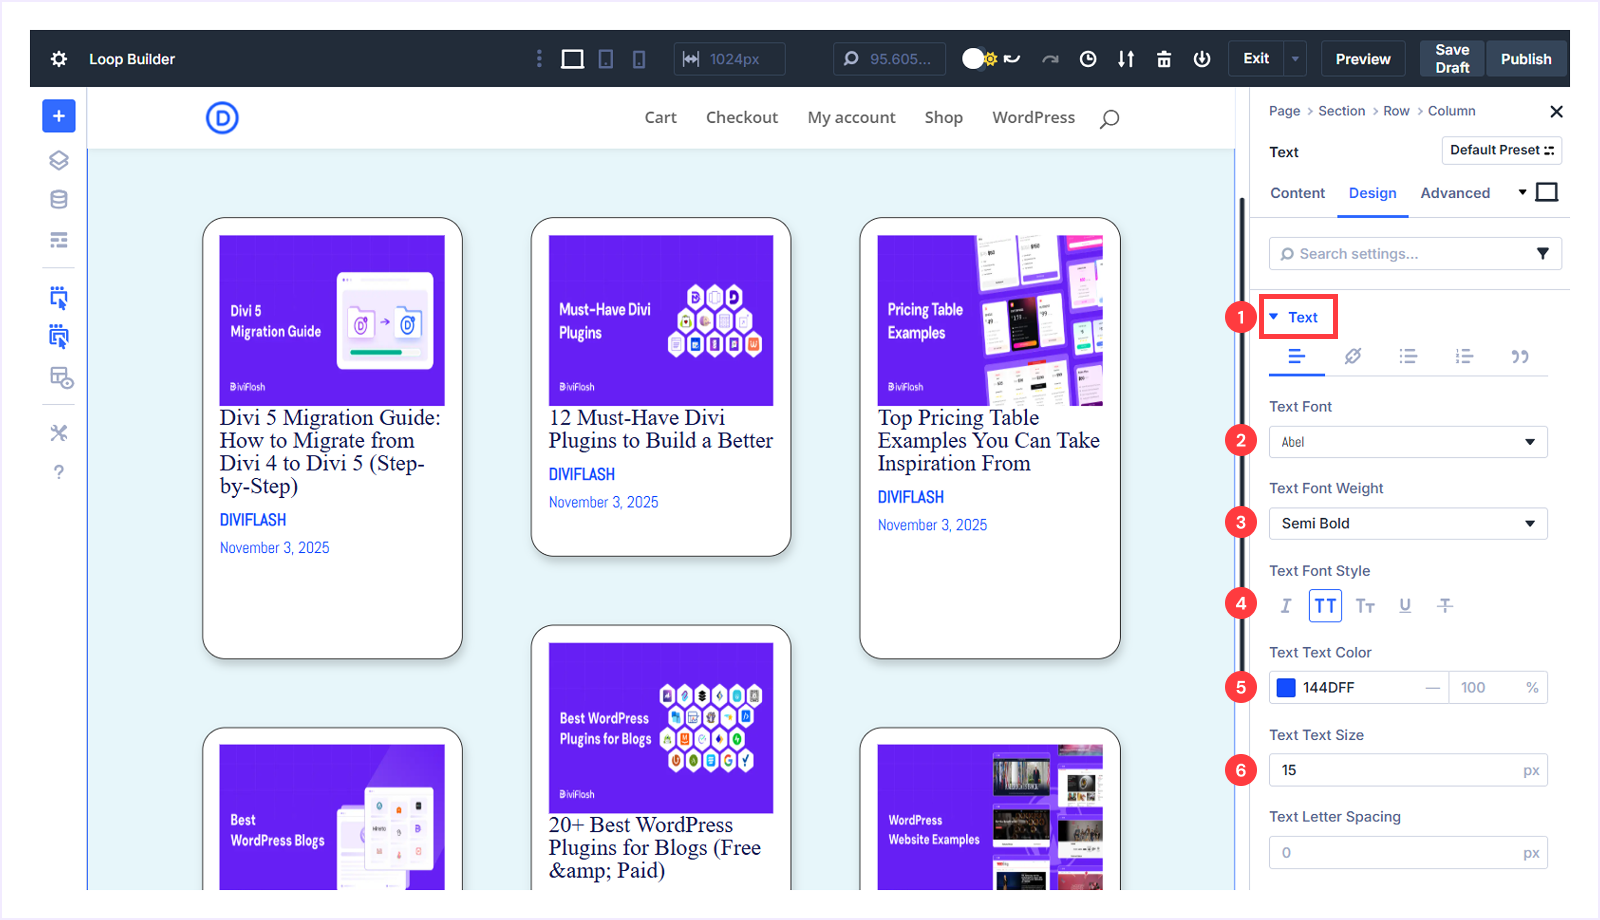
- Text Font: Abel
- Text Font Weight: Semi Bold
- Text Font Style: Uppercase
- Text Font Color: #144DFF
- Text Font Size: 15px
Display Post Excerpt:
Now we are going to display the post excerpt after the published date. Follow these steps:
- Click the + icon below the published date.
- Select the Text module from the list.

- With the Text module selected, go to the Content tab, hover beside the Body field, and click Insert Dynamic Content.
- Click the icon and select Loop Excerpt from the menu.
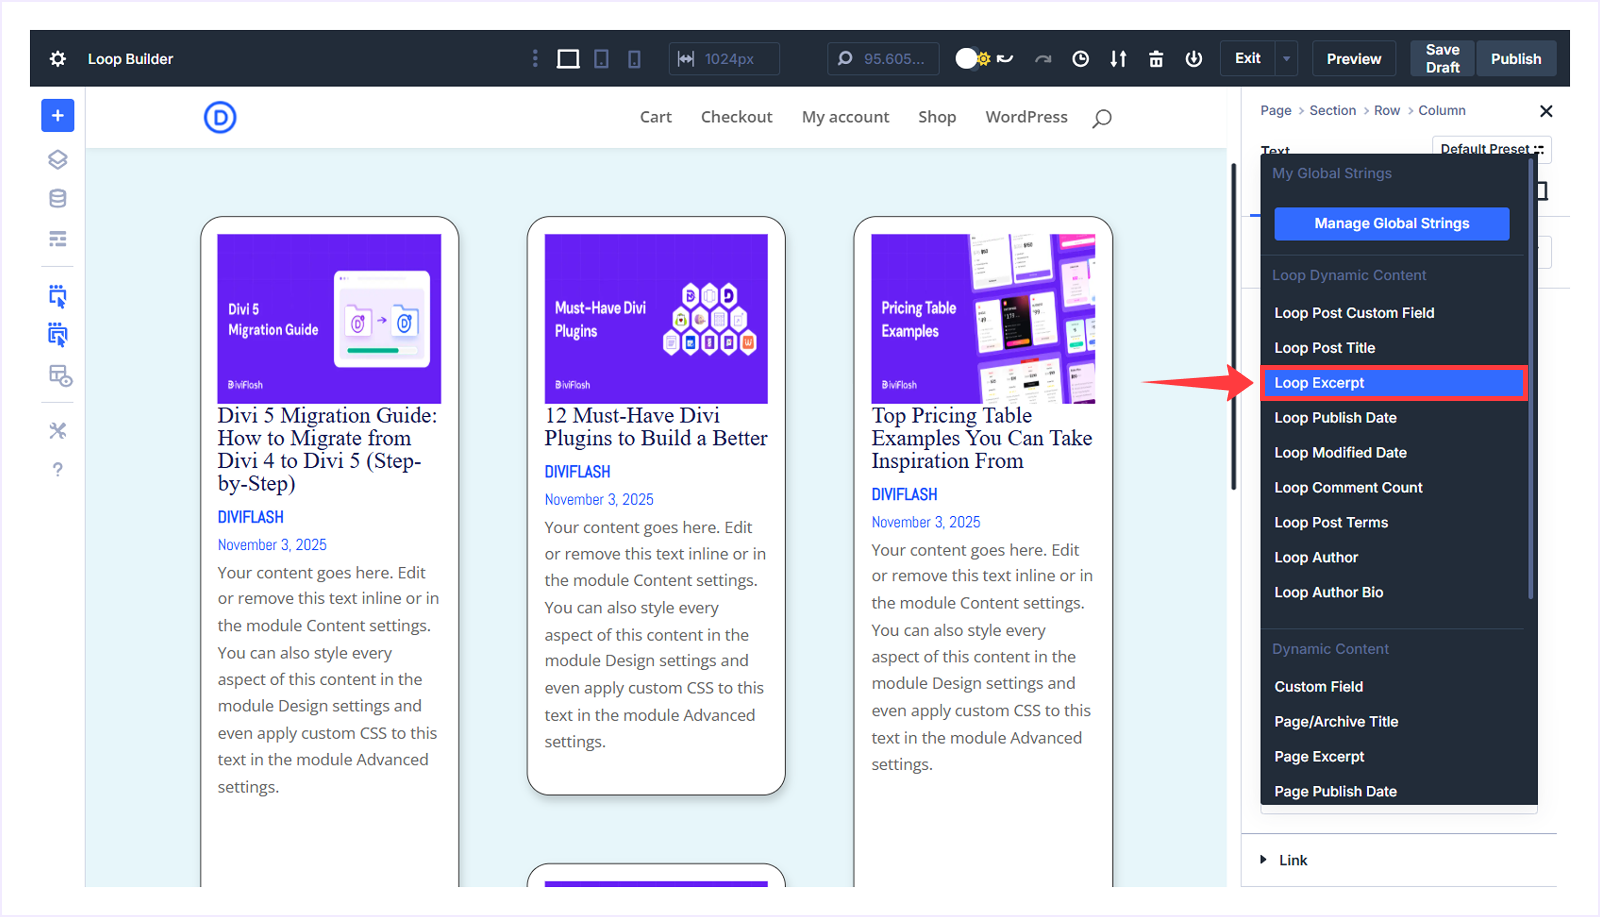
- Set the number of Words to 20 and apply the changes.
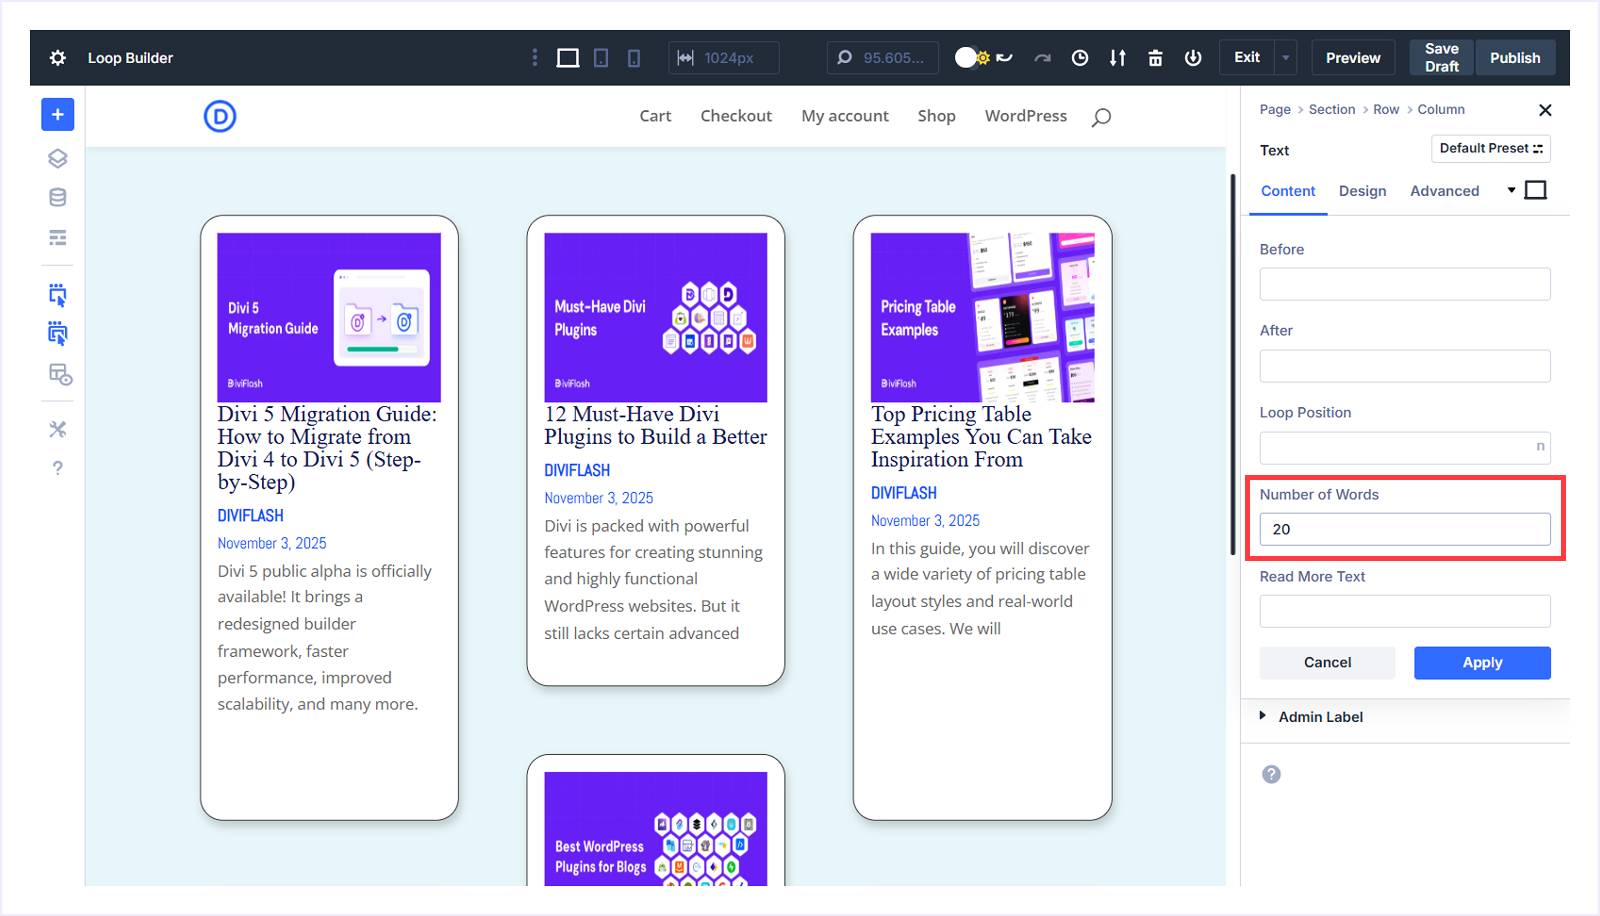
- The post excerpt now displays with a 20-word limit.
Step 5: Display Read More Button:
Follow these steps to add a read more button after every post excerpt.
- Click the + icon below the post excerpt.
- Select the Button module.
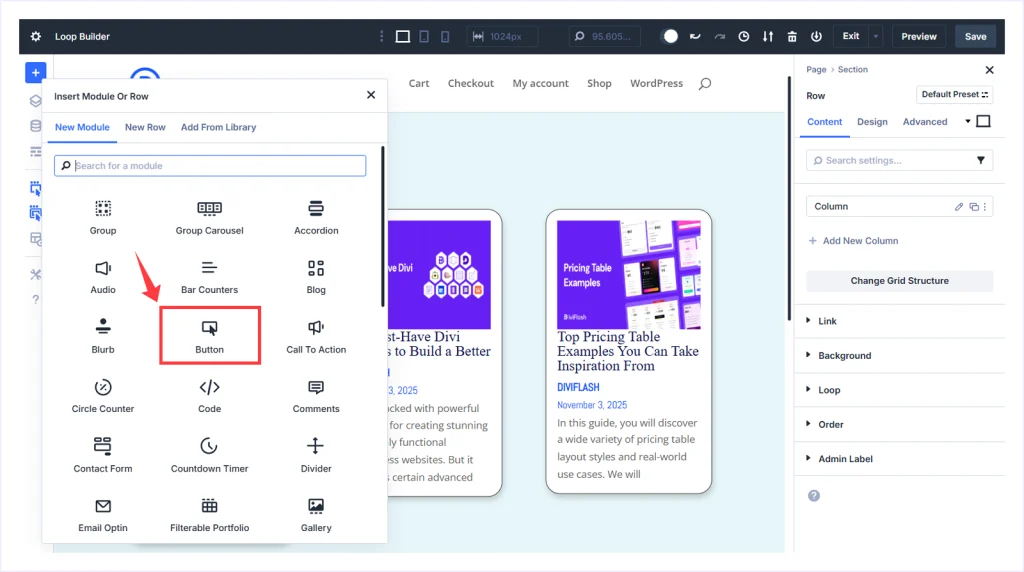
- The Button module is now added after every post excerpt.
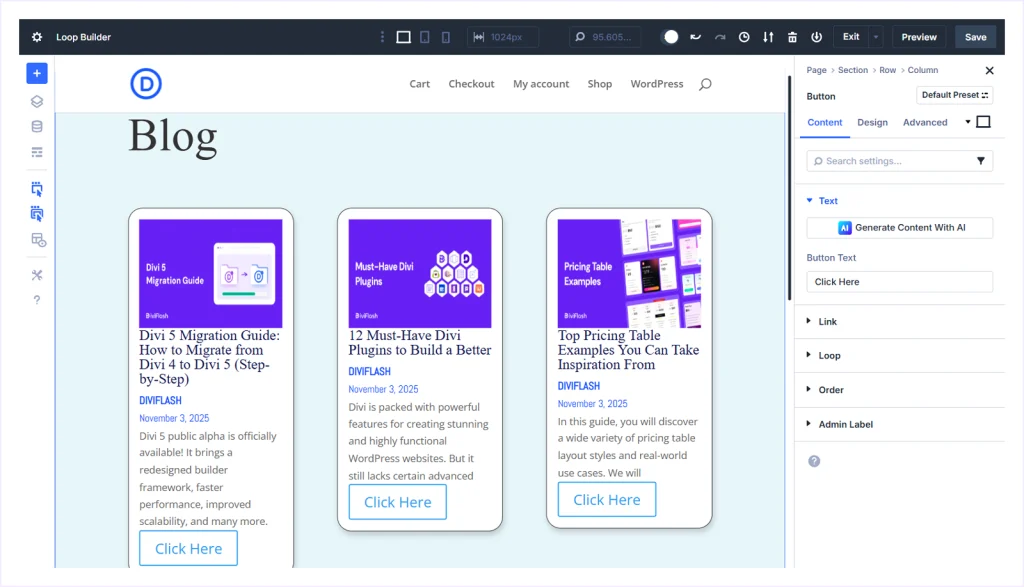
Customize the Read More Button:
- Click any button and go to the Content tab.
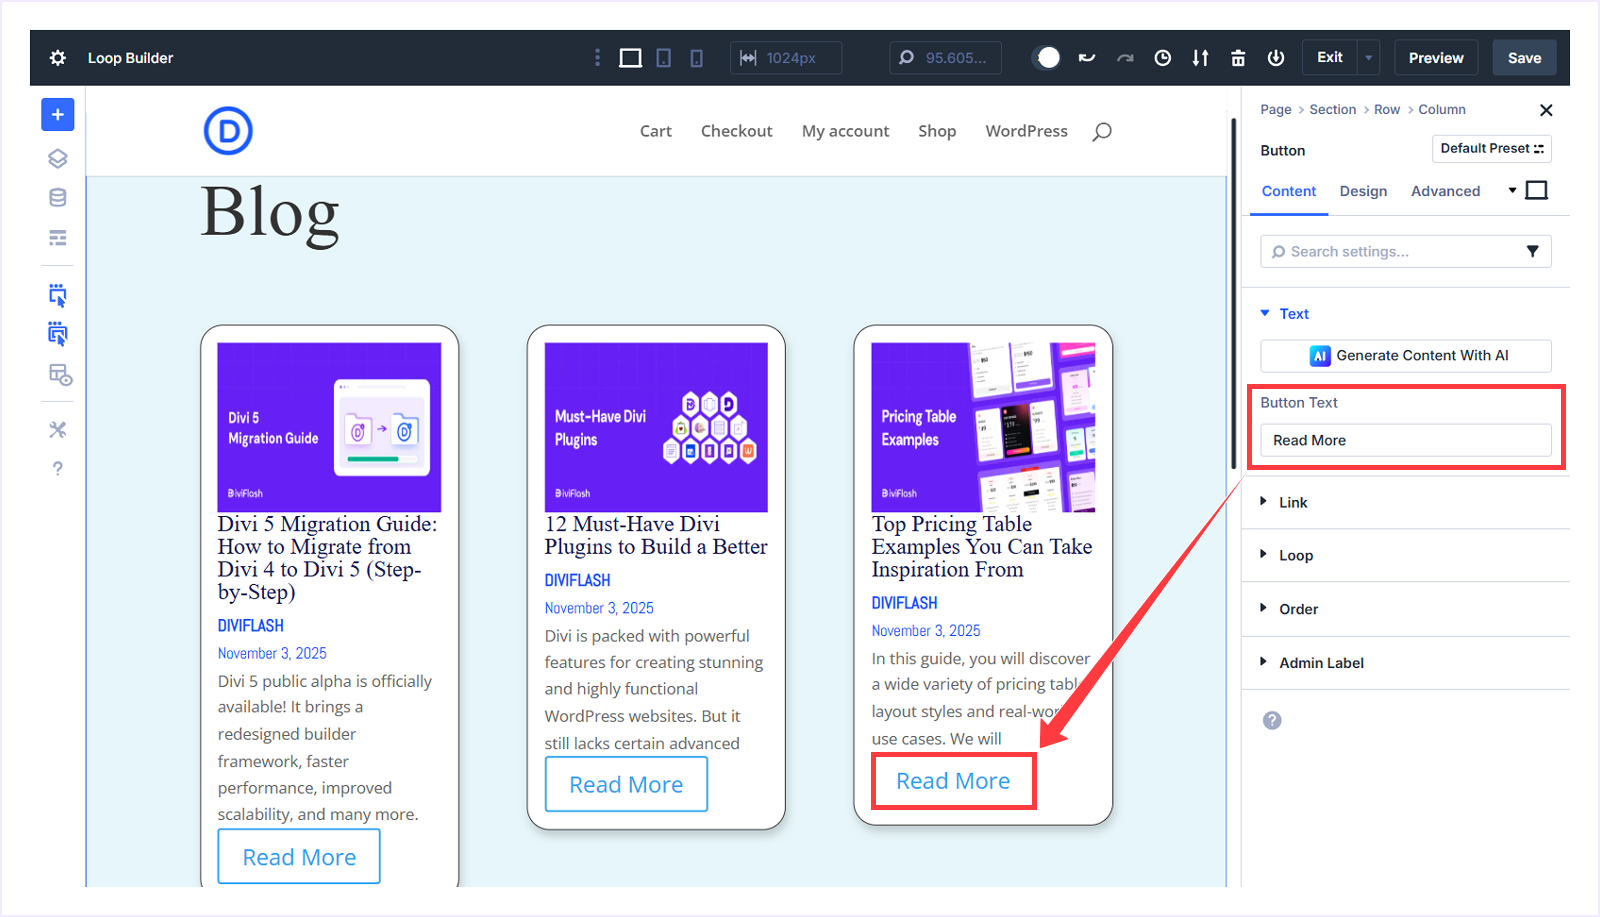
- Change the Button Text to Read More.
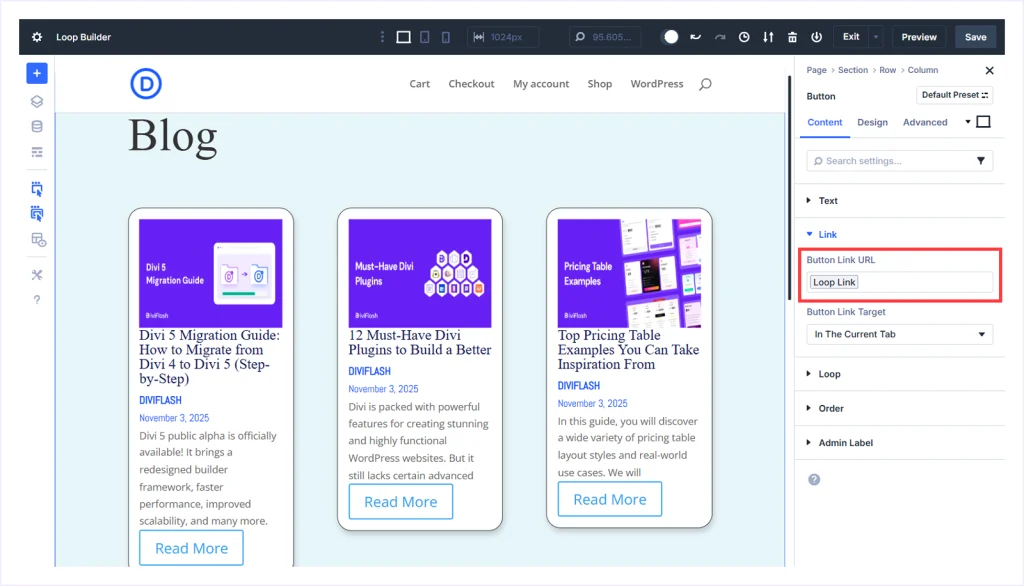
- Expand Link, hover over the Button Link URL field, and click Insert Dynamic Content.
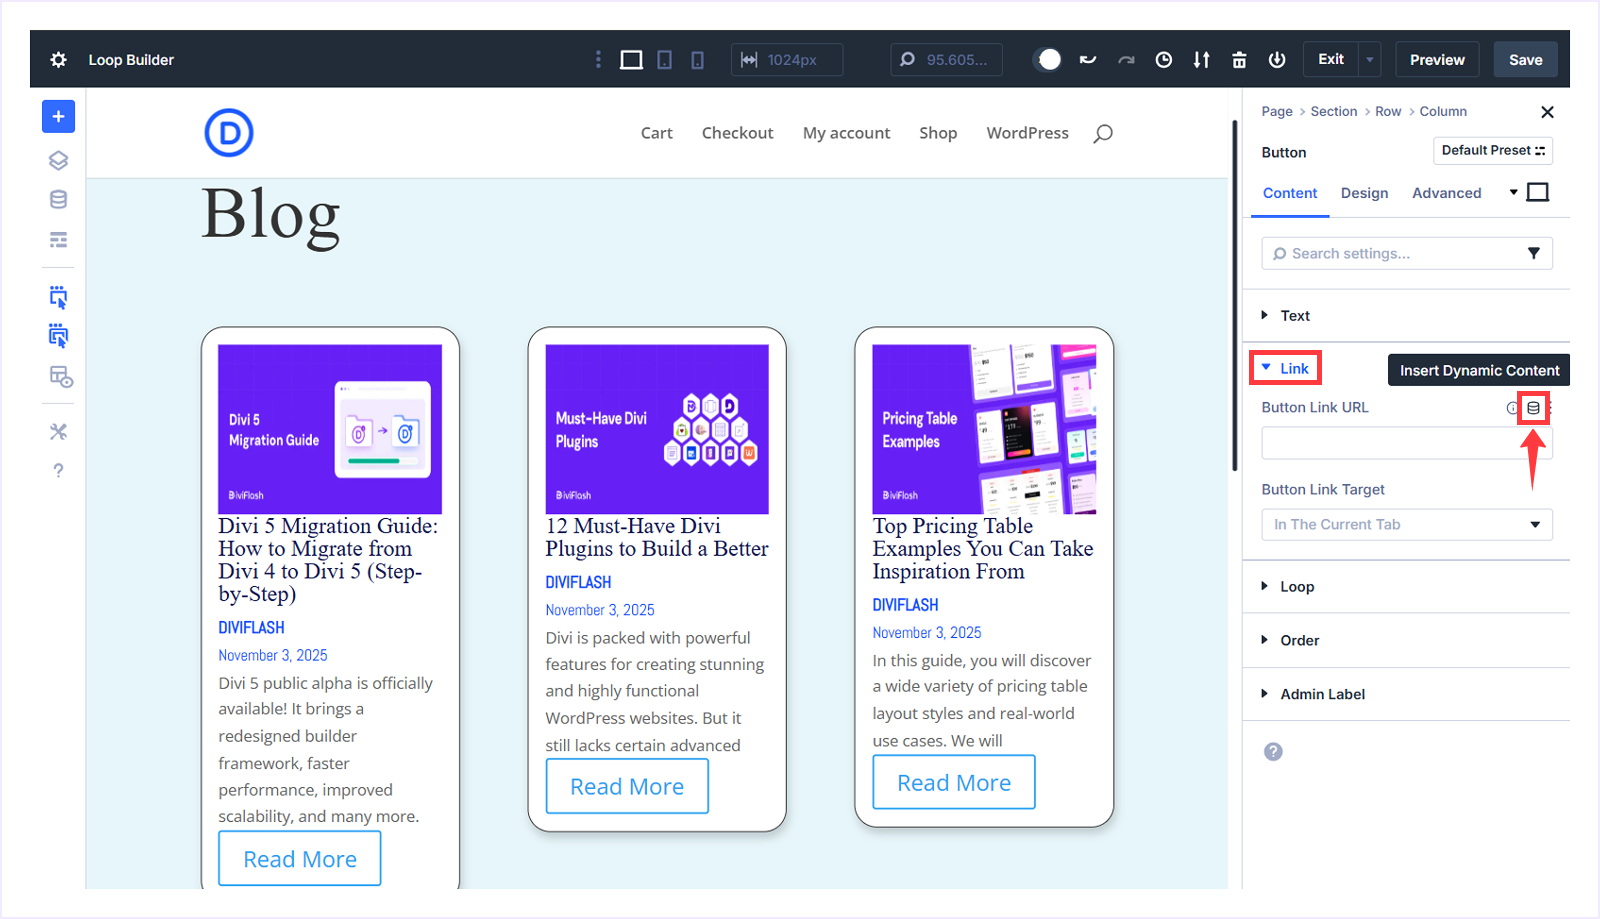
- Click the icon and select “Loop Link” from the context menu.
- Select Apply to save the changes.
- Now every Read More button is connected to the post URL.
- Click the Button Link Target dropdown below and select In A New Tab.

- Now, whenever someone clicks the Read More button, your blog post will open in a new tab.
- With the button selected, go to Design → Button → Use Custom Styles For Button, and toggle it on.
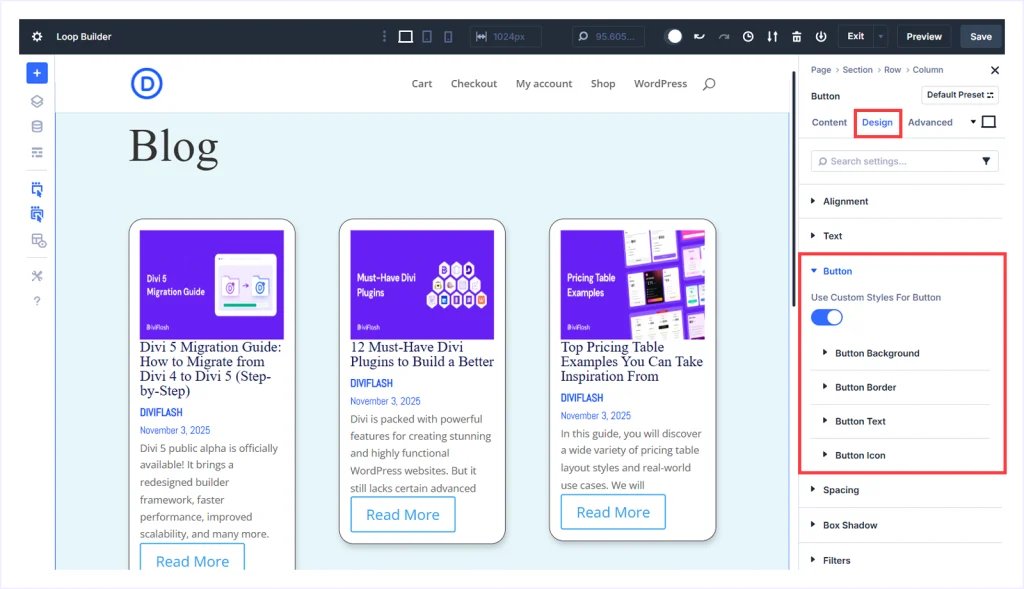
- Adjust the Button Background, Border, Text, and Icon settings to match your brand.
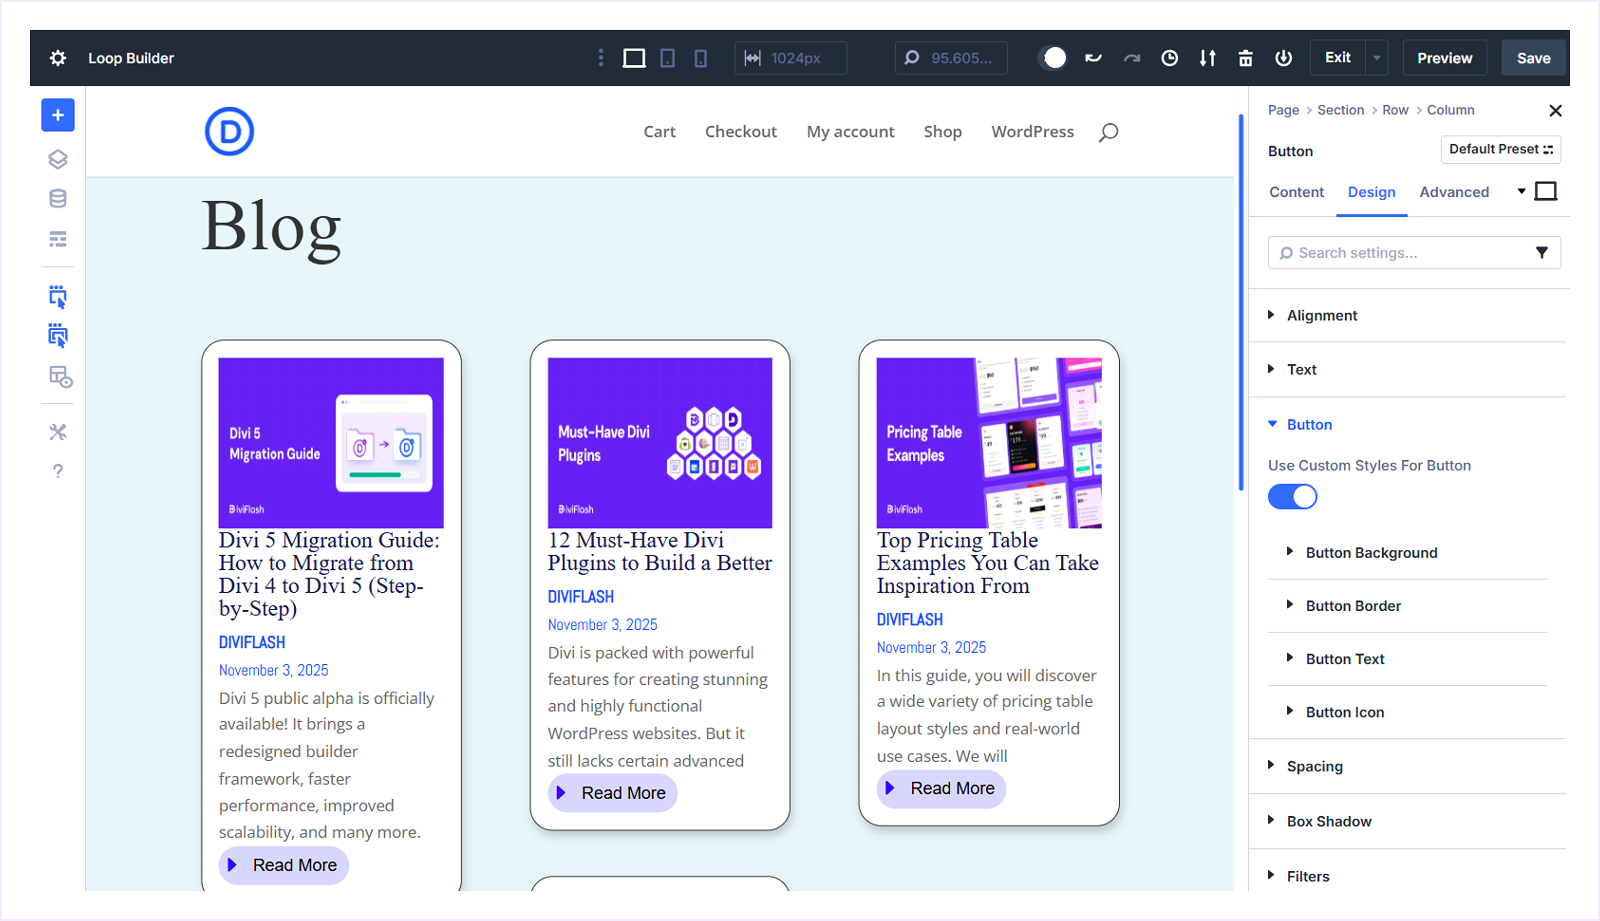
We have chosen:
- Button Background Color: #5656f7
- Opacity: 24%
- Button Border Radius: 20px (top, bottom, left, right)
- Button Font: Arial
- Button Font Weight: Regular
- Button Font Color: Black
- Button Text Size: 15Px
- And place a blue button icon on the left.
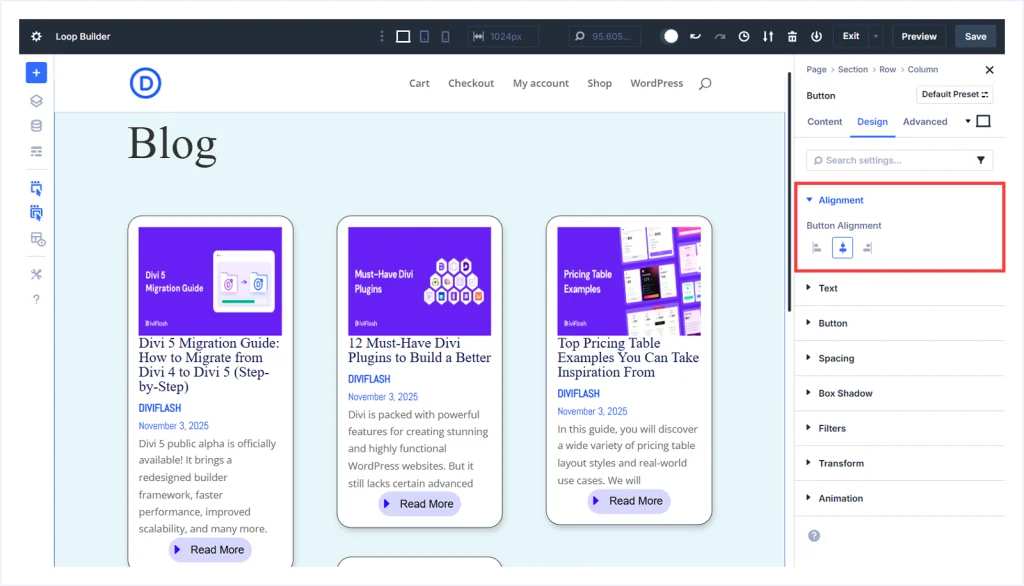
- Expand Alignment and set Button Alignment to Middle.
Step 5: Customize the Overall Blog Loop
Now we are going to customize the overall design of this blog loop to make it more appealing. You can do your own by following these steps:
- Click the Row settings icon and go to the Design tab.

- Expand Layout and set the Horizontal and Vertical Gap to 20px.
- It now reduces the gap among the postcards.
That’s it. You have successfully created a masonry-style blog archive using the Divi 5 Loop Builder.
This same approach can be used to display many other types of dynamic content inside Divi. Using the Loop Builder, you can design and control layouts for posts, products, custom post types, users, and more, all directly within the Divi 5 Visual Builder.
Tips and Best Practices for Using Loop Builder Efficiently
Using Divi 5’s Loop Builder becomes easier once you understand a few best practices that help improve performance, consistency, and workflow efficiency.
- Start with a plan: Before building, decide what content type you want to display (posts, products, users, etc.) and how the layout should look. This saves time during design.
- Use global styles: Apply global presets for text, buttons, and spacing to ensure your loop cards remain consistent across the site.
- Optimize queries: Avoid loading too many posts at once. Limit your query results and use pagination for better performance.
- Keep designs lightweight: Use only necessary modules within the loop to prevent slow rendering in the builder.
- Combine with CSS Grid or Flexbox: Structure your loop container with Grid or Flex layouts for more control over spacing and alignment.
- Test responsiveness: Always check how your loop looks on mobile and tablet views. Adjust column gaps, padding, and image sizes as needed.
- Leverage Dynamic Content: Utilize custom fields (ACF or native WordPress fields) to make your loops truly dynamic, eliminating the need for duplicate layouts.
These minor adjustments make a big difference when managing large or complex content displays across multiple pages.
FAQs About Divi 5 Loop Builder
Can I use the Divi 5 Loop Builder for WooCommerce Products?
Yes, you can display and style product listings using the Loop Builder within the Divi visual builder without any extra plugins.
Is the Loop Builder available in Divi 4?
No. Loop Builder is the newest feature introduced in Divi 5. And it’s not available in the oldest version of Divi 4.
Can I display custom post types and custom fields as loop elements?
Yes, you can display custom fields as the loop element using Divi 5’s Loop Builder. It supports ACF, Meta Box, and similar plugins.
Can I use pagination with loops?
Not really. Divi’s Blog Module is still great for quickly listing posts, while the loop builder is ideal for creating fully custom layouts within many other query types, besides blogs.
Final Thought
Divi 5 Loop Builder gives you complete creative freedom to design how content appears on your website dynamically. It fills in the missing pieces of Divi, allowing you to create any dynamic content layout within the Divi Visual Builder.
If you have been waiting to build fully custom, dynamic content layouts inside Divi, this is the feature you have been looking for.
Please don’t hesitate to leave a comment if we have missed anything. We always appreciate hearing from you and are eager to improve. Share this article with your friends who want to create a dynamic content layout using Divi.


0 Comments