

You can autoplay video in Divi 5 two ways: use a third-party plugin’s module like DiviFlash’s Advanced Video or use Divi’s built-in modules like Code, Video or Divider with custom coding.
To make things easier for you, we will cover both with and without plugin methods in this guide.
Before autoplaying video in Divi, you need to know the following browser restriction related rules:
- Muted Autoplay: Modern browsers like Google Chrome require a mute function for any video that you want to autoplay.
- MP4/WEBM Format Preferred: These formats offer wide browser support and work well with Divi.
- Test on the frontend: You won’t see video autoplay in the visual builder. Always save, exit and view page to see the result.
Now that you know the basics, let’s see how to autoplay video in Divi step by step.
Method 1: Autoplay Any Videos in Divi With Plugin (Beginner Friendly)
The easiest way to autoplay video in Divi is by using DiviFlash’s Advanced Video module. One toggle. Done. No custom CSS, no JavaScript, no messing with embed parameters.
Let’s see how it works:
Step 1: Install DiviFlash (or update to 5.1.0)
Get DiviFlash from its official website, then install and activate it like any other premium WordPress plugin. (If you already use DiviFlash, just update to the 5.1.0 version.)
Step 2: Copy Video Link or Upload It
Go to YouTube, Vimeo, or Dailymotion and copy the link of the video you want to display and autoplay. If you want to use a self-hosted video, upload it to the Media Library.
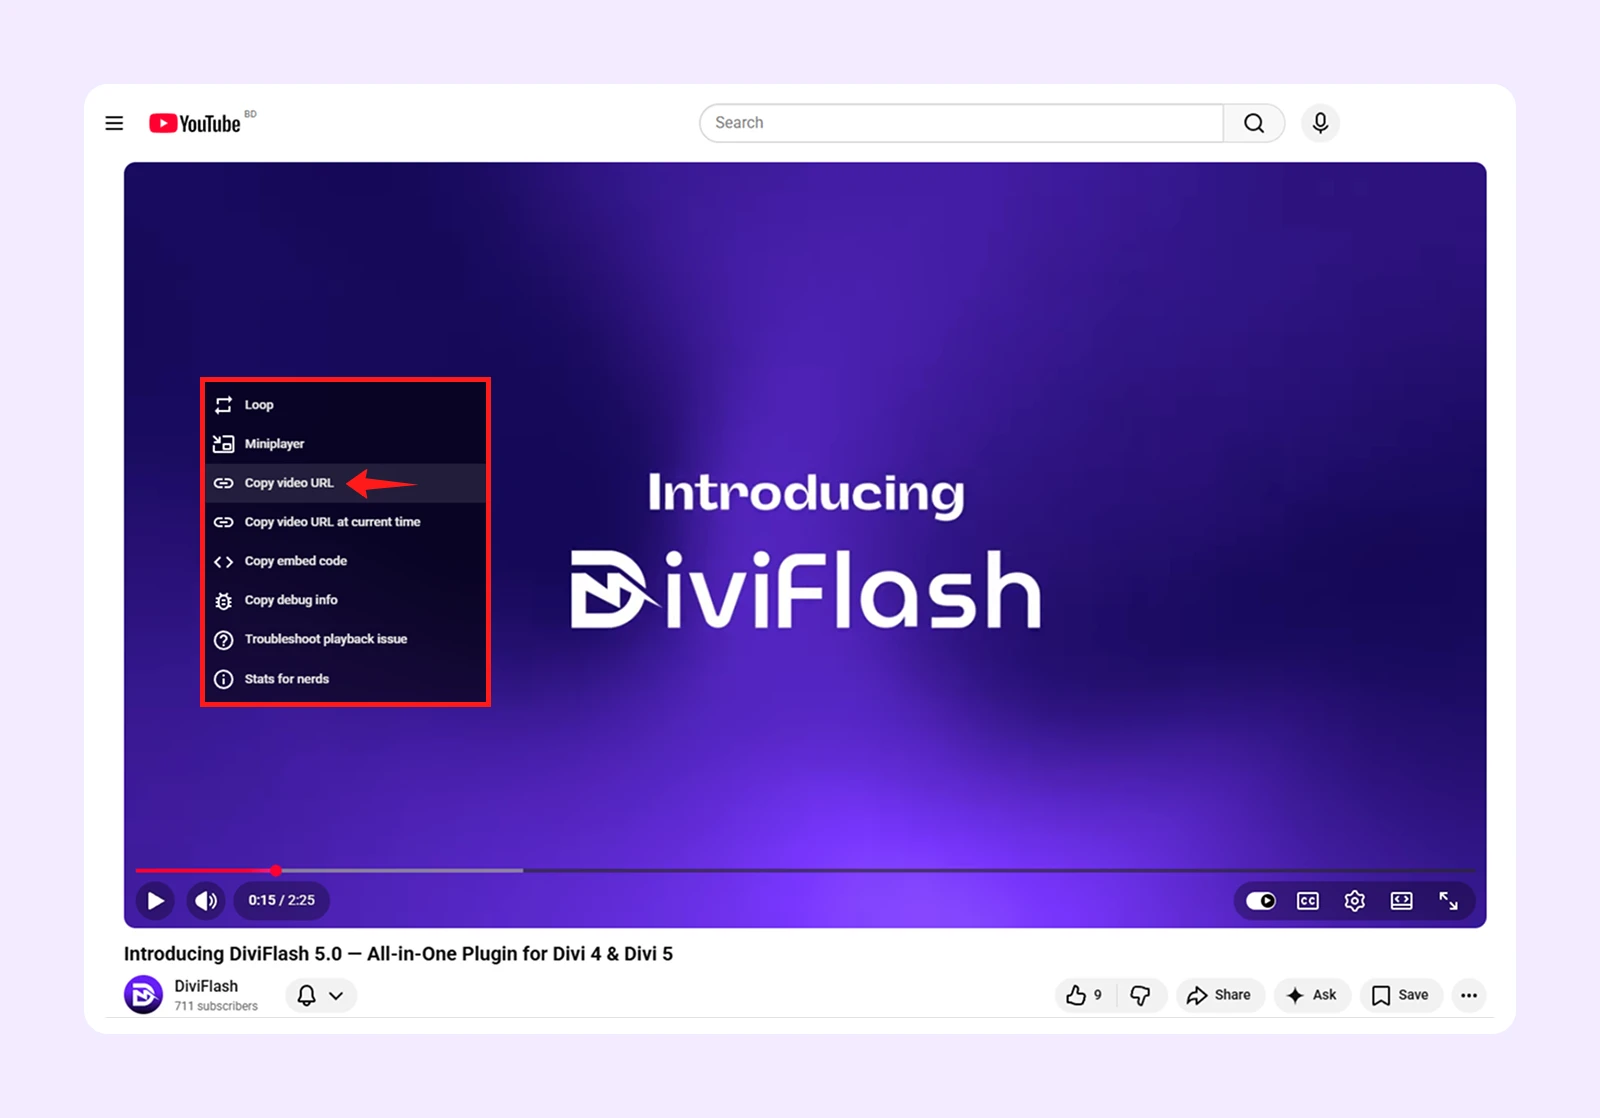
Note: The Advanced Video module lets you embed both self-hosted and external videos.
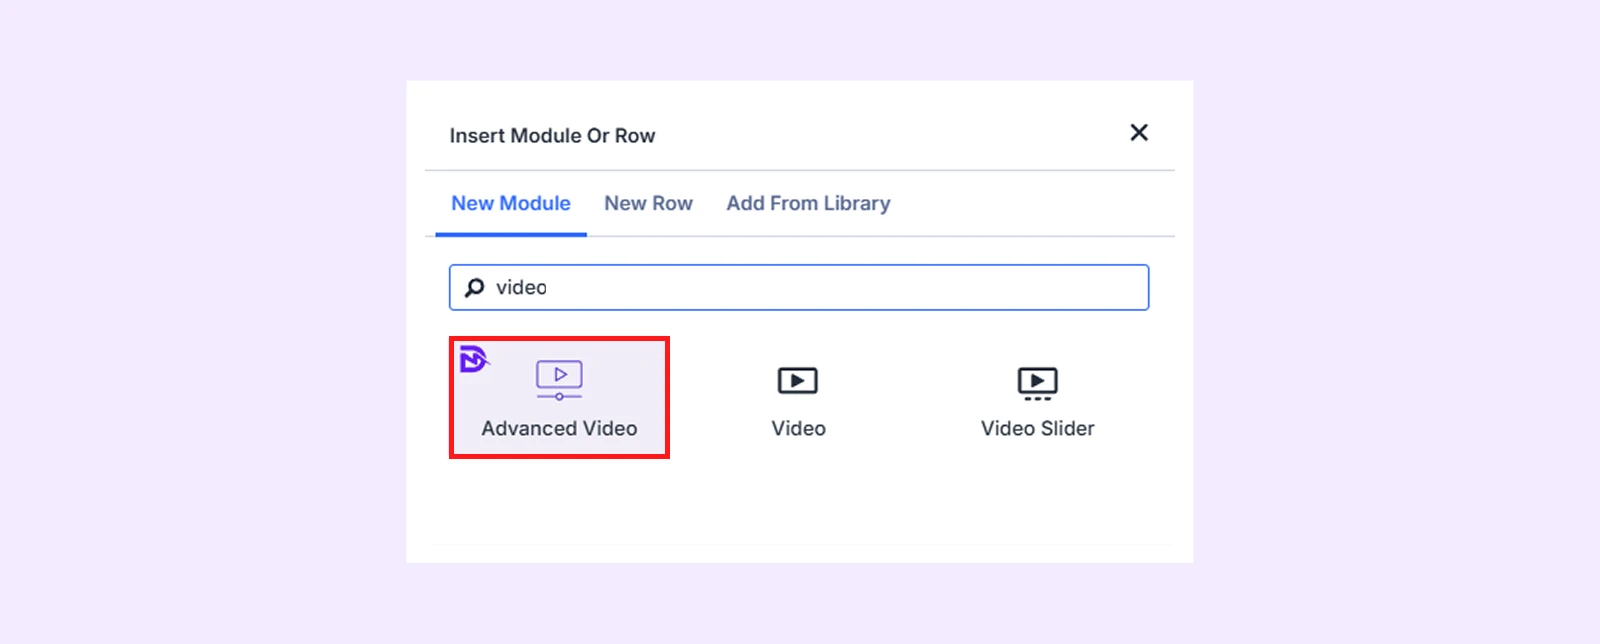
Step 3: Initiate Advanced Video Module
Open the Divi Visual Builder, add your section, row, and column, then search for “Advanced Video.” (If you cannot find the module, go to WordPress Dashboard > DiviFlash > Modules and toggle on Advanced Video)
Step 4: Paste Your Copied URL or Select Your Video
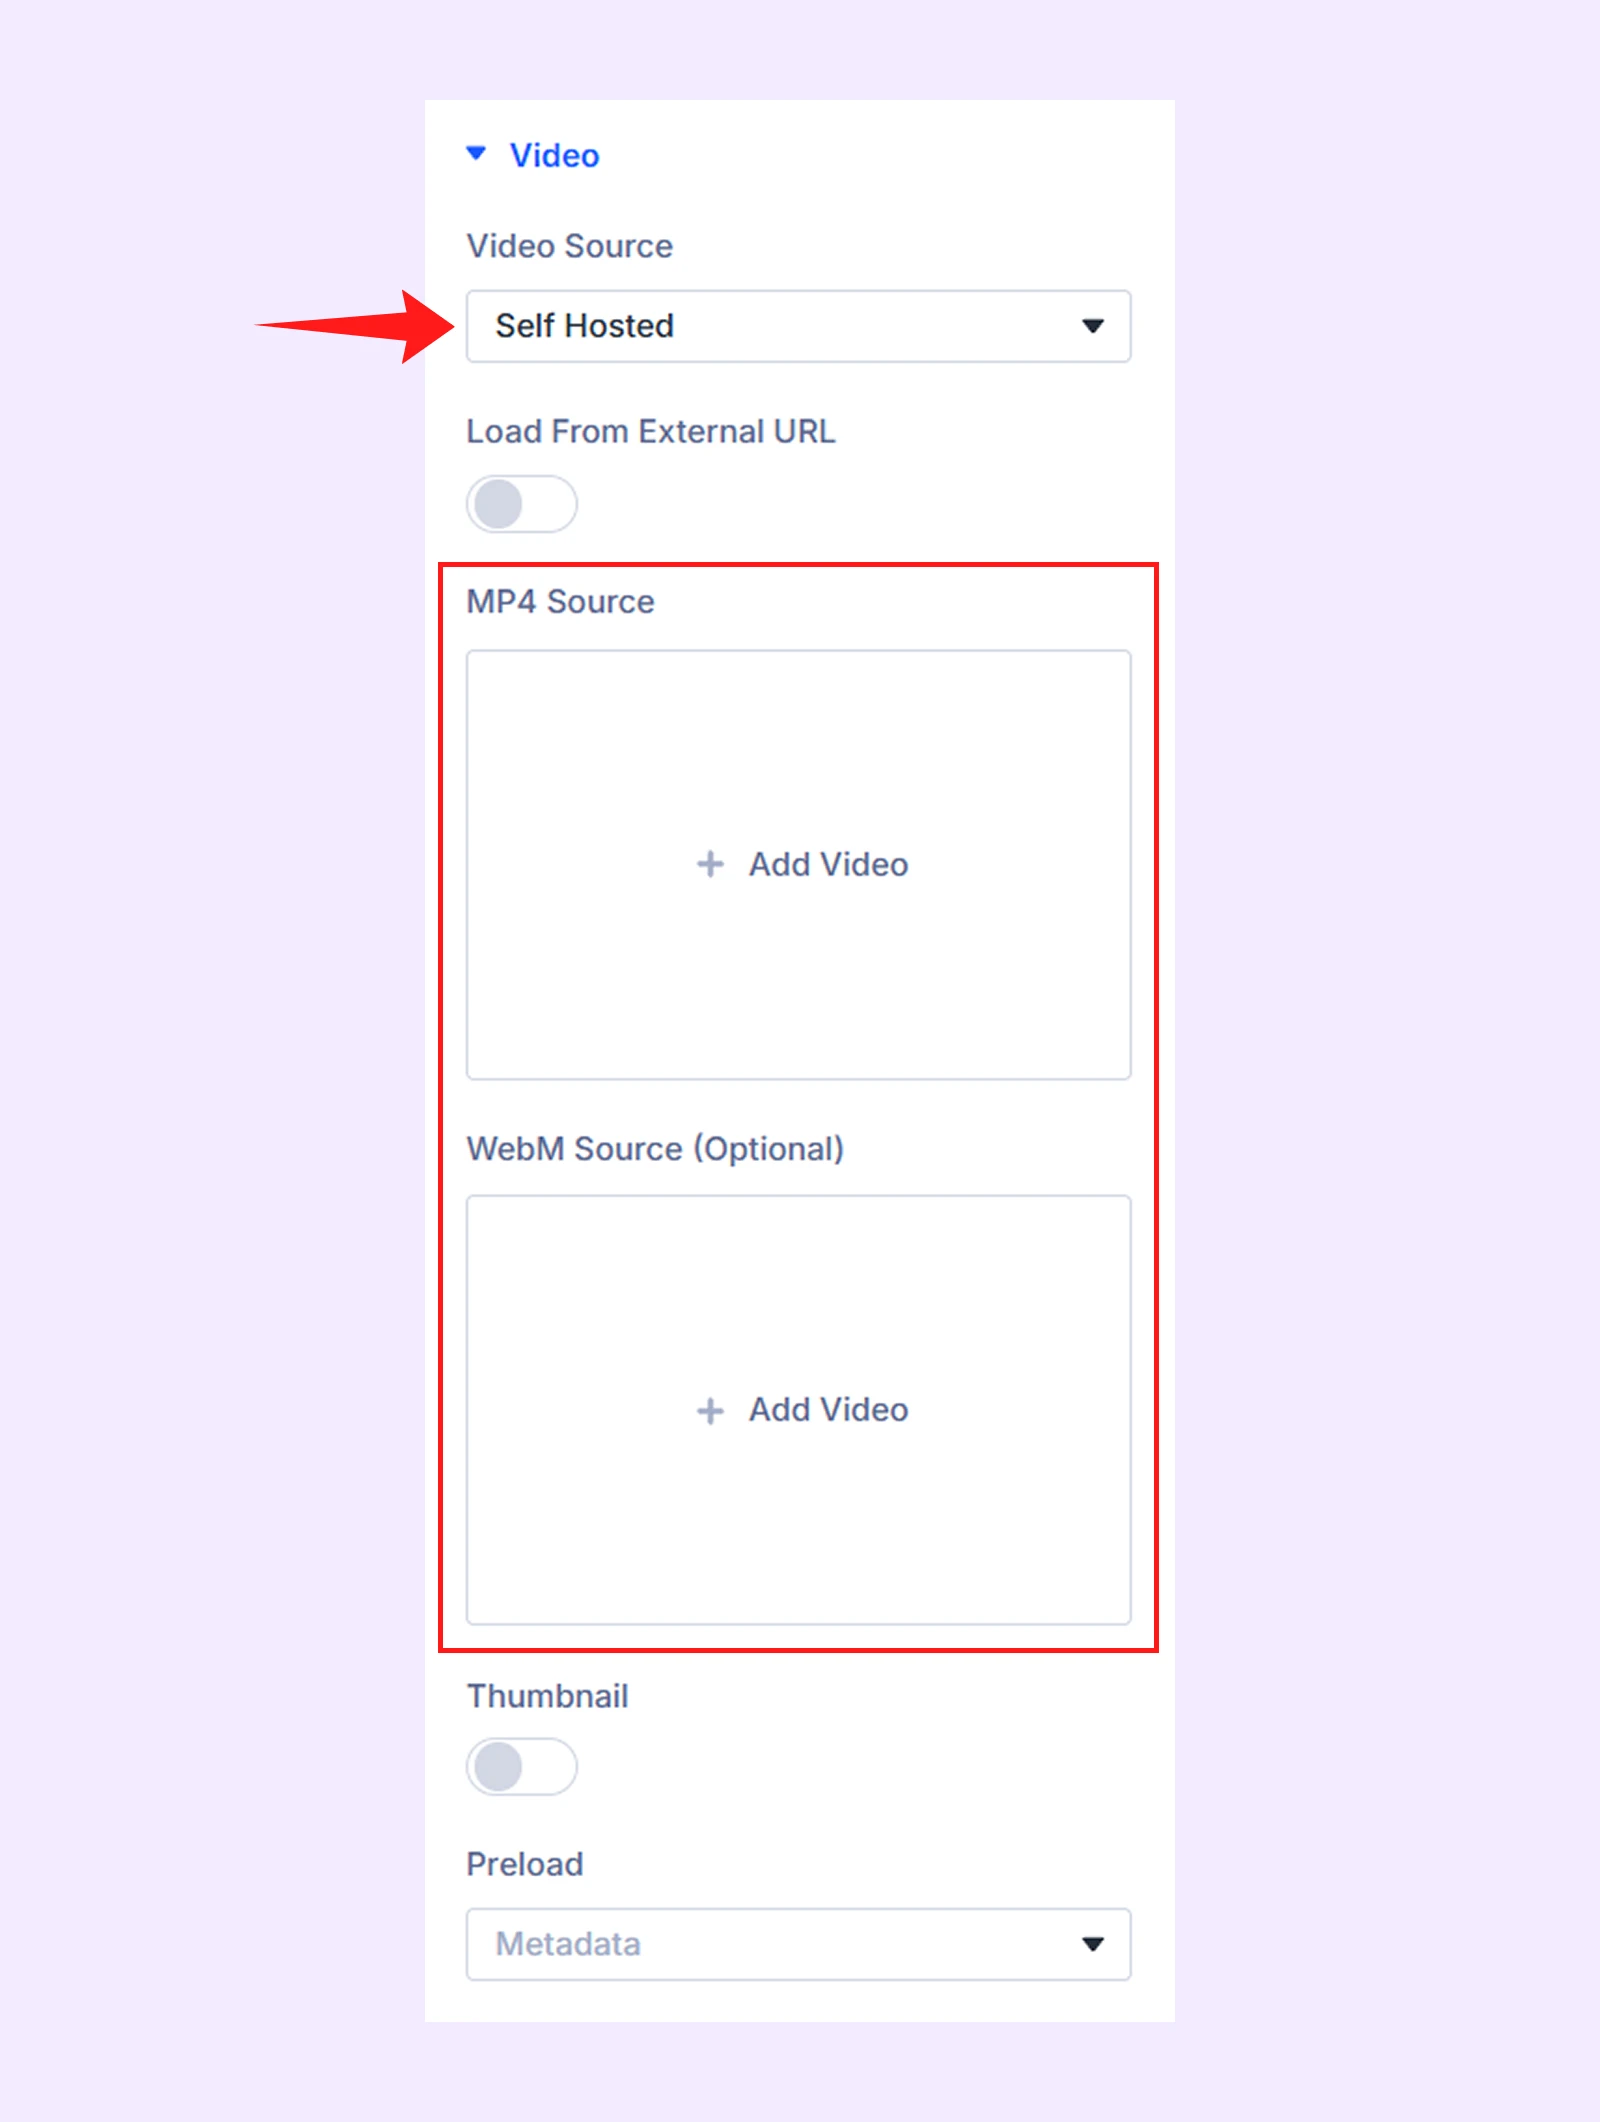
Open the module settings and click Video Source. Select your video type: YouTube, Vimeo, Dailymotion, or self-hosted.
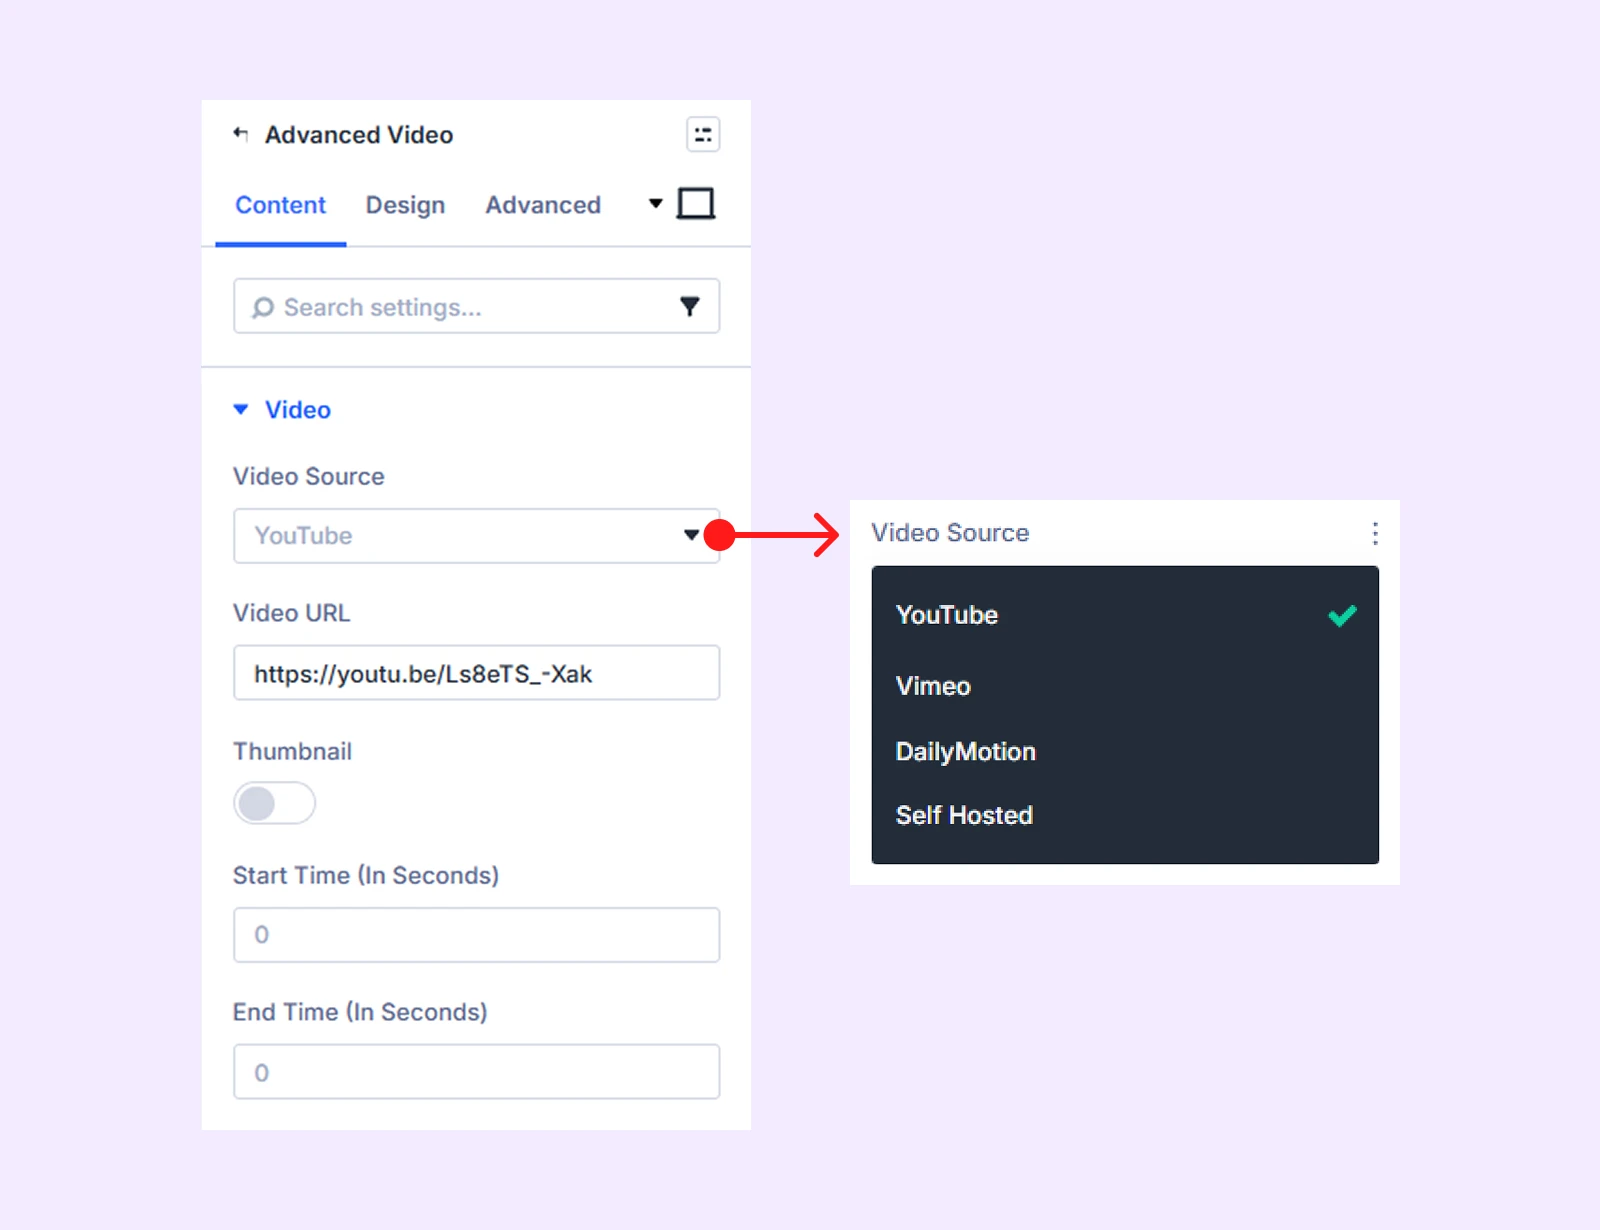
- For hosted platforms: Paste the URL you copied into the Video URL field. (You can also set a start and end time if you only want to play a specific clip.)
- For self-hosted: Choose MP4 or WebM, then select your file from the Media Library.
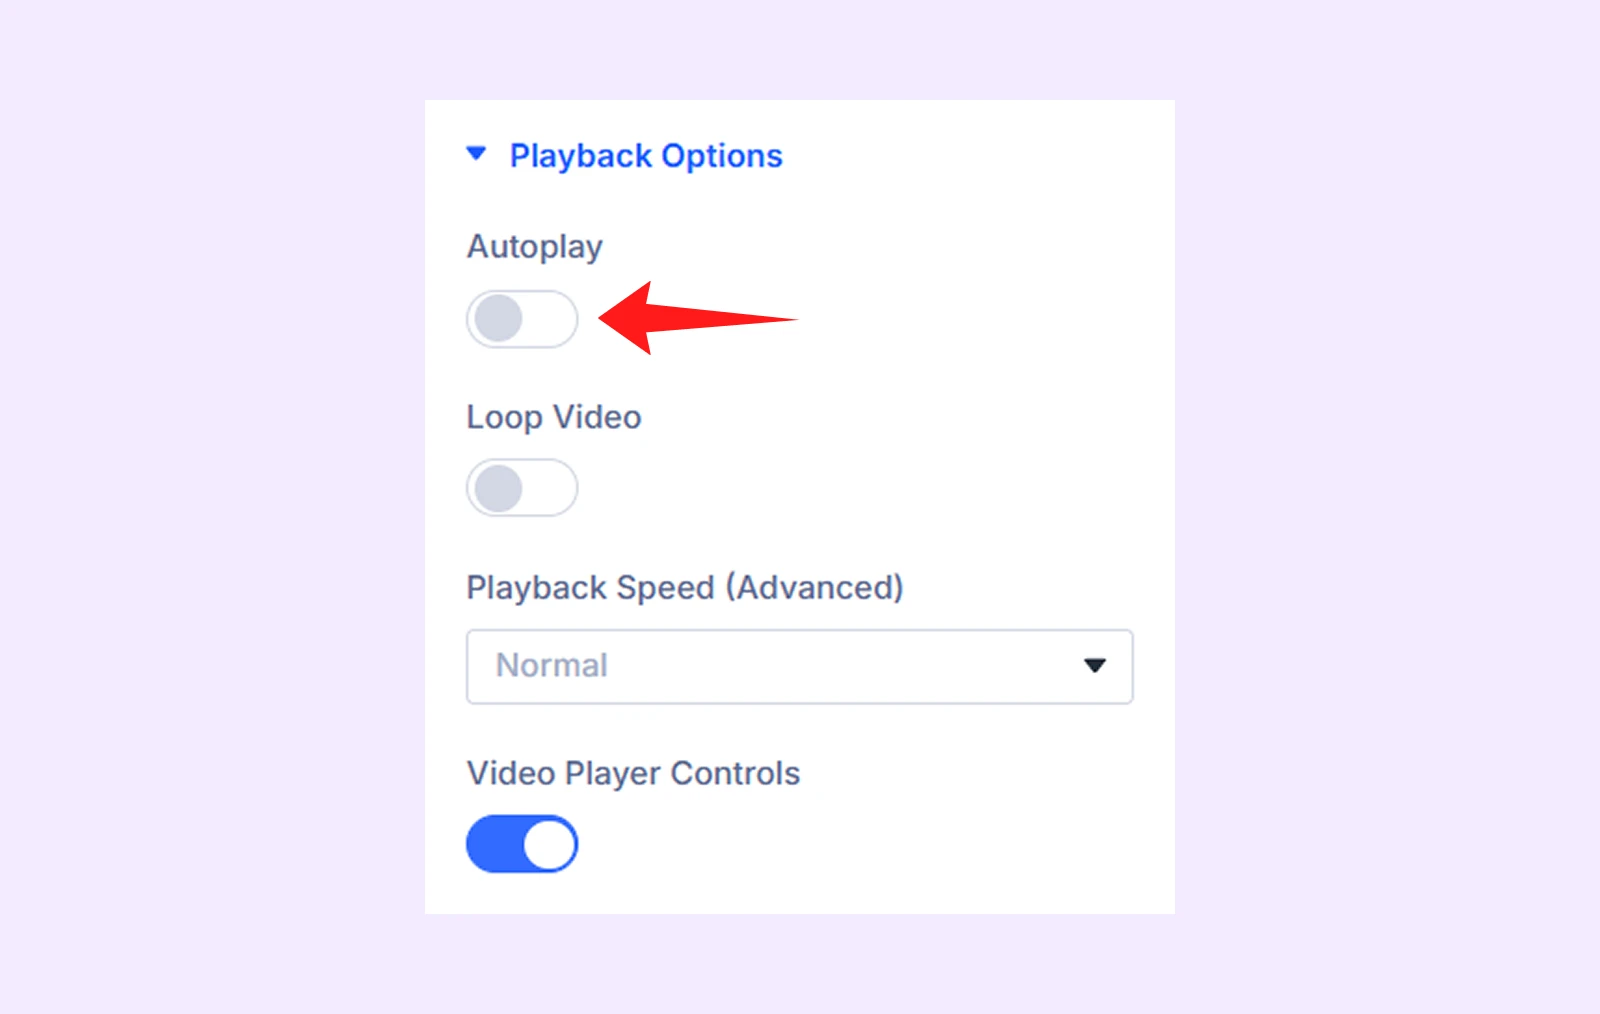
Step 5: Turn on Autoplay
Go to Playback Options and toggle on Autoplay. This will automatically enable mute. Save the page, then open it on the frontend to confirm it’s working.
Step 6: Fine-tune Playback (Optional)
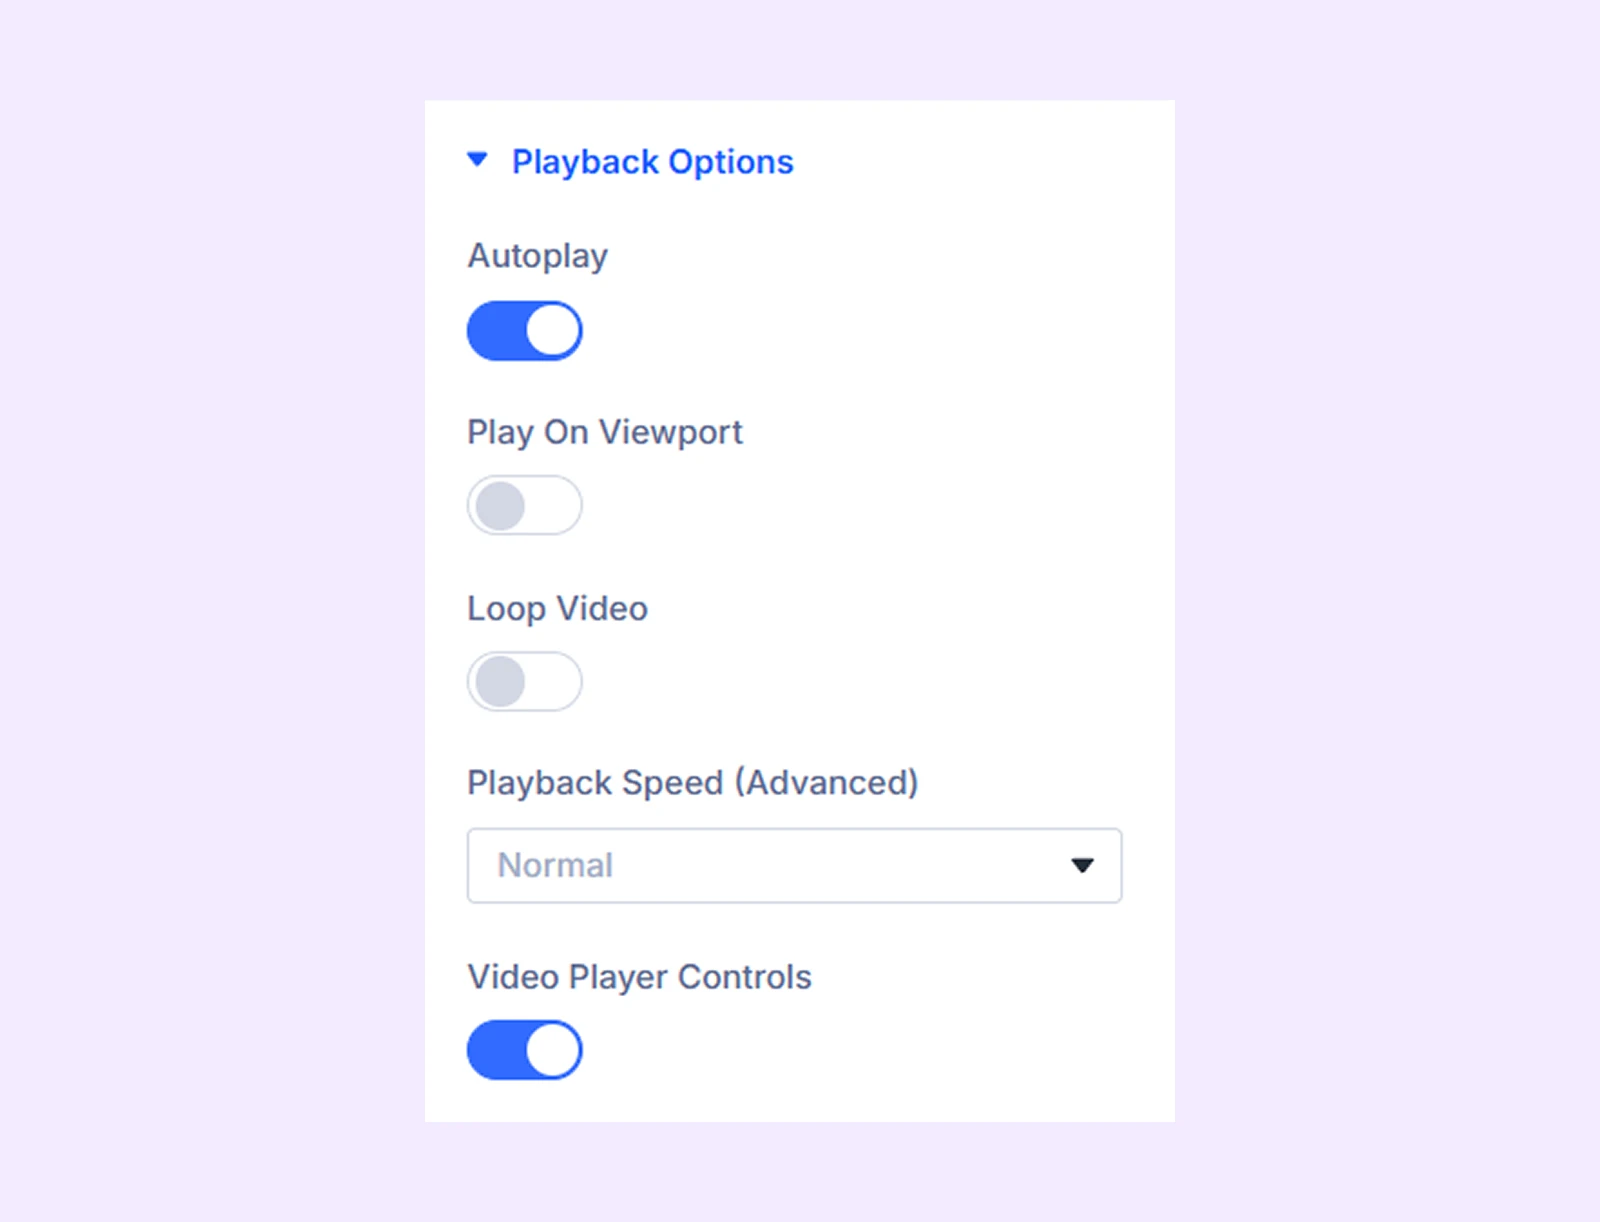
In the playback options, there are certain options that you can consider. Such as:
- Enable Loop Video to make the video replay automatically once it finishes.
- Also, enable Video Player Controls to show or hide the default video controls like play, pause and more.
- Click on Playback Speed (Advanced) to adjust how fast or slow the video plays.
- Enable “Play On Viewport” to trigger autoplay only when the video enters the user’s screen. This will improve performance and user experience.
Step 7: Save and Check It Works
That’s the full setup. The whole process takes under five minutes, and you get proper autoplay behavior without touching a single line of code.
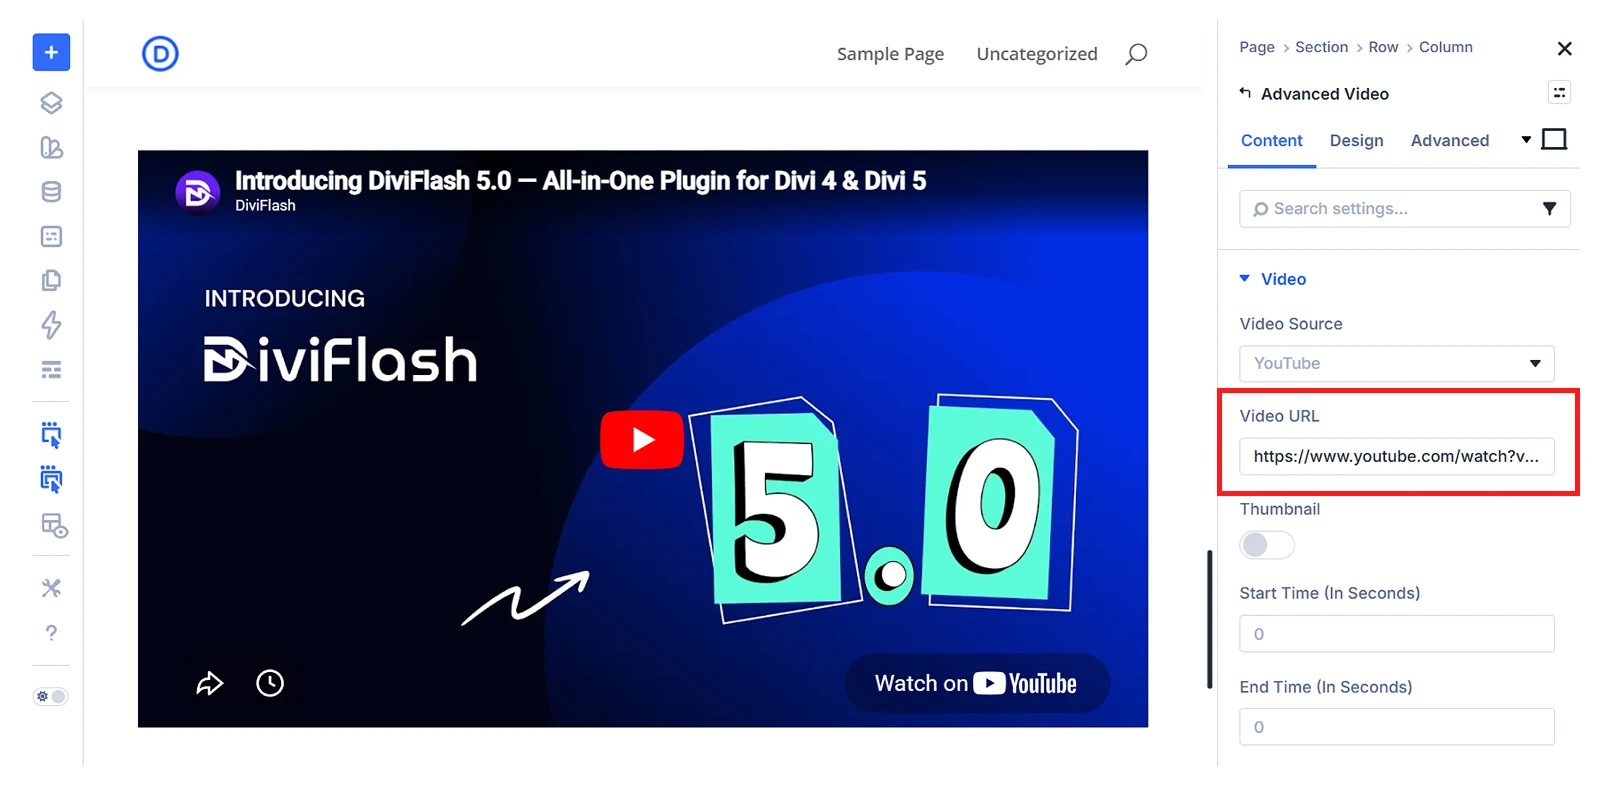
Here is the final Output:
Note: In addition to autoplay, the Advanced Video module also supports video lazy loading and lightbox playback, which helps you handle different video use cases like performance optimization and popup videos.
Method 2: Autoplay Videos in Divi Without Plugin (Less Control, More Work)
Don’t want to use a plugin? You can still autoplay videos in Divi manually, but it requires custom code, and you will need to edit the code again if you make changes later.
Also, different video types like video-sharing platforms and self-hosted videos need different modules and settings to make autoplay work. That’s a lot of work and we will show you how to set each one up step by step.
Autoplay Vimeo or YouTube Video in Divi With Code Module
Both YouTube and Vimeo support autoplay through their native embed code. Here is how to show both platform’s video in autoplay mode:
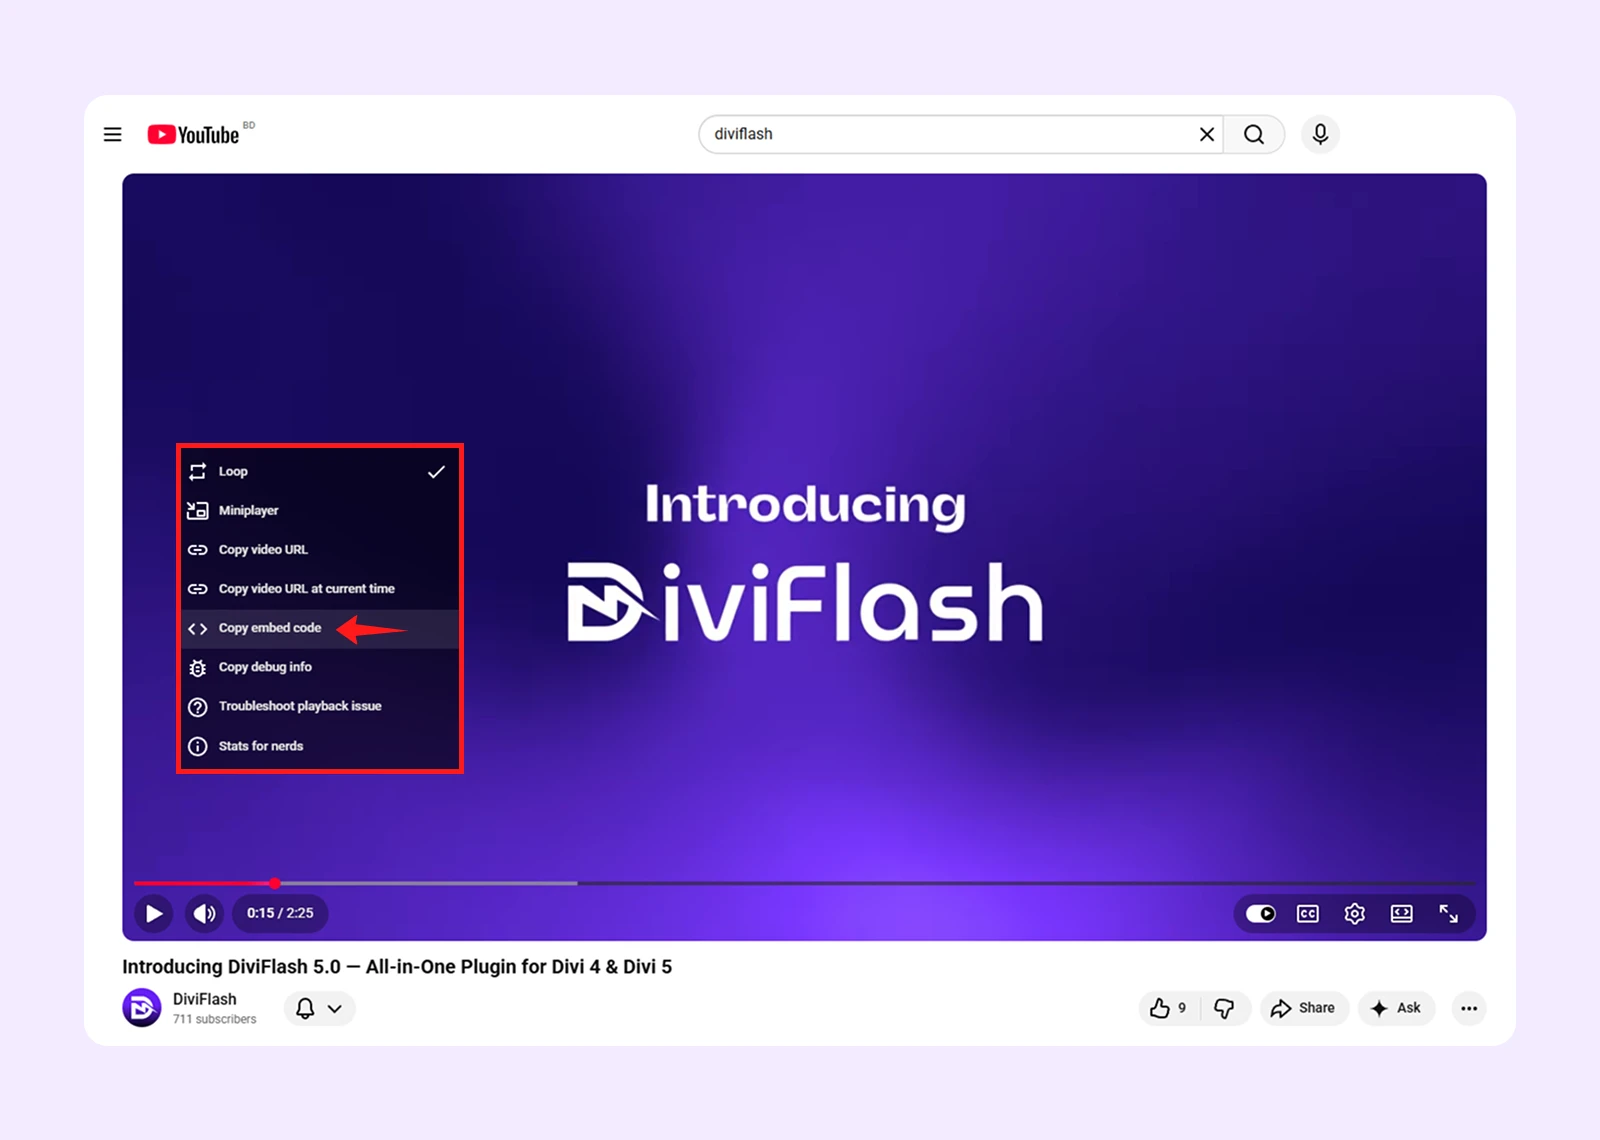
Step 1: Go to YouTube or Vimeo and copy the embed code of the video you want to use.
Step 2: Open your page in the Divi Visual Builder and add Code module.

Step 3: Paste your copied embed code into the Code module’s field.
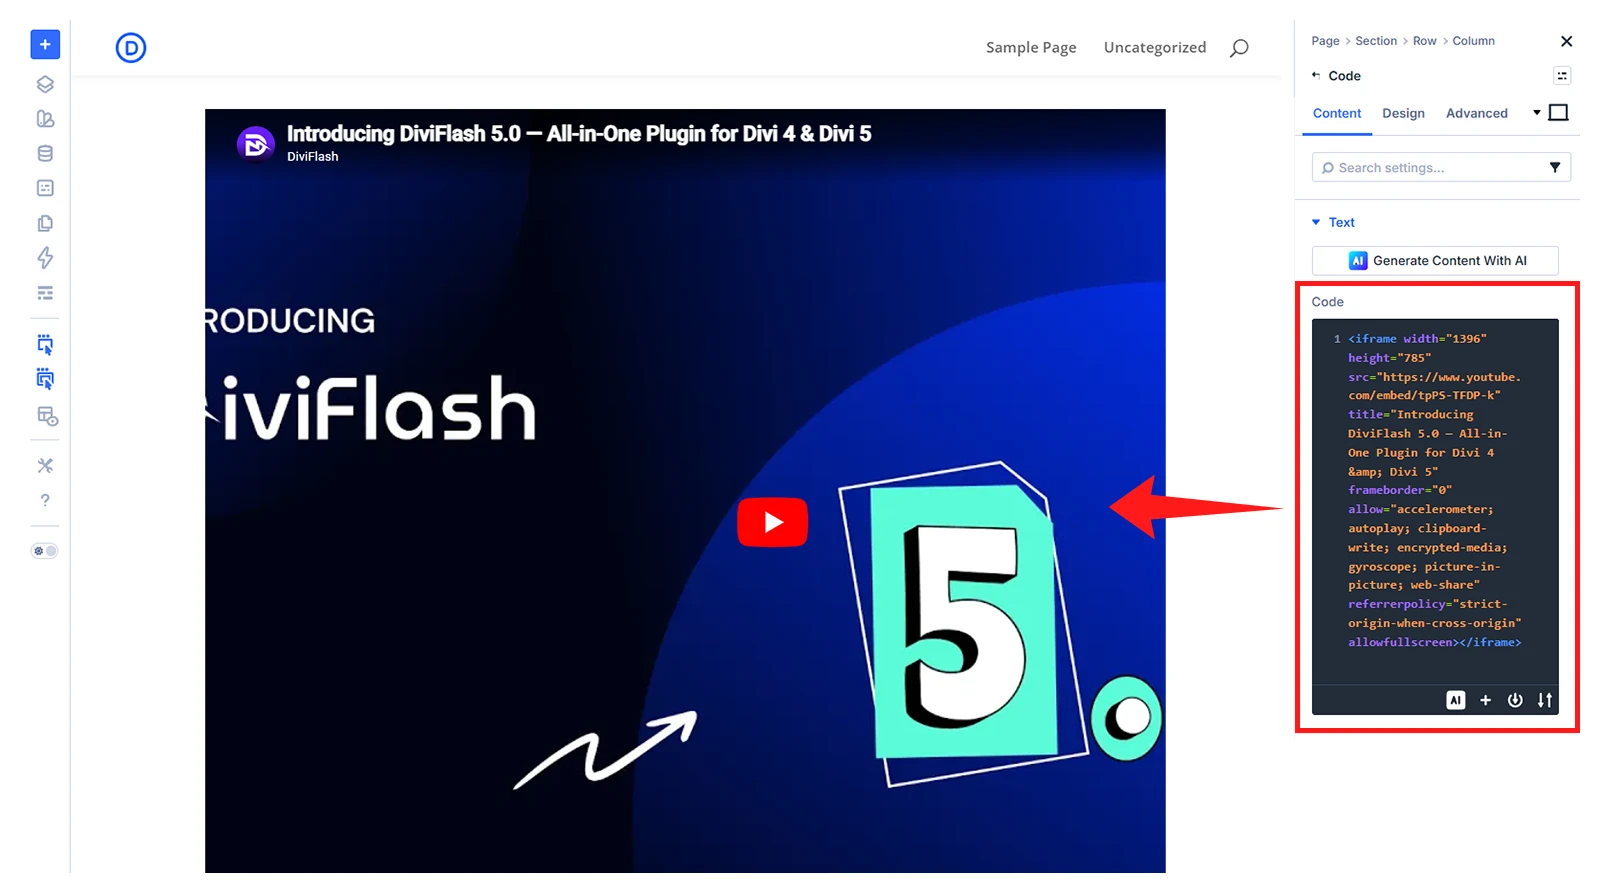
Step 4: Inside the embed code’s src URL, add the following autoplay parameters:
- For YouTube: “?&autoplay=1&mute=1”
- Or use “?autoplay=1&mute=1&controls=0” to hide video player controls
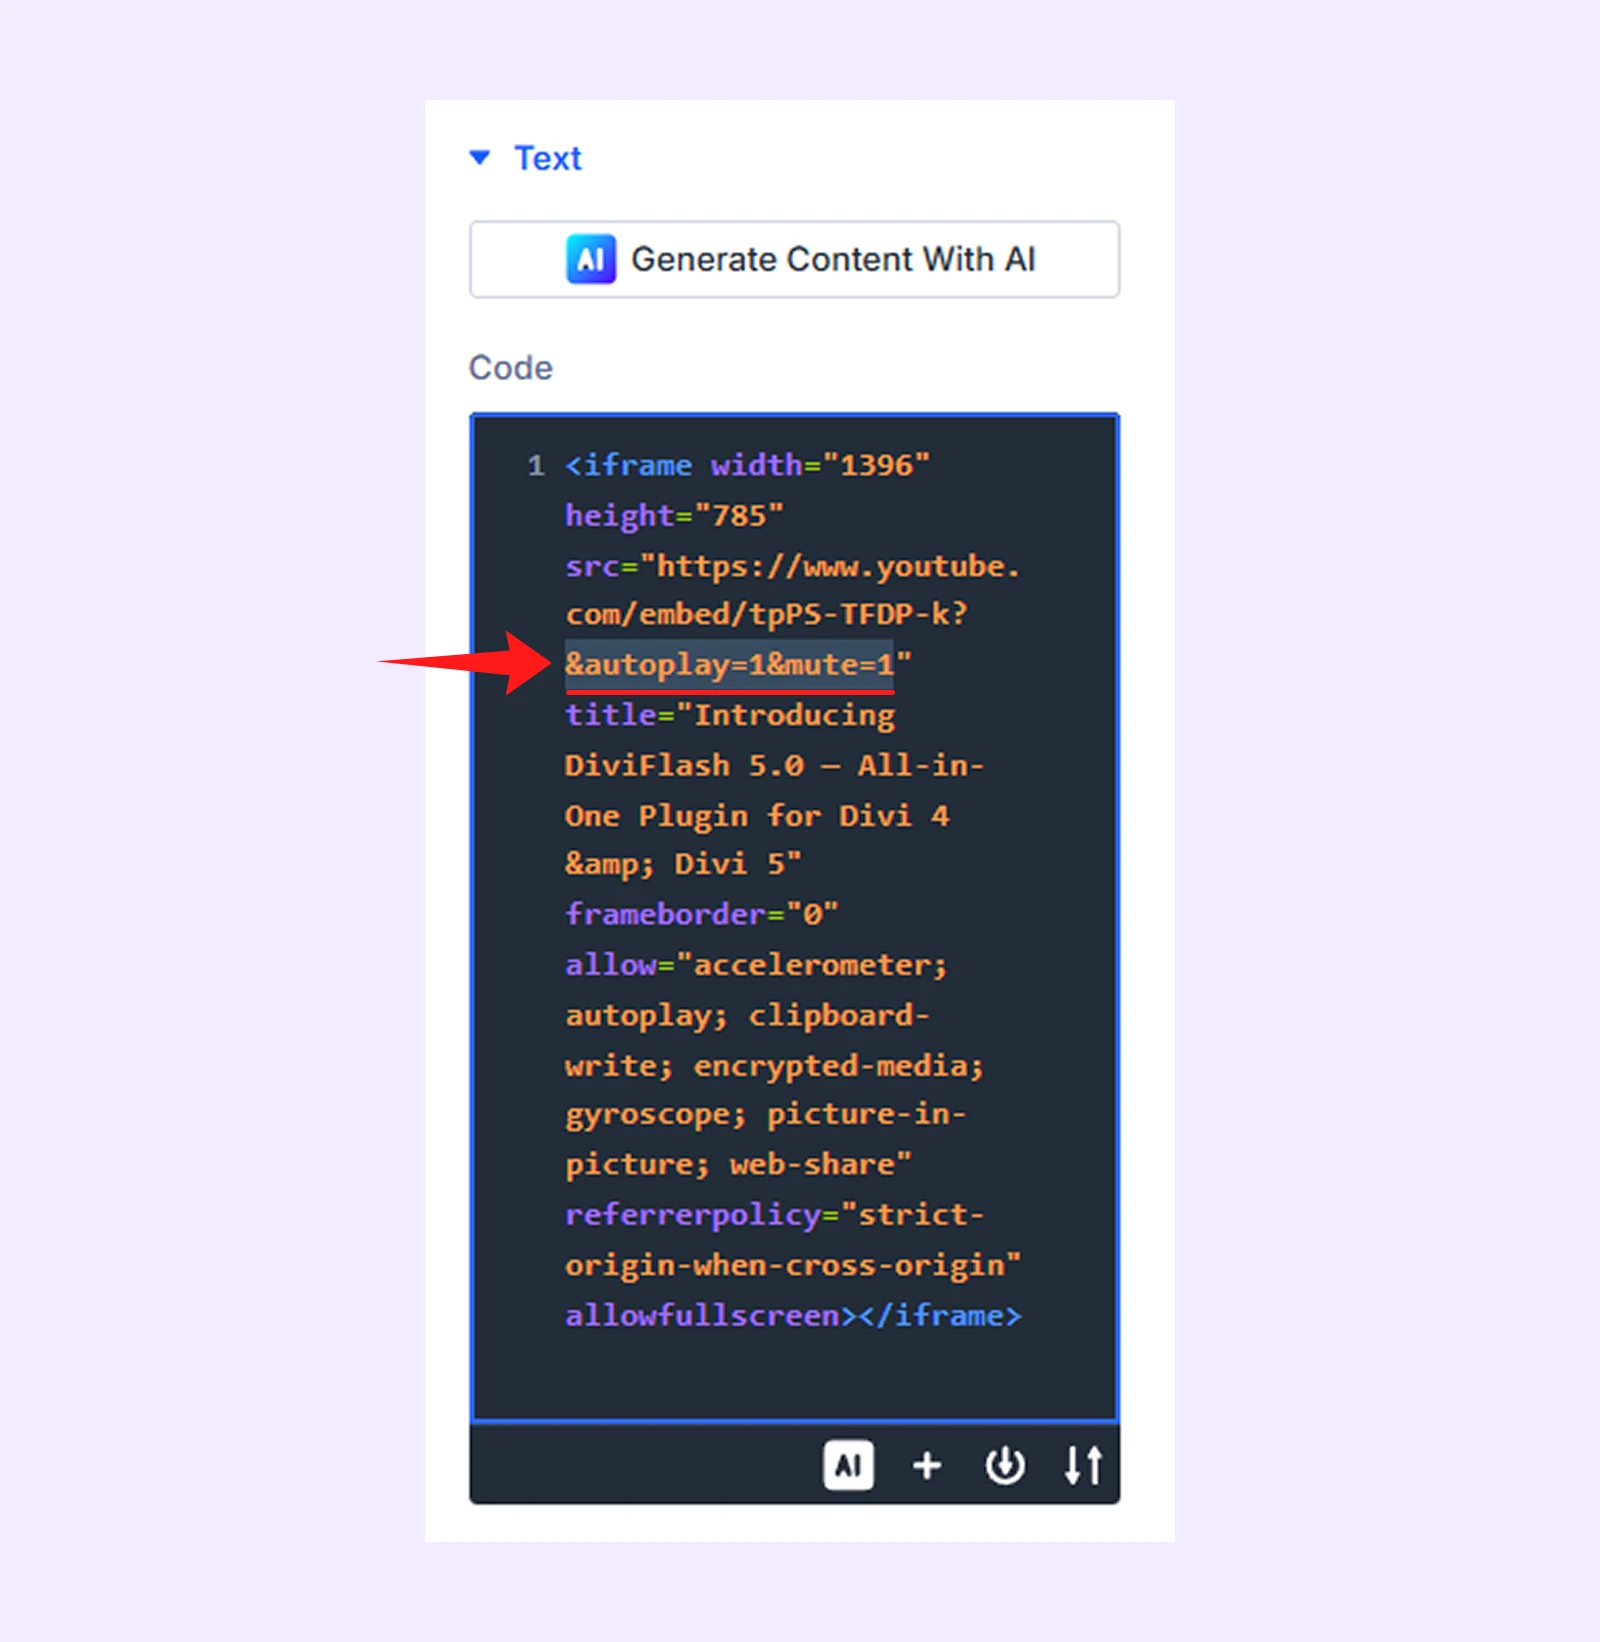
- For Vimeo: “&autoplay=1&muted=1”
- Or use “&autoplay=1&muted=1&controls=0” to hide video player controls
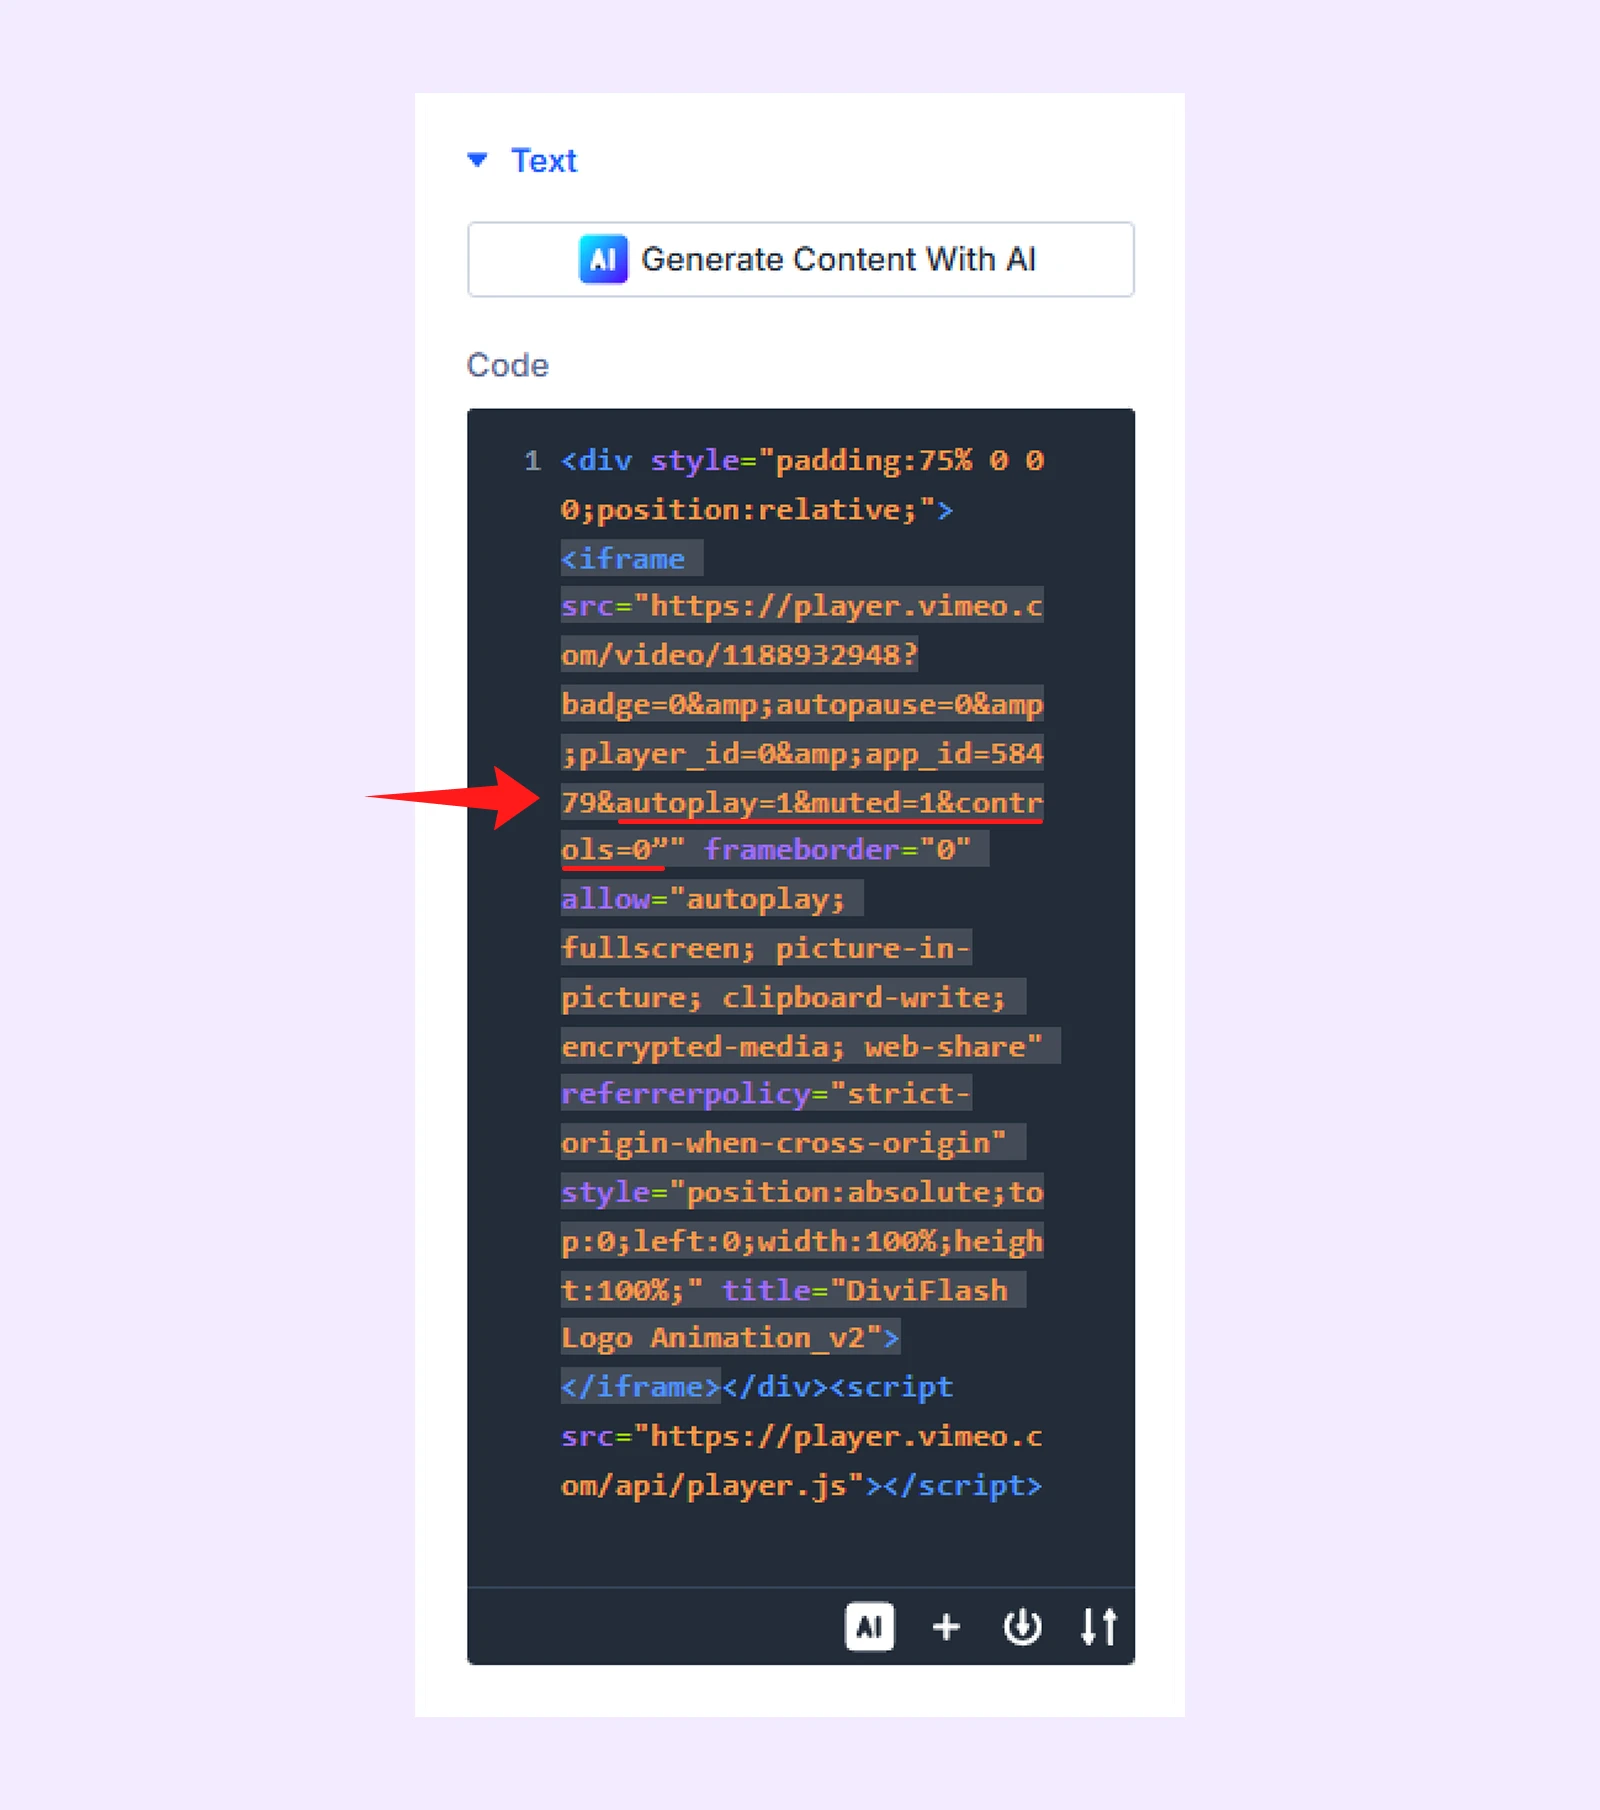
Save, preview on the frontend, and the video will autoplay muted on load.
Note: Make sure you add these parameters inside the iframe’s src URL, right before the closing quotation mark (“).
Autoplay Self-hosted Videos in Divi With Video & Code Module (Single Page or Full Site)
Step 1: Go to WordPress Dashboard > Media > Add Media File and upload your video.
Step 2: In the Visual Builder, add the Video module, go to the Content tab, remove the default YouTube URL, and select your video from the Media Library.
Step 3: Now add a Code Module below the Video Module and paste one of the script:

Script 1: Use this to show video player control:
<script>
jQuery(function($){
    $('.et_pb_video video').prop('muted', true);
    $('.et_pb_video video').attr('autoplay', true);
    $('.et_pb_video video').attr('loop', true);
    $('.et_pb_video video').get(0).play();
});
</script>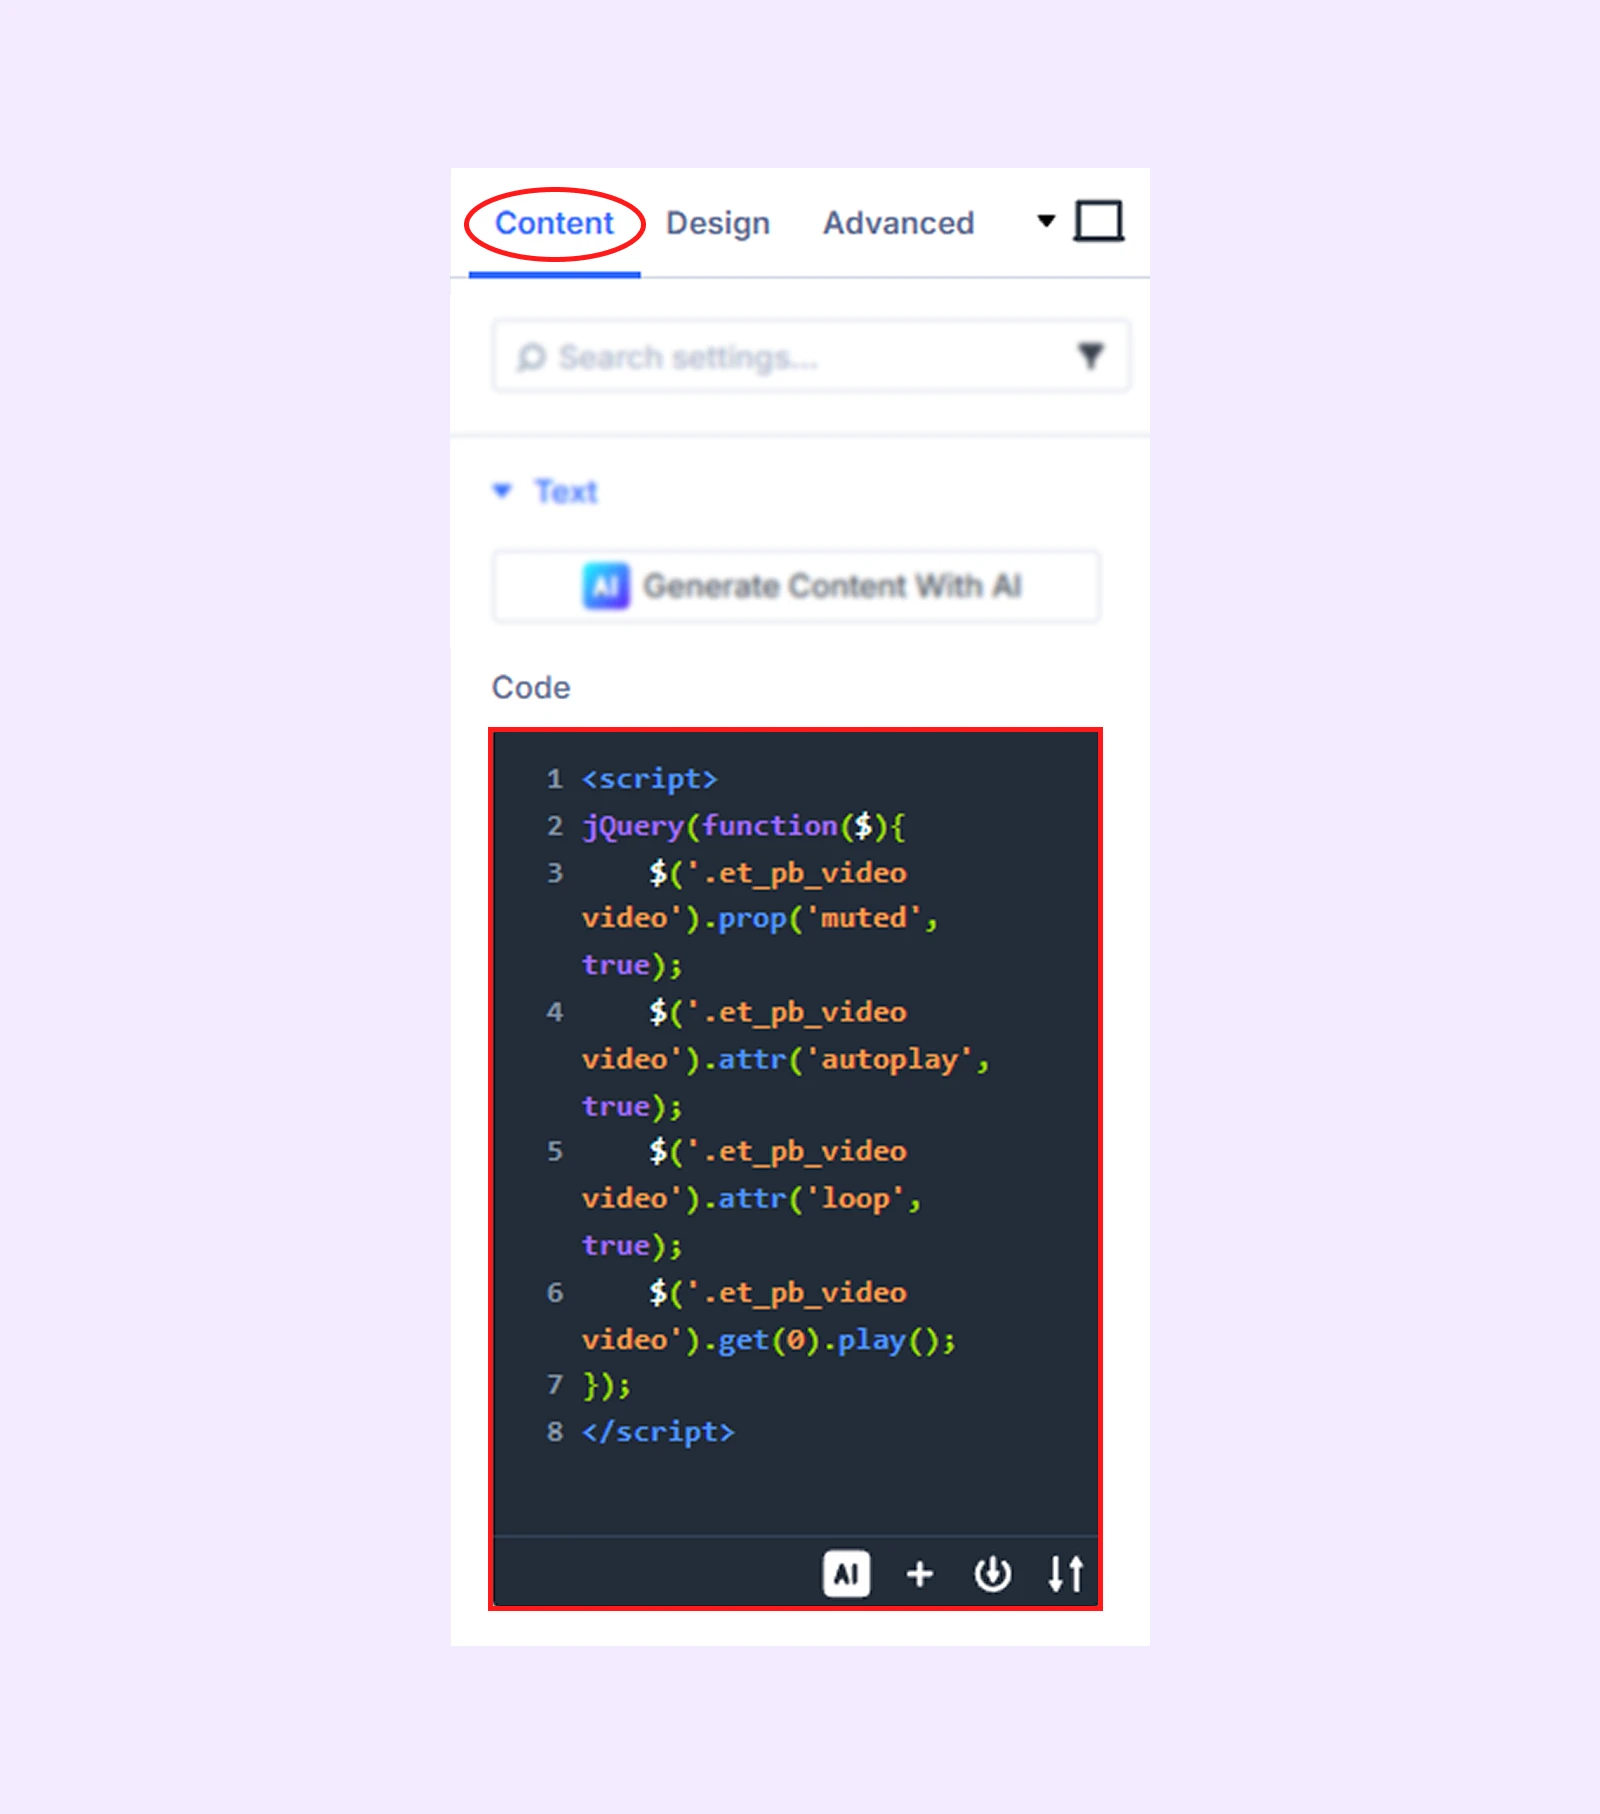
Script 2: Use this to hide video player control:
<script>
jQuery(function($){
    $('.et_pb_video video').prop('muted', true);
    $('.et_pb_video video').attr({
        autoplay: true,
        loop: true,
        controls: false
    });

    $('.et_pb_video video').each(function(){
        this.play();
    });
});
</script>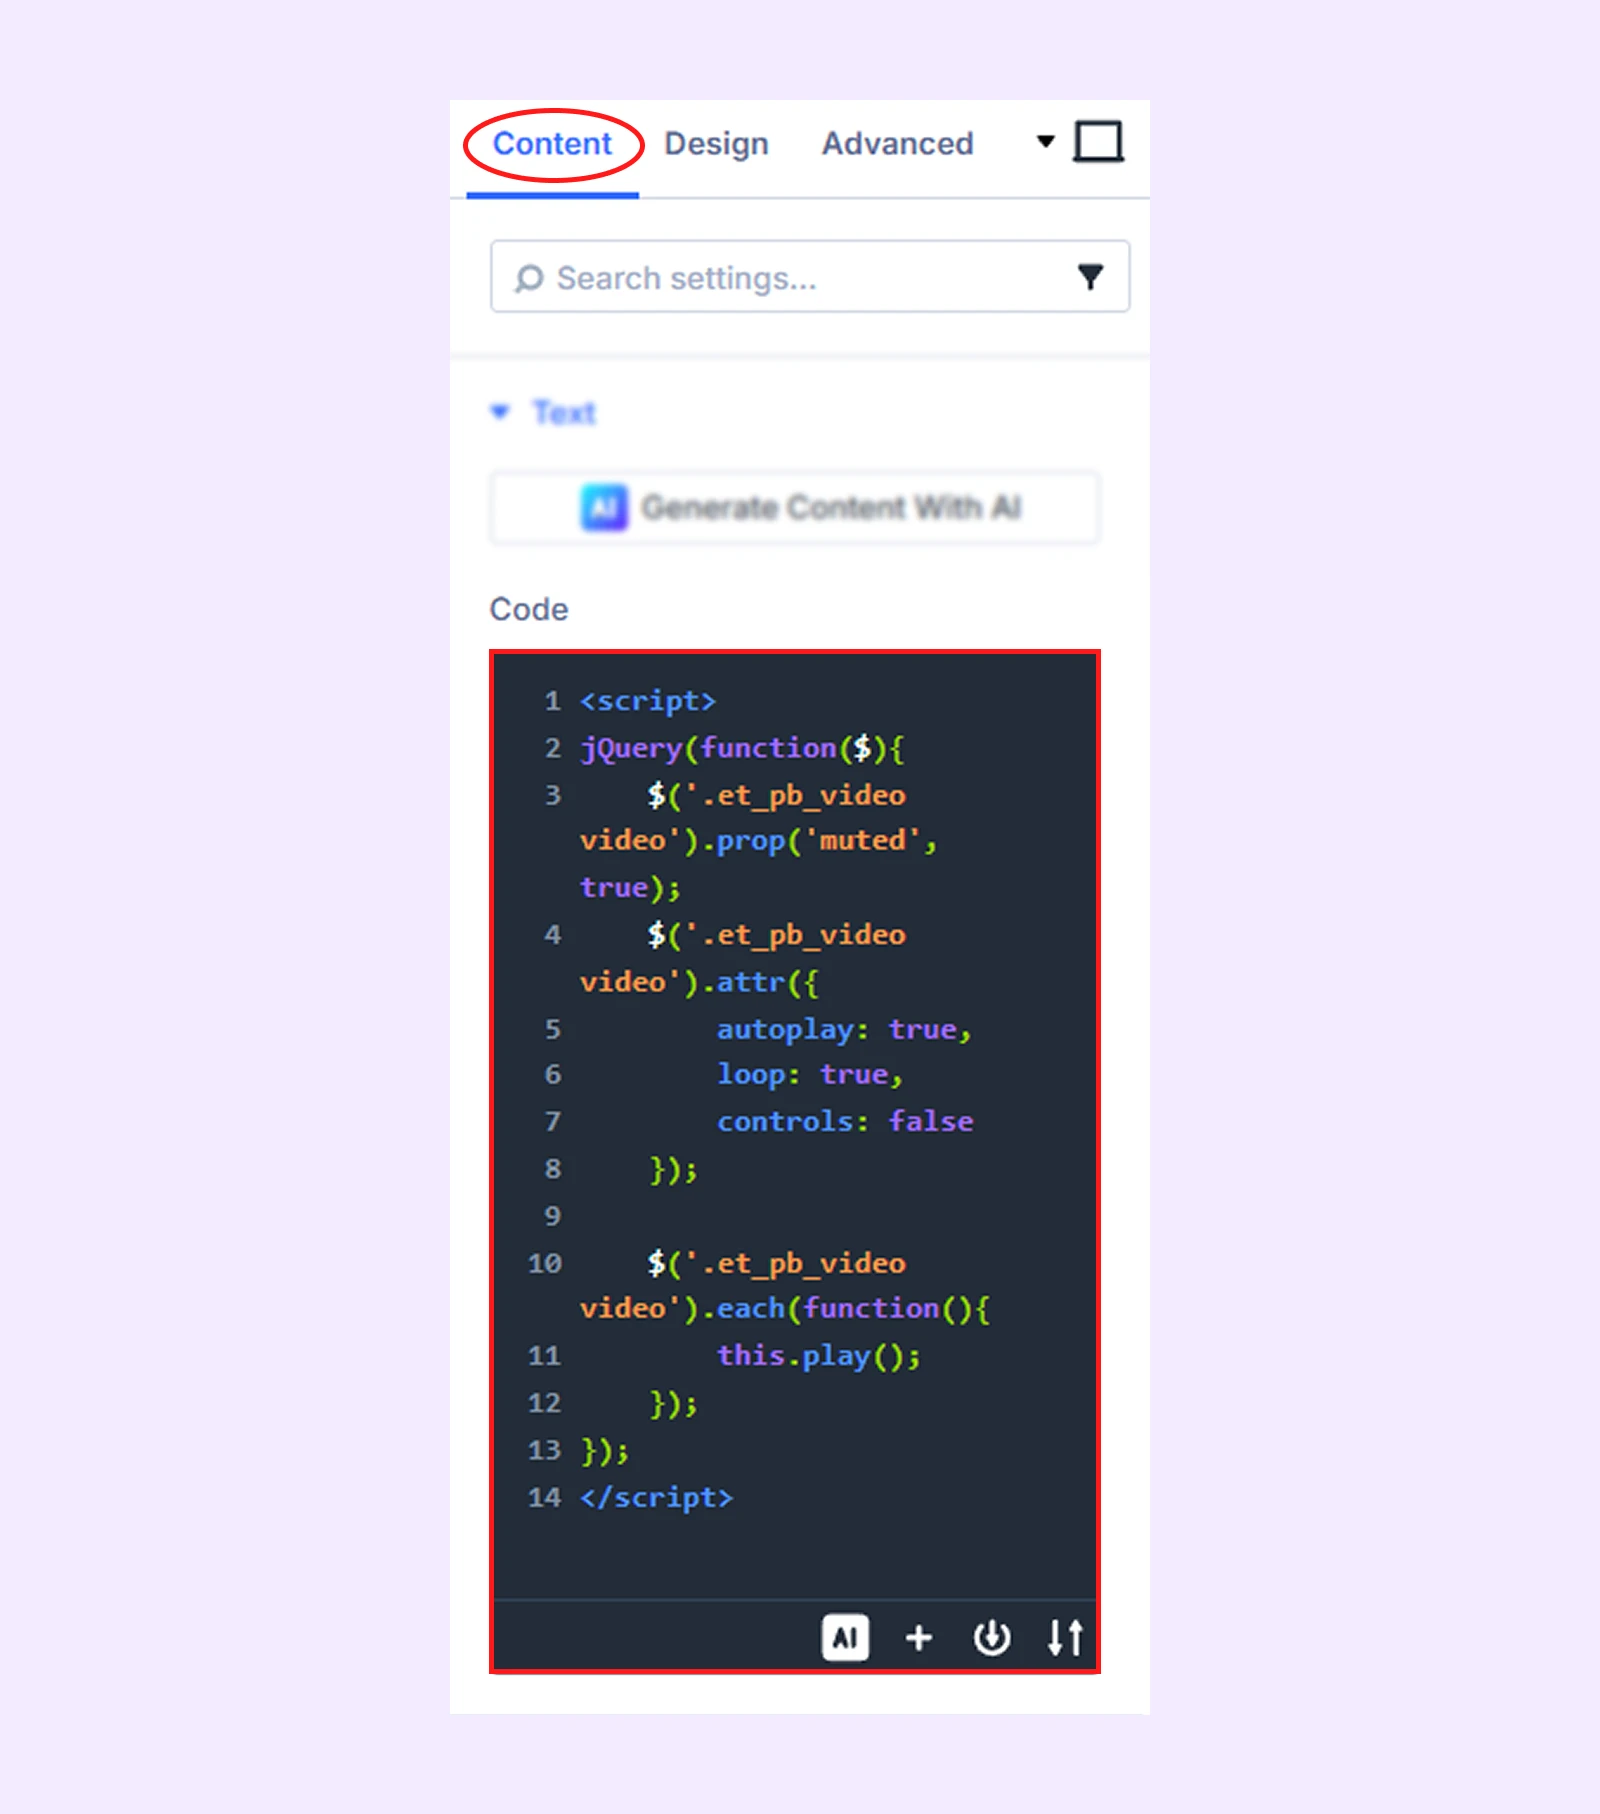
Step 4: Save the page and preview it. Your self-hosted video will now autoplay and loop automatically when the page loads.
Note: The above method is for individual pages or posts. But if you want to autoplay video sitewide, here is what to do:
Step 1: Upload your video file to Media Library, insert Video module on visual builder and add your video.
Step 2: Go to Divi > Theme Options in your WordPress dashboard > Integration tab.
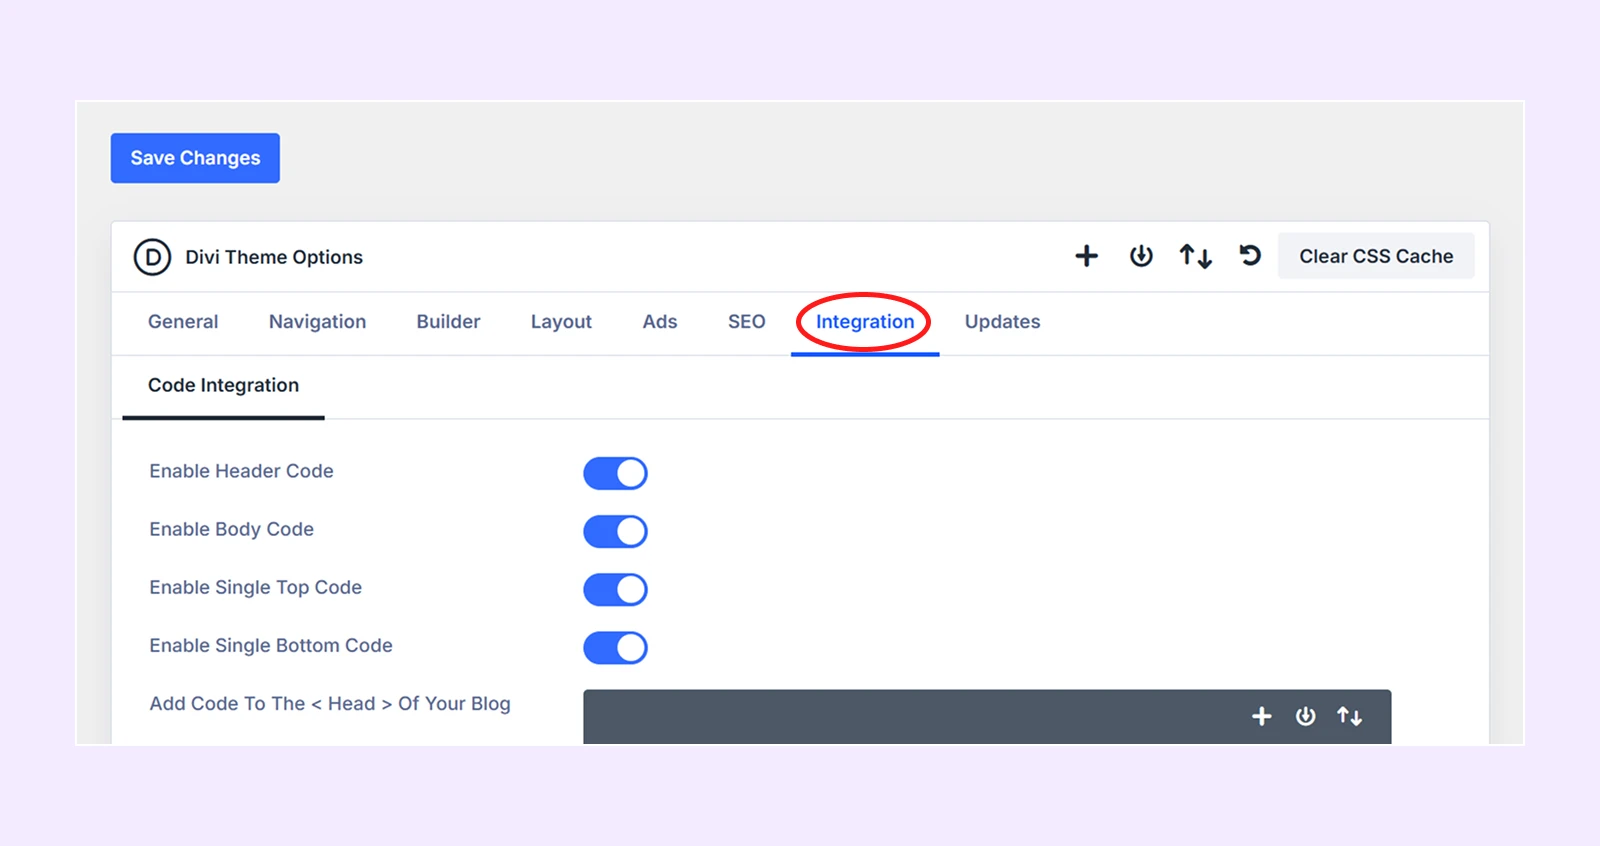
- Find the section: “Add code to the <head> of your blog” and paste one of the following script inside it:
Script 1: Use this to display video player controls:
<script>
jQuery(function($){
    $('.et_pb_video video').prop('muted', true);
    $('.et_pb_video video').attr('autoplay', true);
    $('.et_pb_video video').attr('loop', true);

    $('.et_pb_video video').each(function(){
        this.play();
    });
});
</script>
Script 2: Or you can use this one, if you don’t want to display video player controls:
<script>
jQuery(function($){
    $('.et_pb_video video').prop('muted', true);
    $('.et_pb_video video').attr({
        autoplay: true,
        loop: true,
        controls: false
    });

    $('.et_pb_video video').each(function(){
        this.play();
    });
});
</script>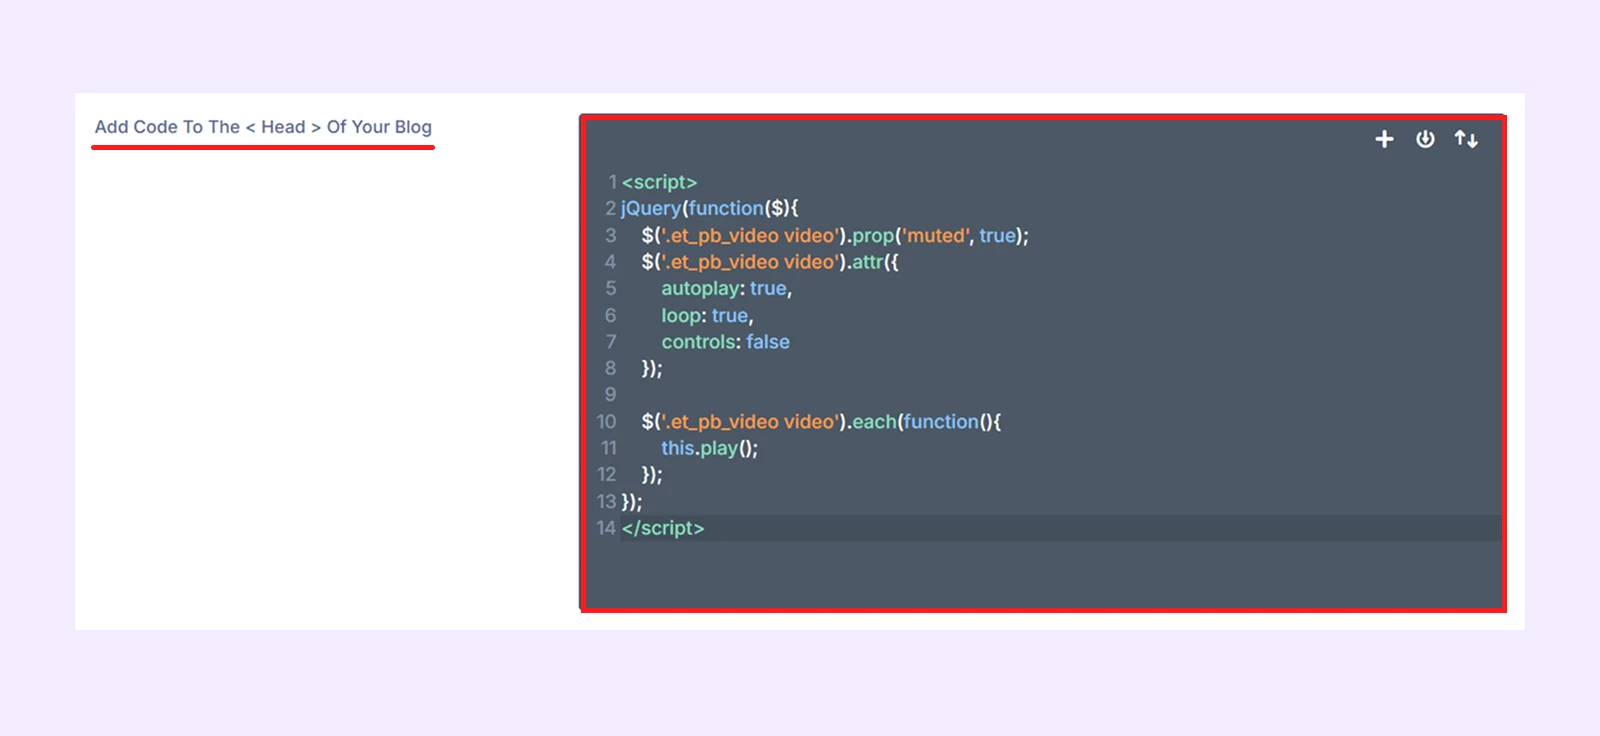
Step 3: Save the changes.
Now open your site on the frontend and verify that all self-hosted videos are autoplaying correctly across pages.
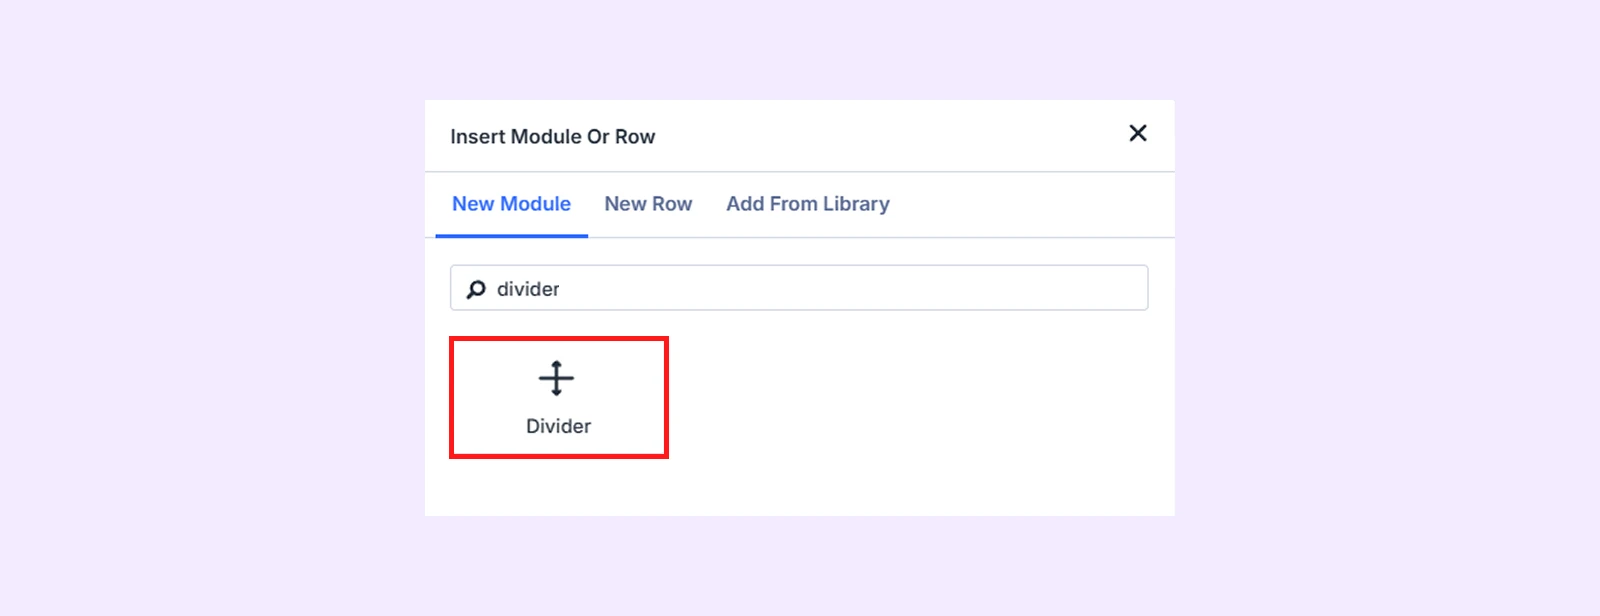
Autoplay Self-hosted Videos in Divi With Divider Module
If you don’t want to do any coding, and just want to add a video and then show it in autoplay format, you can use the Divider module.
Here is how to use it:
Step 1: Enable the visual builder on a page/post and insert a Divider module.
Step 2: In the Divider module settings, go to Content tab > Background > Background Video, then upload or add your video clip.
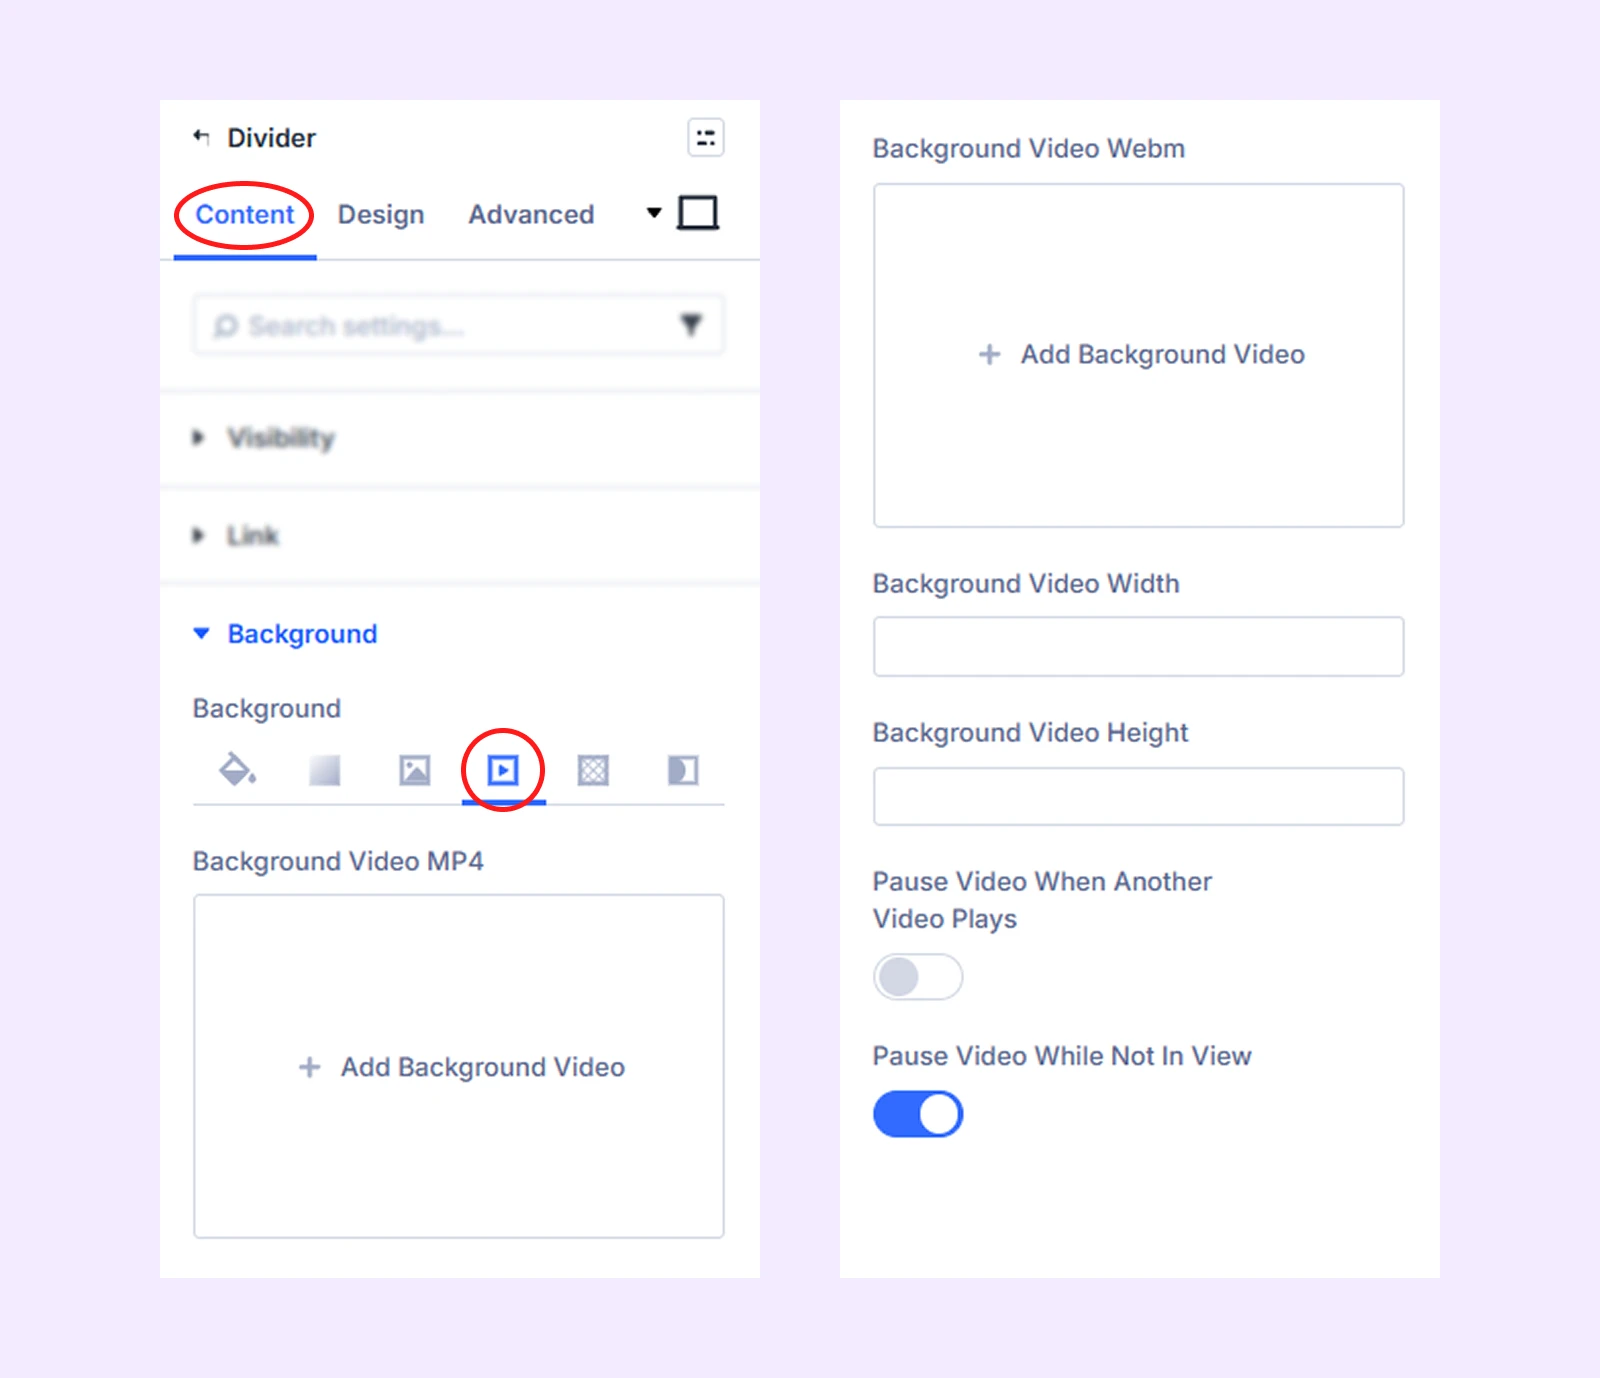
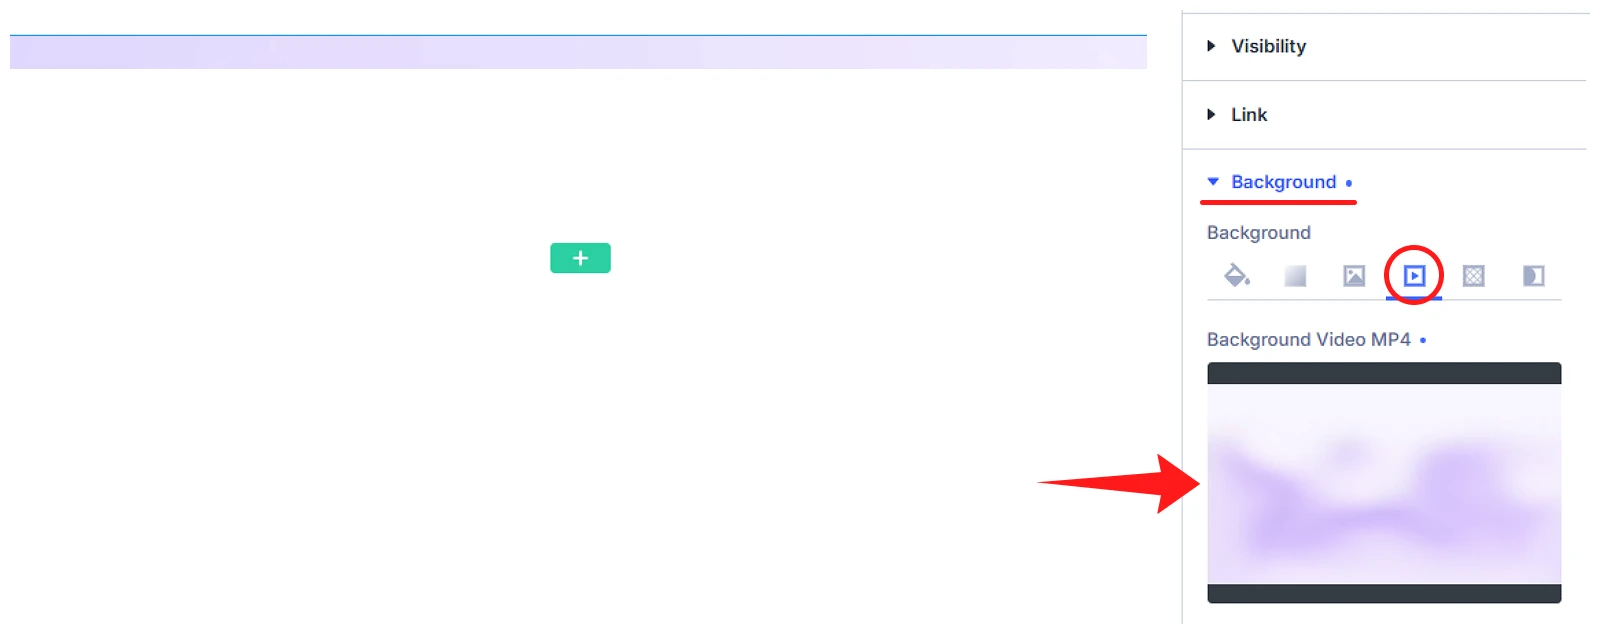
Step 3: Set your preferred aspect ratio by adjusting the width and height by going to Design tab > Sizing. (e.g., height 500 pixels).

Note: By using this autoplaying method, the video will loop automatically with no control and audio. Plus, it is also possible that mobile devices will not be compatible with the video.
Autoplay Self-hosted Videos in Divi With Section, Row, or Column’s Background Video Setting
You can use a Background Video in a Section, Row, or Column to autoplay videos. When you add a background video, it will autoplay without showing any player controls.
Here is how to use it:
Step 1: Go to your page/post and enable Divi Visual Builder.
Step 2: Add Section / Row / Column
Step 3: Click the Section / Row / Column settings icon. Then go to Background > Background Video
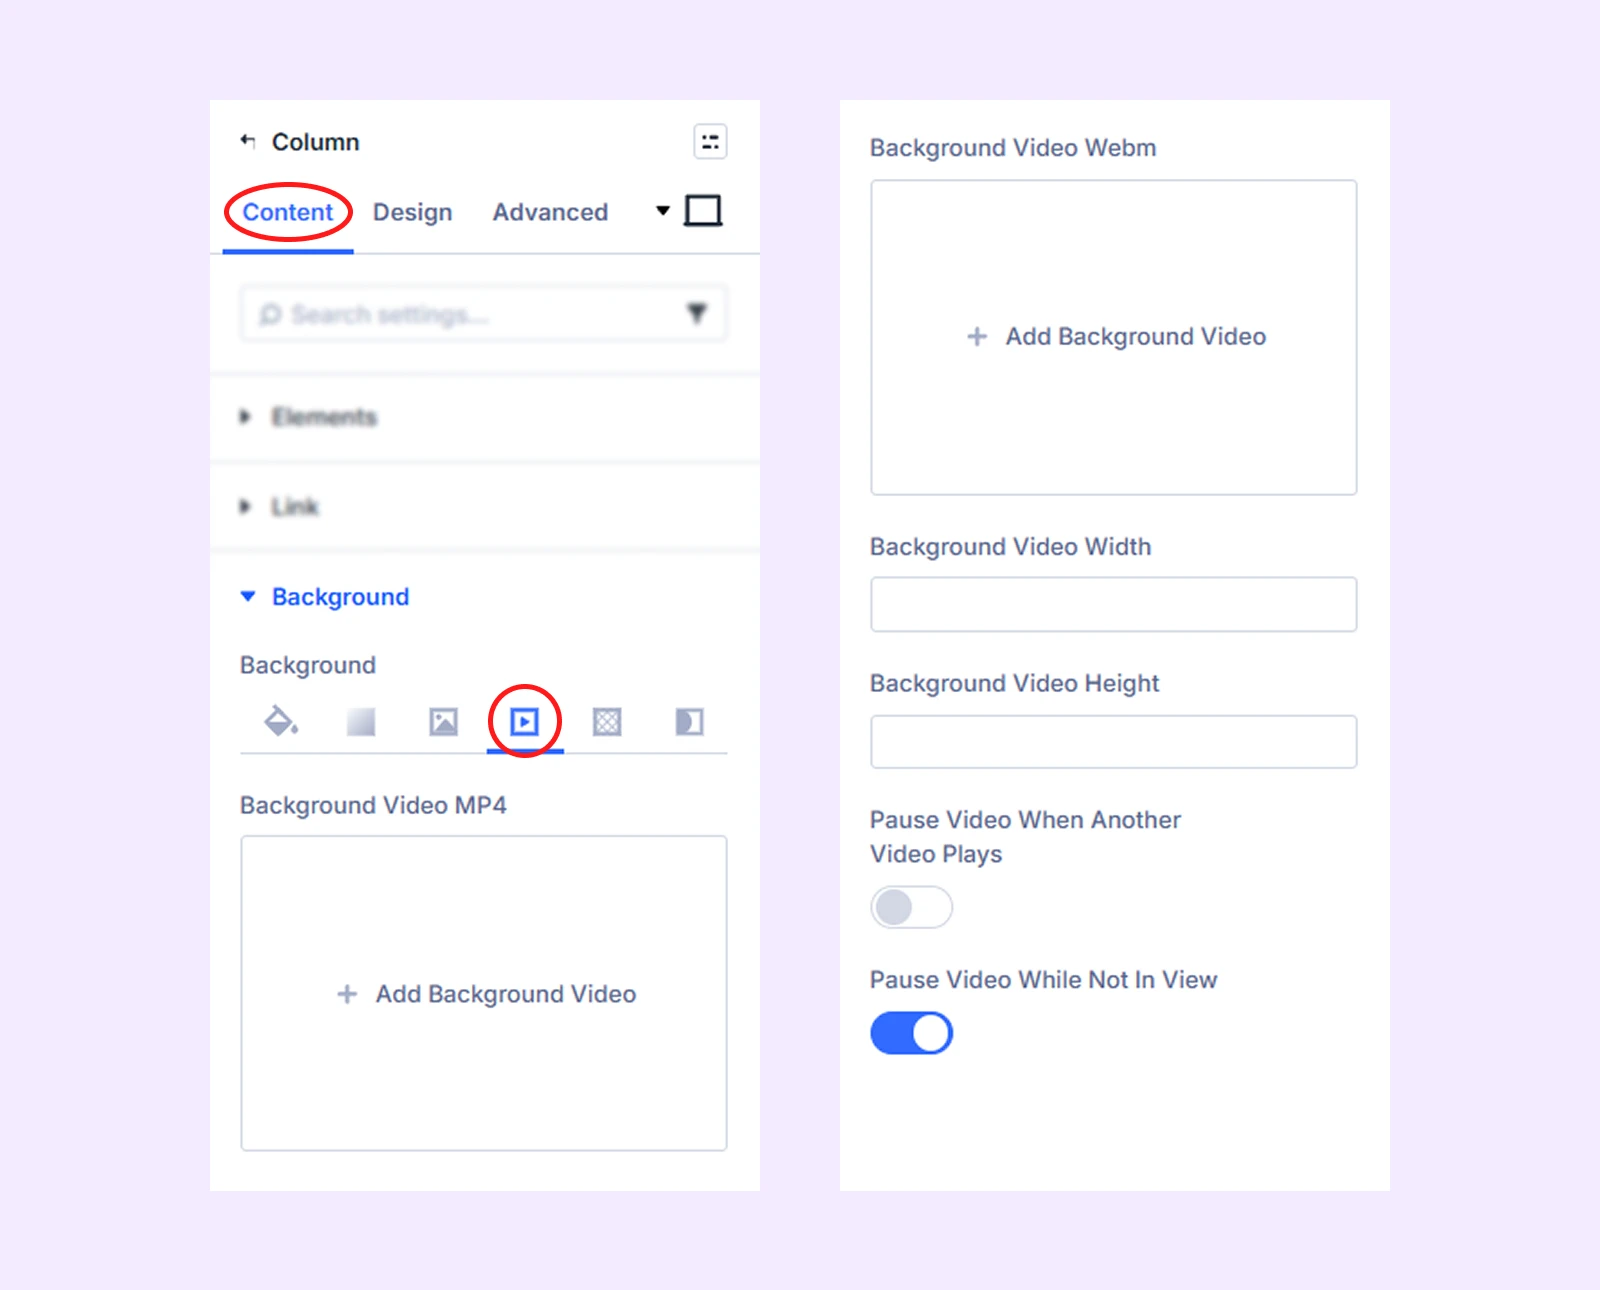
Step 4: Click Add Background Video and Add your video.
Step 5: Go to Design tab > Sizing and adjust the Height.
Step 6: Go to Design tab > Spacing and adjust padding if needed.
Final Thoughts: Which Method Should You Use?
The manual method works, but it takes a lot of steps. YouTube and Vimeo need embed codes with extra parameters. Self-hosted videos also need a separate jQuery script. If you want it sitewide, you have to add more code in Theme Options. And every time you want to make a change, you need to edit the code again.
DiviFlash’s Advanced Video module removes all of this. Just add your video and turn on Autoplay, and it works. No code, no extra modules, no extra setup. You can also control loop, playback speed, and more using simple toggles.
If you haven’t tried it yet, get DiviFlash and see how much easier video setup can be.


0 Comments