
The Cookie Consent extension (introduced in v5.6.0) lets you collect visitors’ cookie preferences and control when non-essential scripts and third-party content can load and more.
Important Note:
- The Cookie Consent extension is available only in Divi 5.
- Cookie Consent is disabled by default, so enable it manually in DiviFlash.
- Script blocking only works with scripts loaded through WordPress. Scripts manually added to theme files or header/footer code are not managed.
- Cookie Consent provides GDPR/CCPA-style consent tools, but your website configuration, policies, tracking setup, and applicable privacy rules still determine compliance. See the Limitations section below for important feature restrictions.
Let’s explore all its settings.
Enable the Cookie Consent Extension
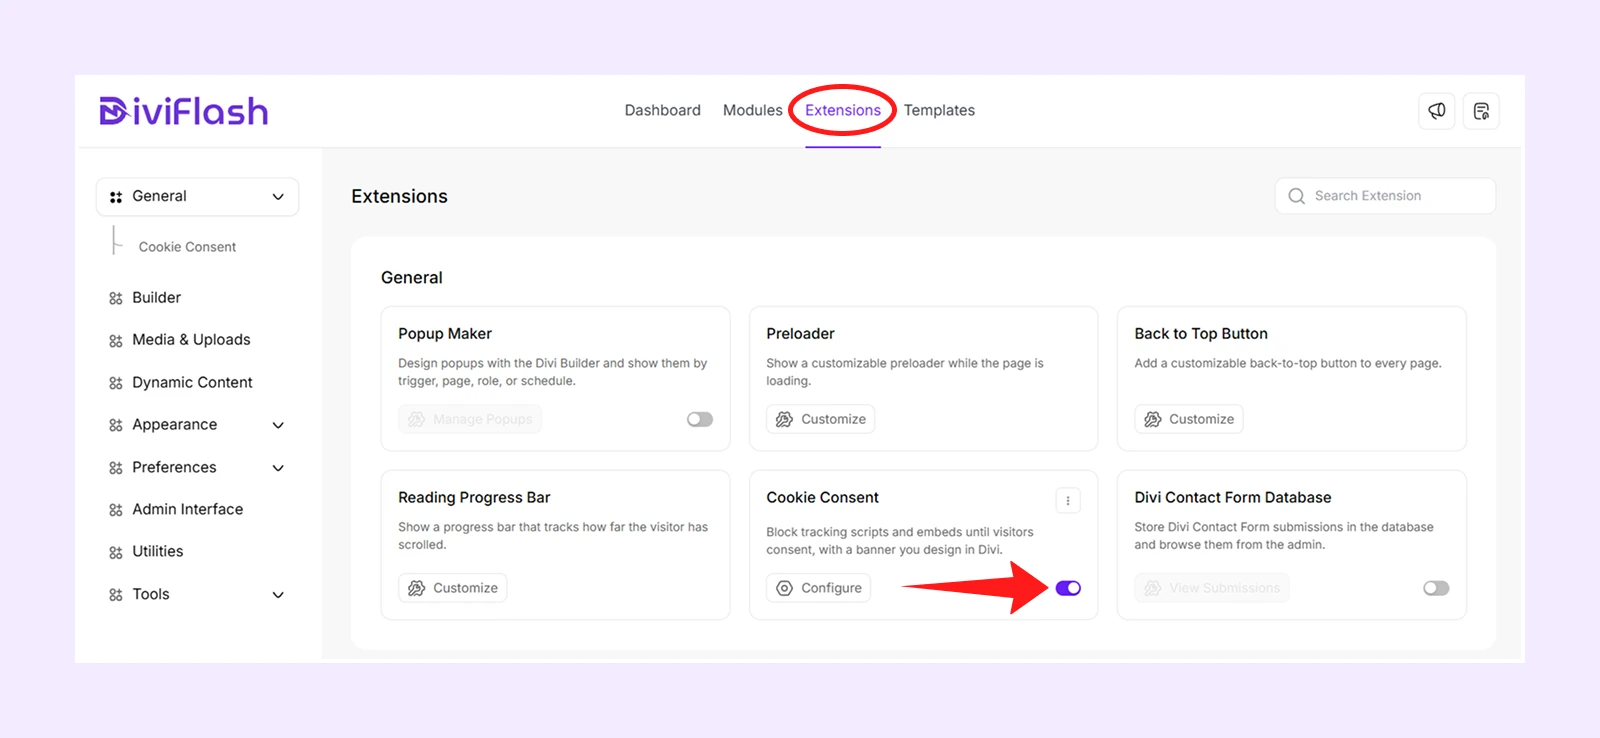
- From your WordPress Dashboard, navigate to DiviFlash > Extensions.
- Find Cookie Consent in the General category and toggle it ON.
- Then click Proceed to enable the extension and open its settings.
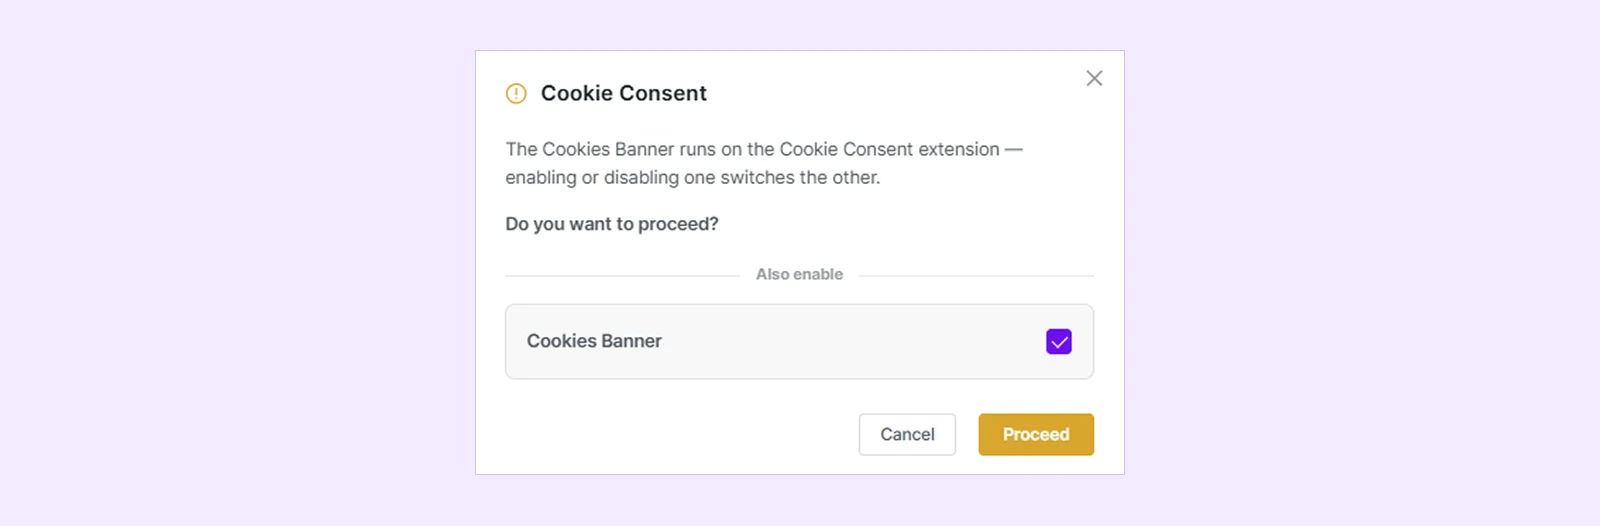
We will describe all the settings in detail below.
General Tab
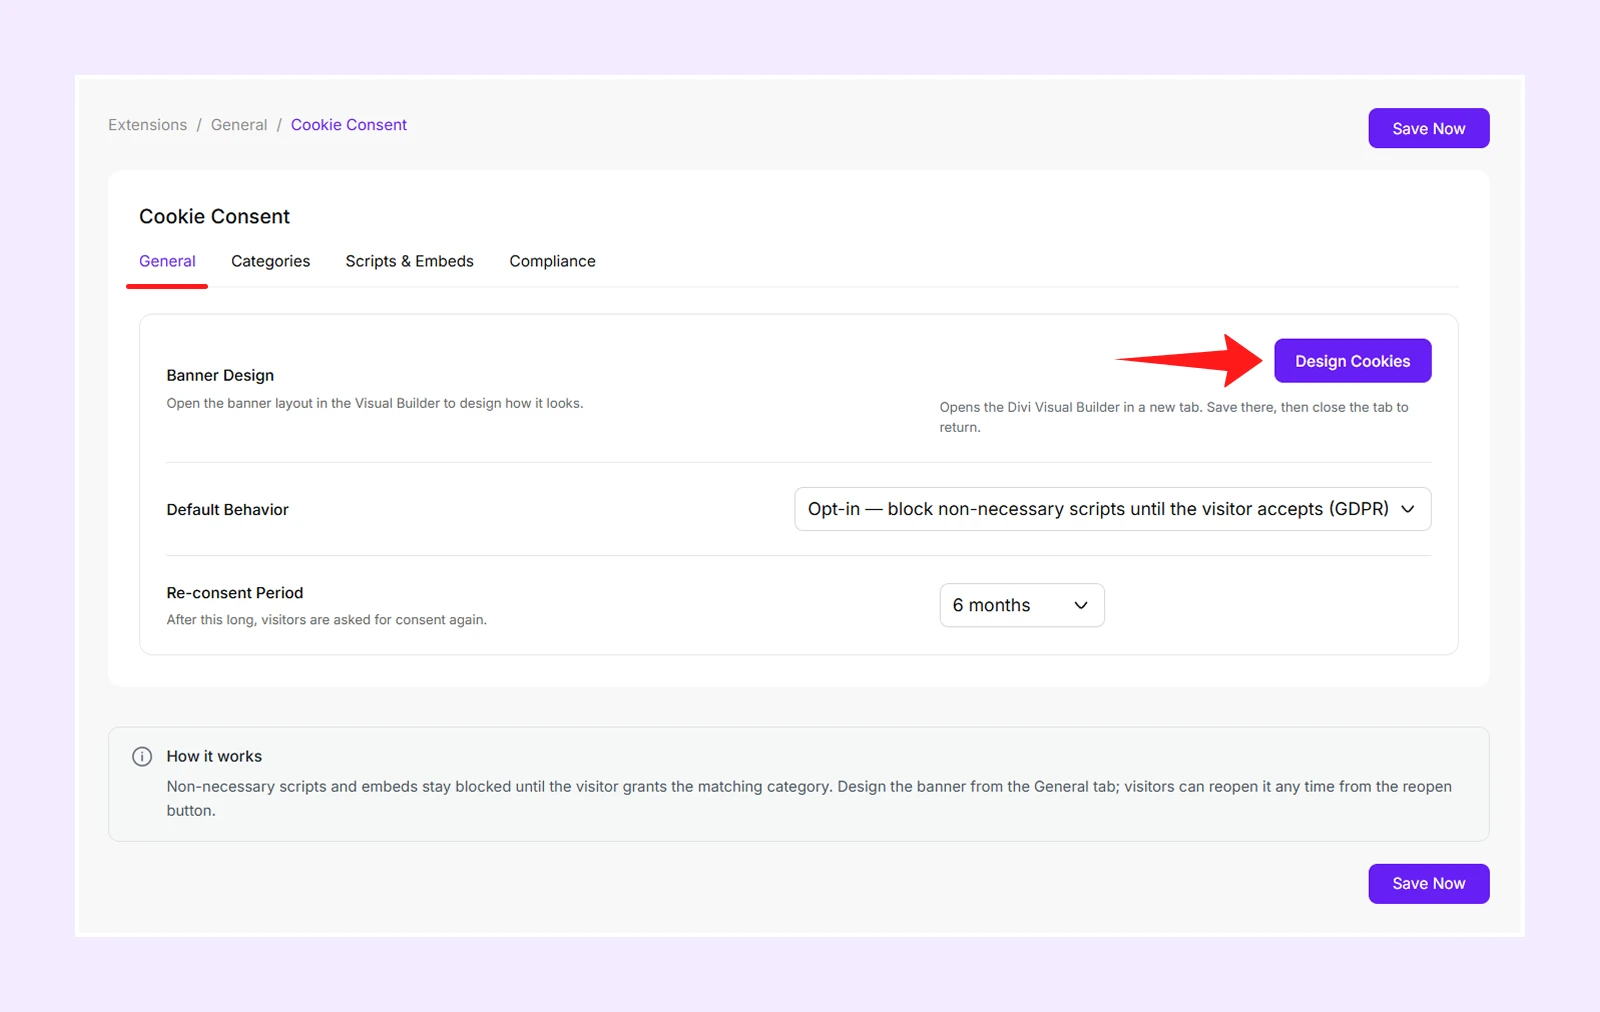
Banner Design
Design Cookies: Opens the default consent layout in the Divi Visual Builder, where you can customize it using the Cookie Banner module. See the Cookie Banner module doc for more details.
Note: The Cookie Banner module is available only inside this consent layout. You cannot add it to regular Divi pages or posts.
Default Behavior
Choose how non-essential managed scripts should behave before a visitor makes a cookie choice.
- Opt-in: Keep non-essential scripts blocked until the visitor allows the required category.
- Opt-out: Allow scripts to run initially and block them only after the visitor rejects the related category.
In Opt-out mode, available categories are selected by default in the banner.
Re-consent Period
Choose how often visitors should be asked to confirm their cookie preferences again:
- 3 months
- 6 months
- 12 months
The selected period also controls how long the visitor's consent cookie remains valid.
Categories Tab
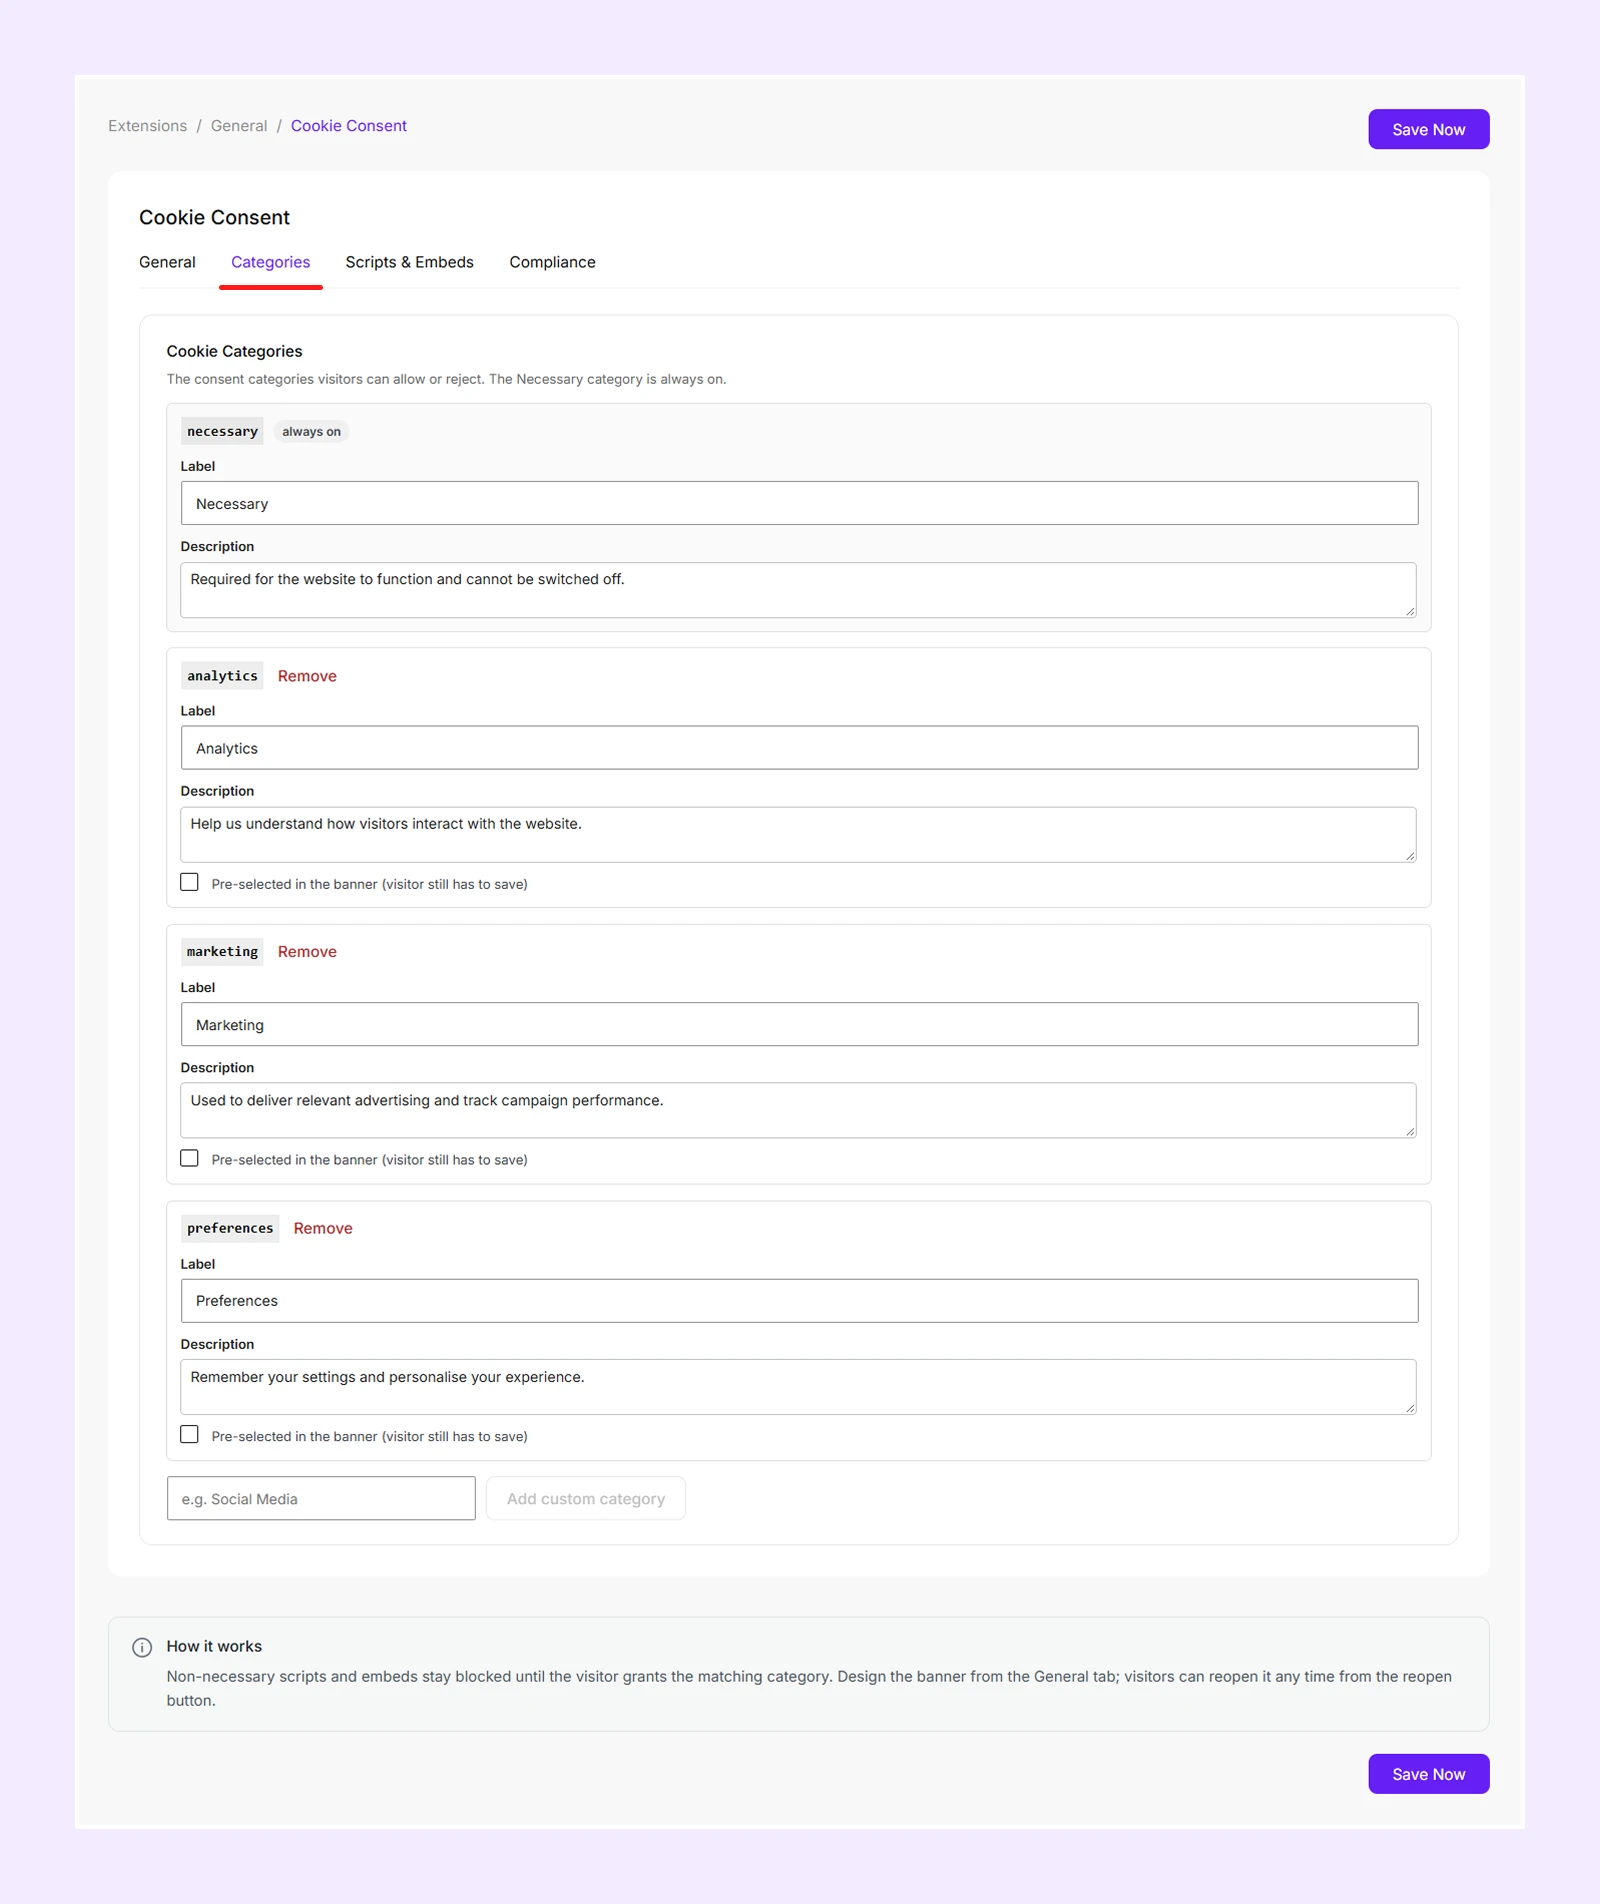
Use categories to group scripts and embeds by purpose. DiviFlash includes four categories by default:
- Necessary: Required for the website to work and always remains enabled.
- Analytics: Used to understand how visitors interact with your website.
- Marketing: Used for advertising and campaign tracking.
- Preferences: Used to remember settings and personalize the visitor experience.
For each category, you can configure:
- Label: Change the category name visitors see.
- Description: Explain what the category is used for.
- Pre-selected in the banner: Show the category as selected when visitors open the preferences panel. (The Necessary category does not include this option because it is always enabled.)
- Remove: Delete a category you no longer need. The Necessary category cannot be removed. Any scripts or embed providers assigned to a deleted category become unmanaged.
Note: Pre-selecting a category does not grant consent automatically. Visitors still need to save their choice.
Add Custom Category
Click Add custom category to create additional categories such as Social Media, Video, or Personalization. You can then assign scripts and embed providers to the new category.
Note: Changing or adding categories does not reset existing consent automatically. Use Compliance > Ask all visitors again if returning visitors should review the updated category list.
Scripts & Embeds Tab
Use these settings to control which scripts and third-party embeds should load based on a visitor’s consent.
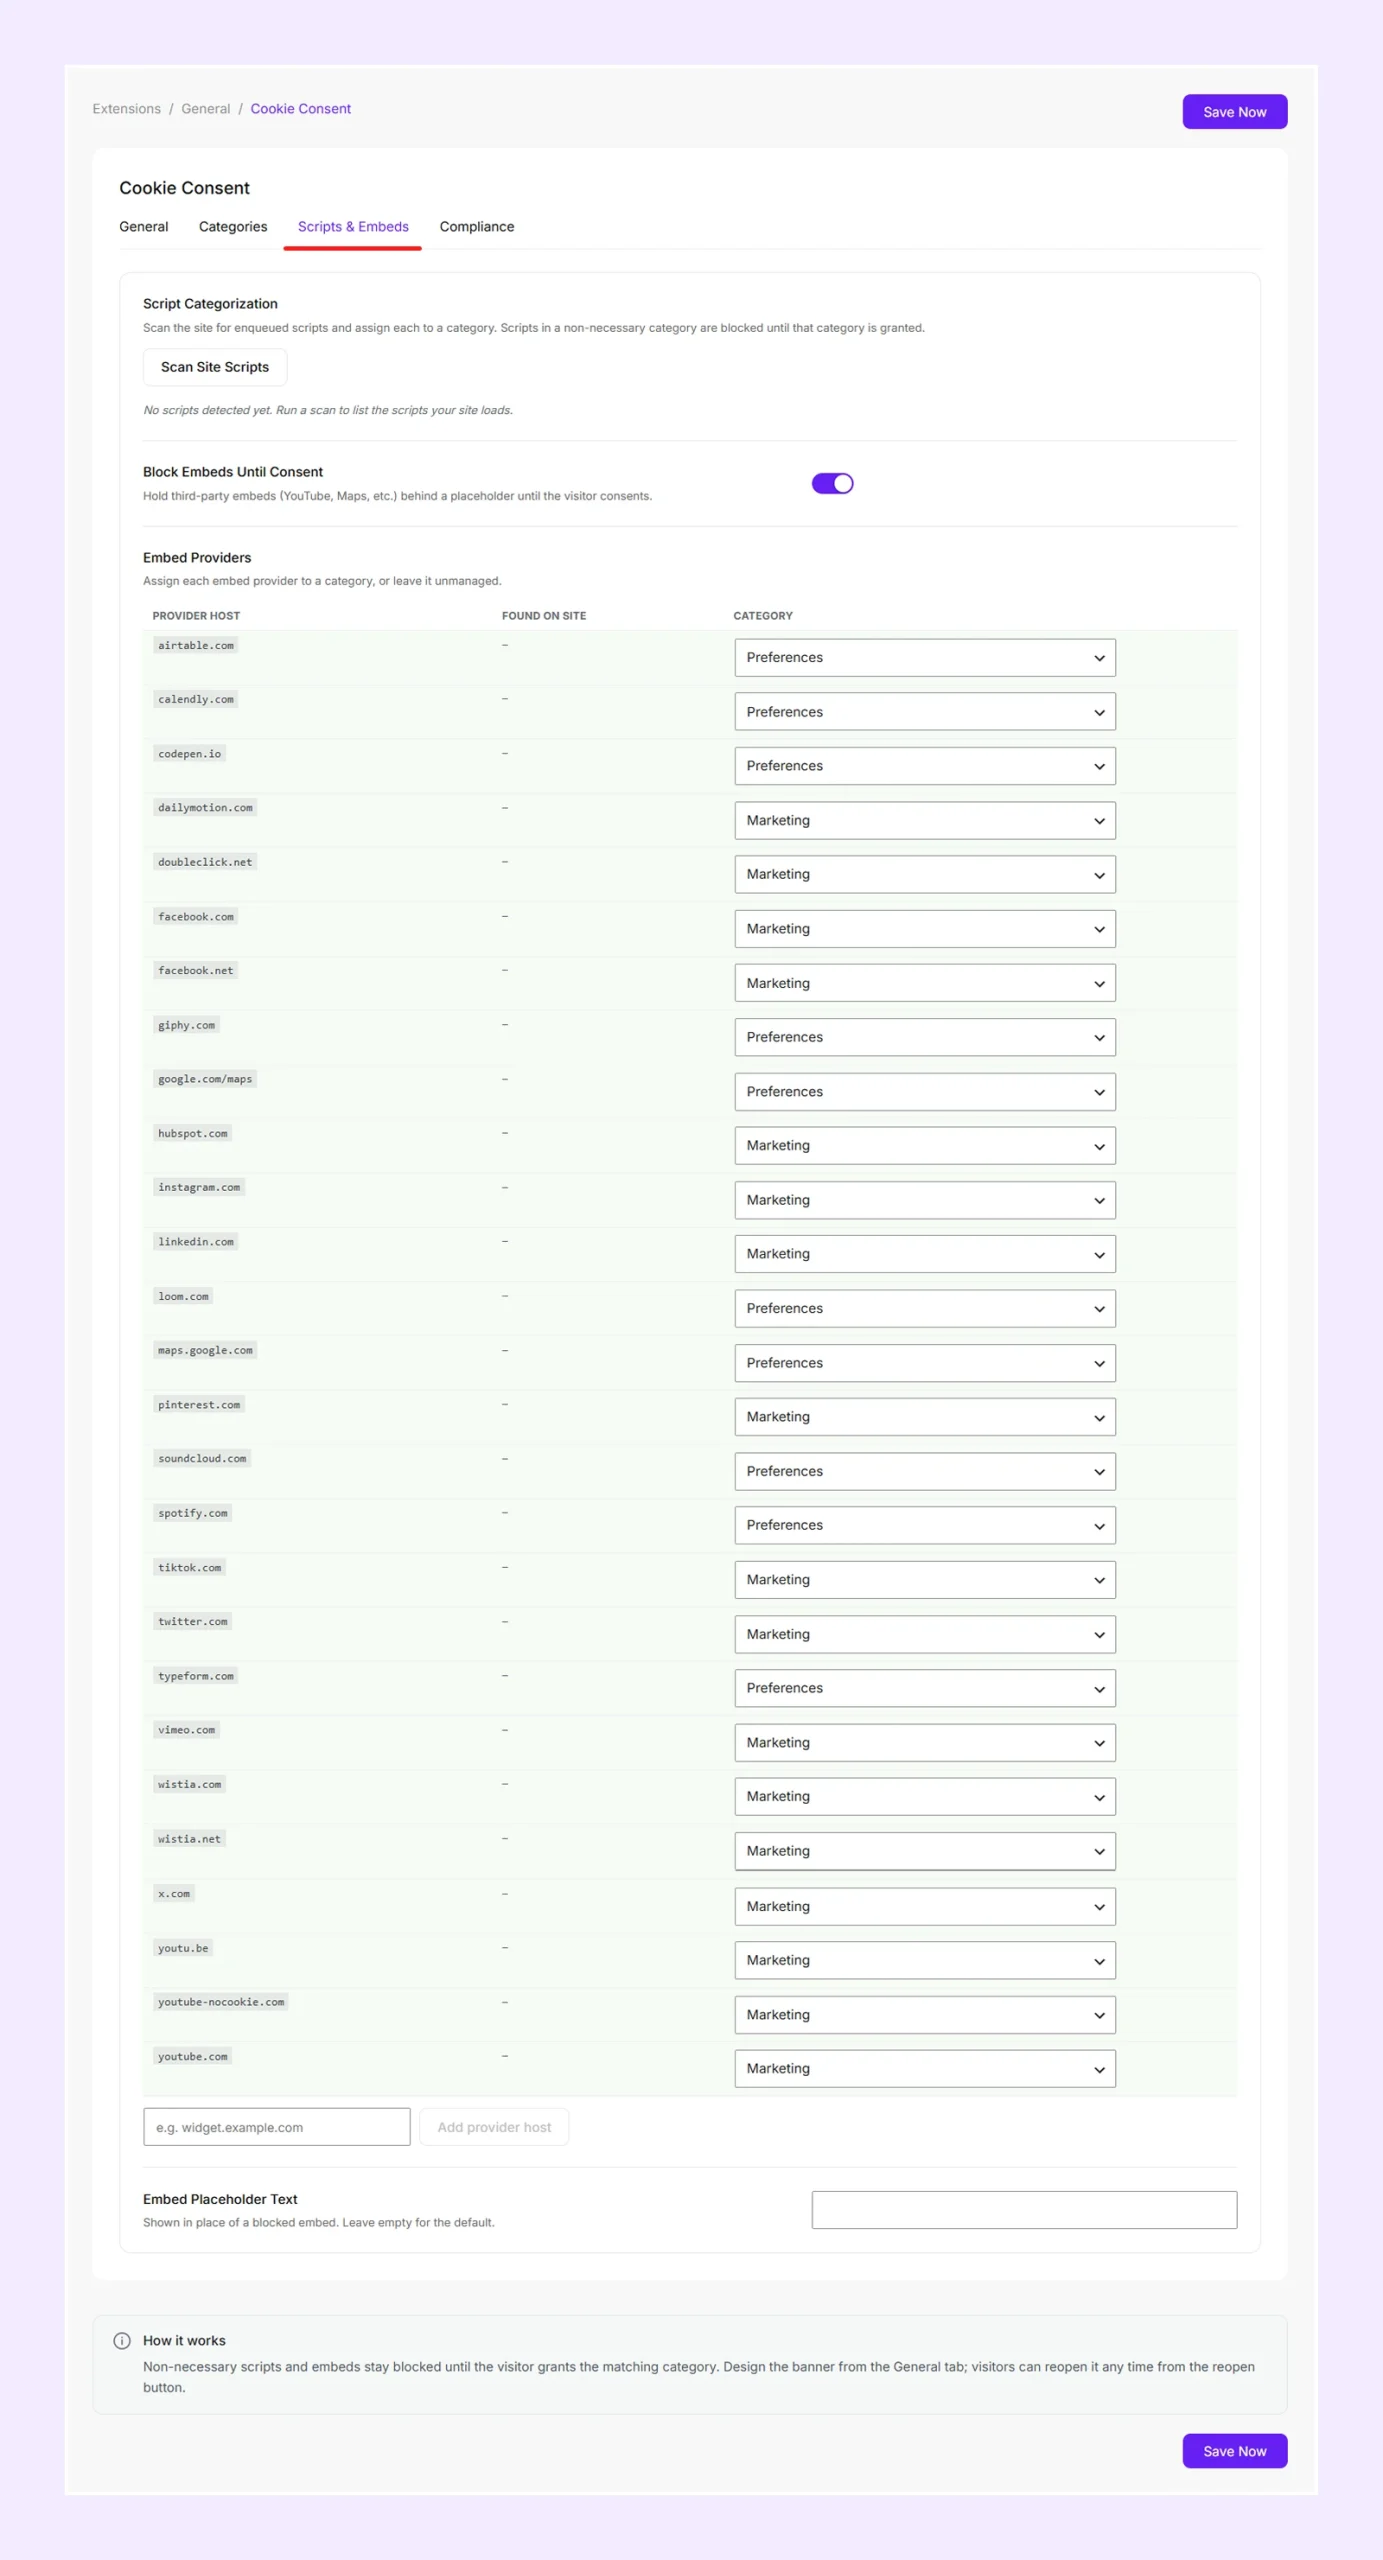
Script Categorization
- Scan Site Scripts: Scans your homepage and up to three recently modified pages or posts for scripts. For each manageable script, the scan shows:
- Handle: The script’s WordPress identifier.
- Source: Where the script is loaded from.
- Category: The cookie category that controls whether the script can load.
Choose Not managed (always runs) if Cookie Consent should not control the script. For example, when an analytics script is assigned to Analytics in Opt-in mode, it remains blocked until the visitor allows that category.
Note: Hard-coded scripts added directly to theme files, header/footer code, or similar locations cannot be blocked or managed. Scripts loaded from a file URL may appear in scan results with a warning, while pasted inline code snippets are not listed.
Block Embeds Until Consent
Enable this option to prevent supported third-party content from loading until the visitor allows the required category. Supported examples include:
- YouTube videos
- Vimeo videos
- Google Maps
- Social media embeds
- Spotify
- Calendly
- Other supported third-party content
Blocked content is replaced with a placeholder. The placeholder includes an Allow … and load button, so visitors can allow the required category and load that content directly.
Note: Embed blocking applies to supported third-party content added through posts or pages, blocks, widgets, and oEmbeds. Third-party embeds hard-coded in theme template files are not blocked.
Embed Providers
When embed blocking is enabled, use this section to control supported providers. For each provider:
- Provider host: Shows the provider domain.
- Found on site: Indicates whether the latest scan detected the provider.
- Category: Choose which category visitors must allow before the content can load.
Select Not managed (loads freely) if the provider should not be controlled by Cookie Consent.
Add Provider Host
If a service is not already listed, enter its hostname and click Add provider host. You can then assign it to the appropriate category.
Embed Placeholder Text
Customize the message visitors see while third-party content is blocked. Use {category} to insert the required category name automatically. Leave the field empty to use the default message.
Compliance Tab
Use these settings to manage consent signals, browser privacy preferences, re-consent, and consent records.
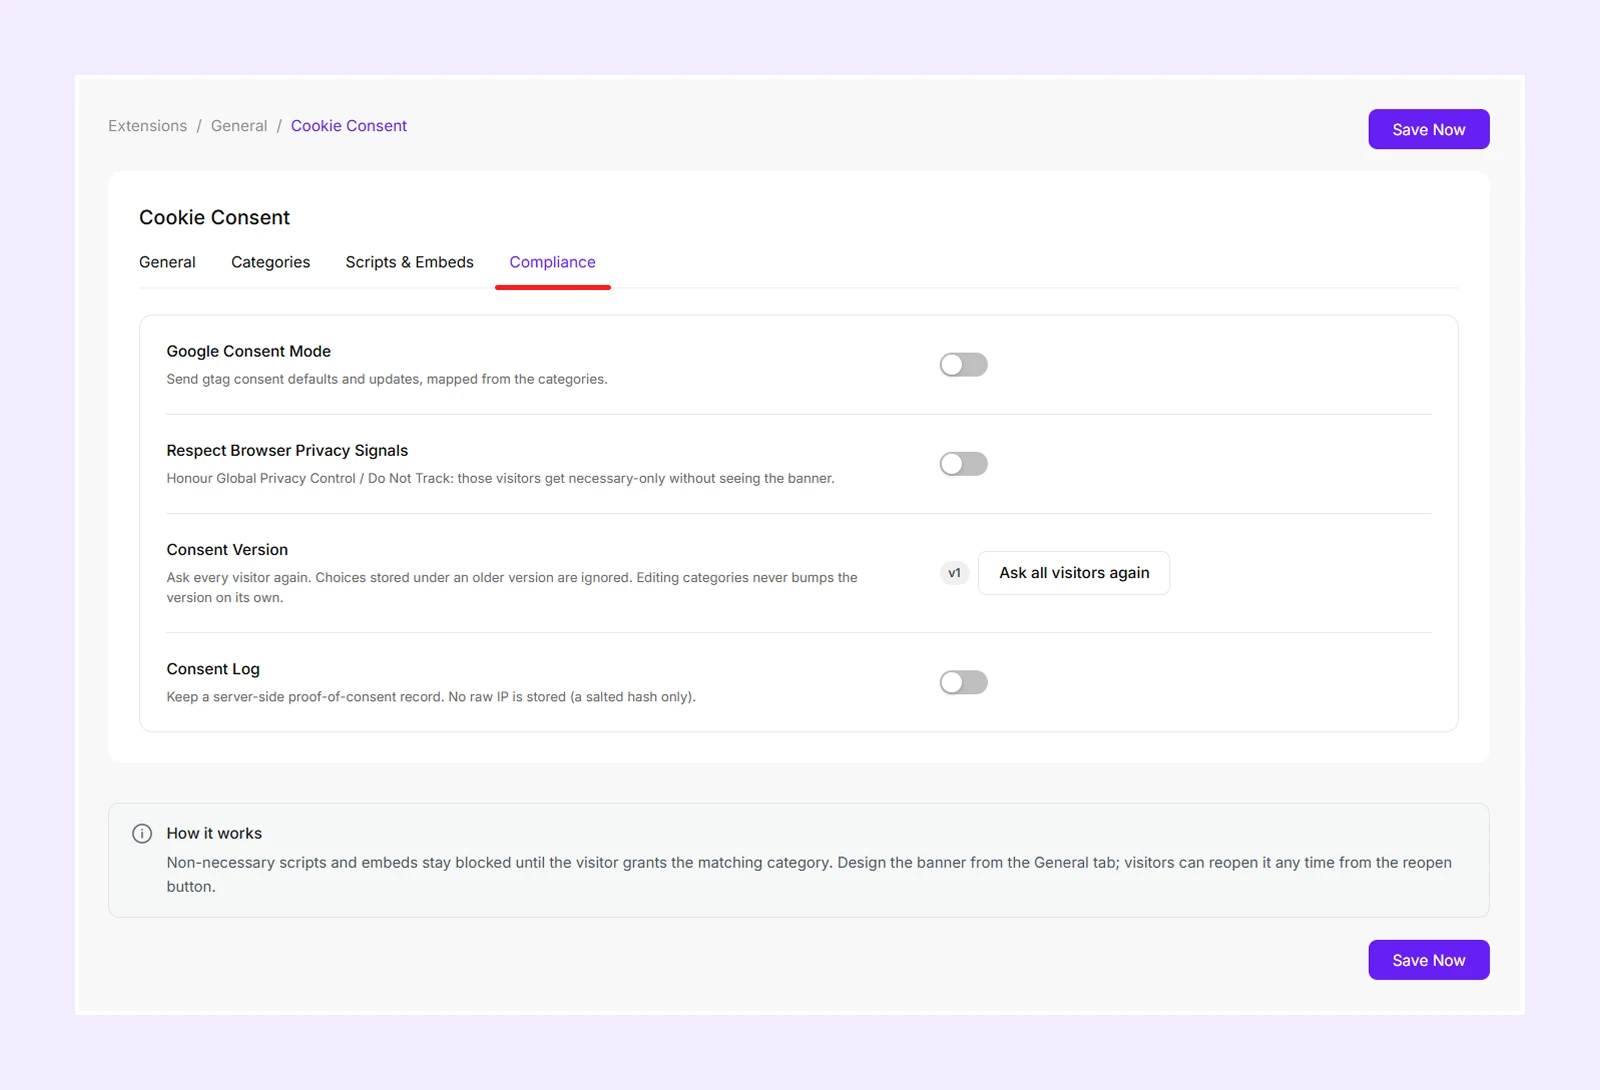
Google Consent Mode
Send visitors’ consent choices to supported Google services. The consent state updates when visitors:
- Accept all cookies
- Reject non-essential cookies
- Save custom preferences
- Change an existing preference
Note: Only the four built-in categories are mapped to Google Consent Mode. Custom categories are not mapped.
Respect Browser Privacy Signals
Enable this option to respect supported privacy signals sent by the visitor’s browser. DiviFlash recognizes:
- Global Privacy Control (GPC)
- Do Not Track (DNT)
If one of these signals is detected before the visitor makes a choice, only Necessary cookies are allowed and the banner is skipped.
Consent Version
Use Ask all visitors again when you want every visitor to make a fresh cookie choice. This increases the consent version, so choices saved under older versions no longer apply.
If you add or change cookie categories, the consent version does not update automatically. For example, if you add a new Social category, use Ask all visitors again when you want existing visitors to review the updated category list.
Consent Log
Enable Consent Log to keep a server-side record of visitor consent choices. The log can include information such as:
- Consent ID
- Date and time
- Action taken
- Selected categories
- Consent version
- Page URL
- Salted IP hash
- Browser user-agent
Note: Cookie Consent stores a salted IP hash, not the raw IP. The log keeps up to 50,000 records, removes the oldest automatically, and allows up to 10 records per visitor per minute. Export the CSV regularly if you need long-term records.
Consent Records
When Consent Log is enabled, the Consent Records section shows the latest consent activity. You can:
- Refresh: Reload the latest records.
- Export CSV: Download all consent records as a CSV file.
- Clear log: Delete all stored consent records.
The dashboard shows the latest 20 records, while Export CSV includes the full log.
Open Cookie Preferences From a Custom Link or Button
After visitors make their cookie choice, they may want to review or change it later. The built-in Reopen Button provides one way to do this, but you can also use any existing link or button on your site instead.
For example, you can add a Cookie Settings link to your footer or privacy policy page and use it to open the preferences panel directly.
To do this, add either:
CSS Class: difl-cc-open-preferences
Attribute: data-difl-cc-open
When visitors click that element, the cookie preferences panel opens so they can update their choices.
Important Limitations
Keep these points in mind when configuring Cookie Consent:
- Cookie Consent does not generate a cookie or privacy policy.
- Site scanning is manual and does not crawl your entire website.
- It does not remove cookies that were already created before consent changed.
- It does not provide location-based consent rules.
- It does not support IAB TCF.
- Only one cookie banner design is used across the website.
Need Help?
If you have any questions or need assistance, contact our support team: [email protected]